Look. You have created an awesome spooky cellar with meticulous lighting setup. Or better yet, you have created an attic. This attic could have been mentioned in Stephen King’s novel. (If you are curious, Stephen King’s attics have always been a massive inspiration for me).
But something is not right about lighting.
Personally, I had a hard time realizing what is not right about my abandoned mansions and creepy hallways.
No matter what I did, the image didn’t come to life. It simply didn’t ignite my imagination. Not speaking about childhood memories. And it didn’t seem real, you know.
Why?
Here is my solution, after doing some research and drinking lots of coffee.
It’s dust, my friend. It’s atmospheric effects. And after following this 4-steps tutorial, you will be able to really breathe life into your grungy artworks.
LEARN HOW TO USE DUST TO YOUR ADVANTAGE
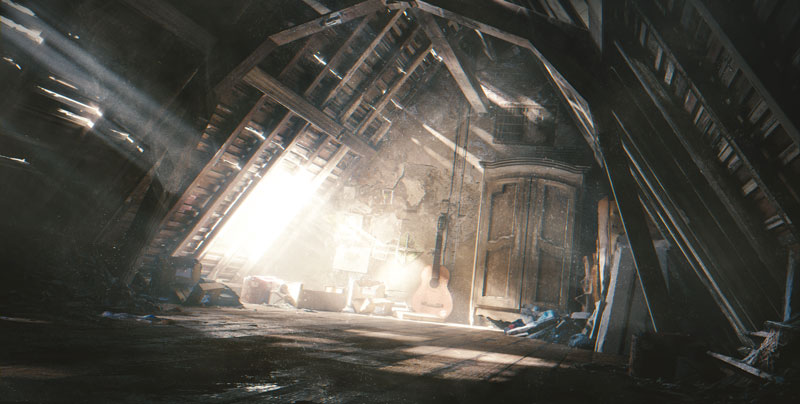
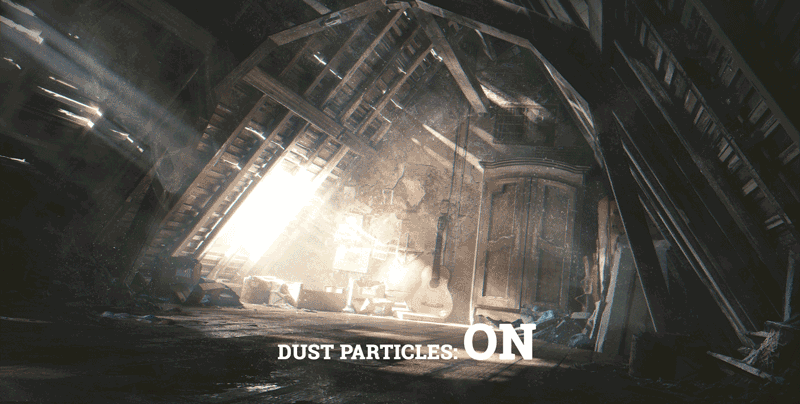
When you are creating old abandoned interiors, dust in the air is a key to believable image. Just look. These tiny particles, that catch the light, give an enormous boost to the realism of your scene.
These floating particles enable you to see the light shafts.
When you have that feeling of an atmospheric perspective, you actually see dust.
Hollywood long ago embraced this kind of lighting effects. Cinematographers call them a realistically motivated lighting.
The realistically motivated lighting “enables the audience to see where the story is taking place”.
Hollywood Lighting from the Silent Era to Film Noir by Patrick Keating.
Let’s see what you can do to apply this technique to your scene.

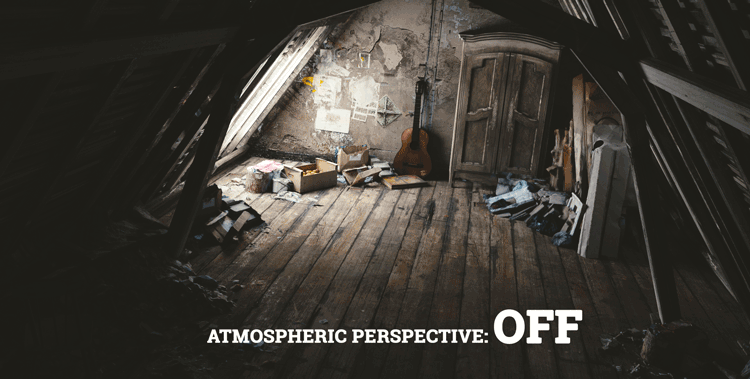
STEP 1. ADD ATMOSPHERIC PERSPECTIVE TO YOUR ATTIC
Think about air as a third dimensional thing. It has volume, doesn’t it? It has perspective.
You have heard about atmospheric perspective a thousand times. When you create a landscape, you apply it to portray the distance.
But what about the small grungy attic?
I’m sure it’s fine to exaggerate the perspective, when you need it. Dust creates a very thick air, that at times looks almost like a smoke. So why not?
#Blender Tip: Use the mist (or Z-depth) pass to simulate the fog or aerial perspective
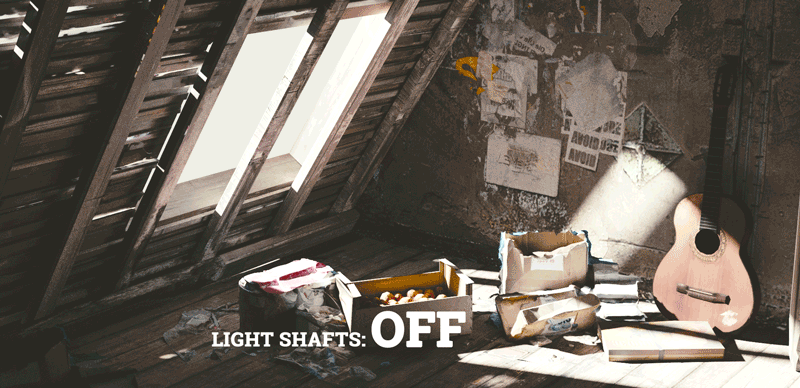
STEP 2. SIMULATE LIGHT SHAFTS
If you want to create a really convincing grungy interior, you should simulate the dust. Suspend the dust in the air, and watch how it traces the light.
What you get are the light shafts.
Light shafts help you to sell the grungy interior to the viewer. This small touch really adds a lot to the realism. William Daniels, american Actor, once said “we try to tell the story with light as the director tries to tell it with action”.
Try it and you’ll see how your lighting gets the realism boost. You are used to see the light shafts in the dusty rooms, aren’t you?
Also, realistically motivated light shafts will enhance your storytelling.
TIP: USE VOLUMETRIC RENDERING (OR FAKE IT)
Today, you have a technology at your fingertips. You have access to the tools like Blender – that can do physically correct volumetric effects like scattering and absorption.
If you want to fake it using real-time engine like Unreal or Unity, it’s great too! Even if it’s not a physically correct simulation, it can still look VERY convincing.
For example, you can simulate volumetrics in the Unreal engine by using lit particles (particles, that react to light).

Actually, do you know how to make Teddy Bear in 1 click in Blender?
STEP 3. BRING ON THE SPARKS
In the attic that you created, the air is super-thick. And full of tiny particles, floating in the air. They catch the sun rays and start to glitter.
In the previous step, you created the light shafts. It’s the base of the volumetric effect. Now let’s add the tiny sparkles here and there.
These freaking tiny sparkles help to add that extra ‘oomph’ to the image. These tiny fireflies create the additional layer of complexity.
Add the sparkles as a finishing touch, and you are good to go.
#Blender Tip: Dust can look like smoke
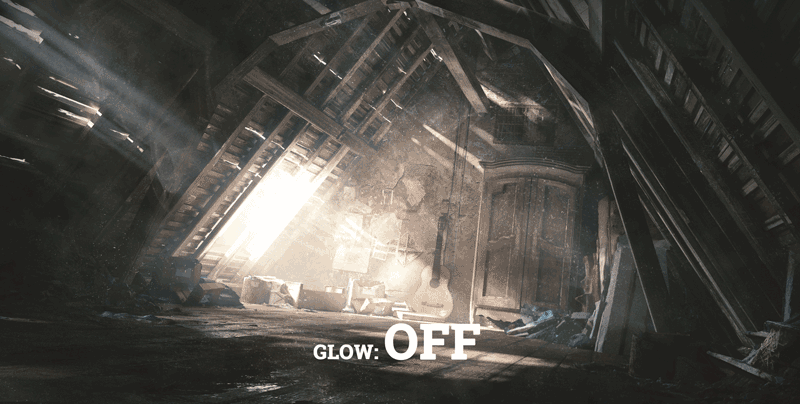
STEP 4. POST-PROCESS WITH A GLARE
If you have done everything we discussed, you should already have an awesome image!
What else can you do, to make you attic even more striking?
Post-process your image with a bit of a glare. In reality, this glare effect is a part of light scattering. But who cares, if the post-processing filter looks just as cool?
Make it glow and watch your friends’ reaction. I bet they’ll be impressed.
And don’t forget to share your render with me too.
It’s your turn.

LIGHTING OPEN PROJECT
This project is my way of writing a book, with your interest and support.
Every week I publish the tutorial, touching some aspect of digital lighting. Work in progress and other exciting stuff goes straight to social media. So be sure to like (on Facebook) and follow (on Twitter).
Oh, and please share it by clicking the fancy buttons below or above the article. It will mean a world for me, as this project relies on word of mouth type of marketing.

Michel Rochette
Awesome! Thanks for the share Gleb!
Java
I just watched Interstellar last night. I swear I saw the dust coming.
Jaroslav Novotny
There should be step 5: Don’t over-do it. And that sometimes less is more. The glare for example ruins the readability of the wall imho. But very nice article overall, thx
Gleb Alexandrov
Jaroslav, that’s definitely something to think about. Glare and bloom are often overused (that’s especially true in case of some video games). So yep, I agree with you here.
David Mcsween
Don’t forget light coming from the sky as well as the sun. Sometimes the broad cool sweep of the empty sky can give an attic a different feeling, but I guess you don’t get to see all the cool dust that way :S Great blog entry Gleb! Although I disagree about the glare a bit.
CrazyEngine
i would love a video with some insights into that scene… like how you’ve created the dust particles n stuff… i also a but curious about your light shaft setup 😀 I’m trying to create some since 2 hours but they aren’t looking convincing!
Lcq92
Wow, good article, but, moreover, impressive artwork your created for it ! That attic scene works so well and looks so good !
rickles13
Gleb,
Great article but some of us (speaking for myself) need more “hand holding” a tutorial on creating these atmospheric conditions would surely be appreciated
Adam Earle
Shakespeare used pen and paper to write because that was the most available technology at the time. Should we really continue down the same path? You are well known for your educational clips.
Put on your thinking cap and use the current tech in delivering your message.
Give away the words. Actions speak louder than words and you have a really kool voice man use it we want to hear it.
Love your work mate. Keep on drilling at it.
Pingback: The Dusty Attic
Sh Shin Zhao
I have some opinion about your first step. I think the point is good, but that was too much atmosphere effect, that amount of effect is for distant, giant environment, a small room will not have those kind of atmosphere. But I said your point is right, for my taste I think it is just because the effect is too strong.
thisisprabha
Hey GLeb how to do Dust Particles….i tried many time…any tip…plz?
Jamius Siam
thanks a lot 🙂
Pingback: How to Create Dust Floating in the Air? | DL-UAT
Pingback: Why Personality Matters So Much (Even If You Are a Table Lamp) • Creative Shrimp