Realistic camera shake is a pain in the butt to create. After watching this 7-step tutorial you’ll be ready to crush a handheld camera animation in Blender.
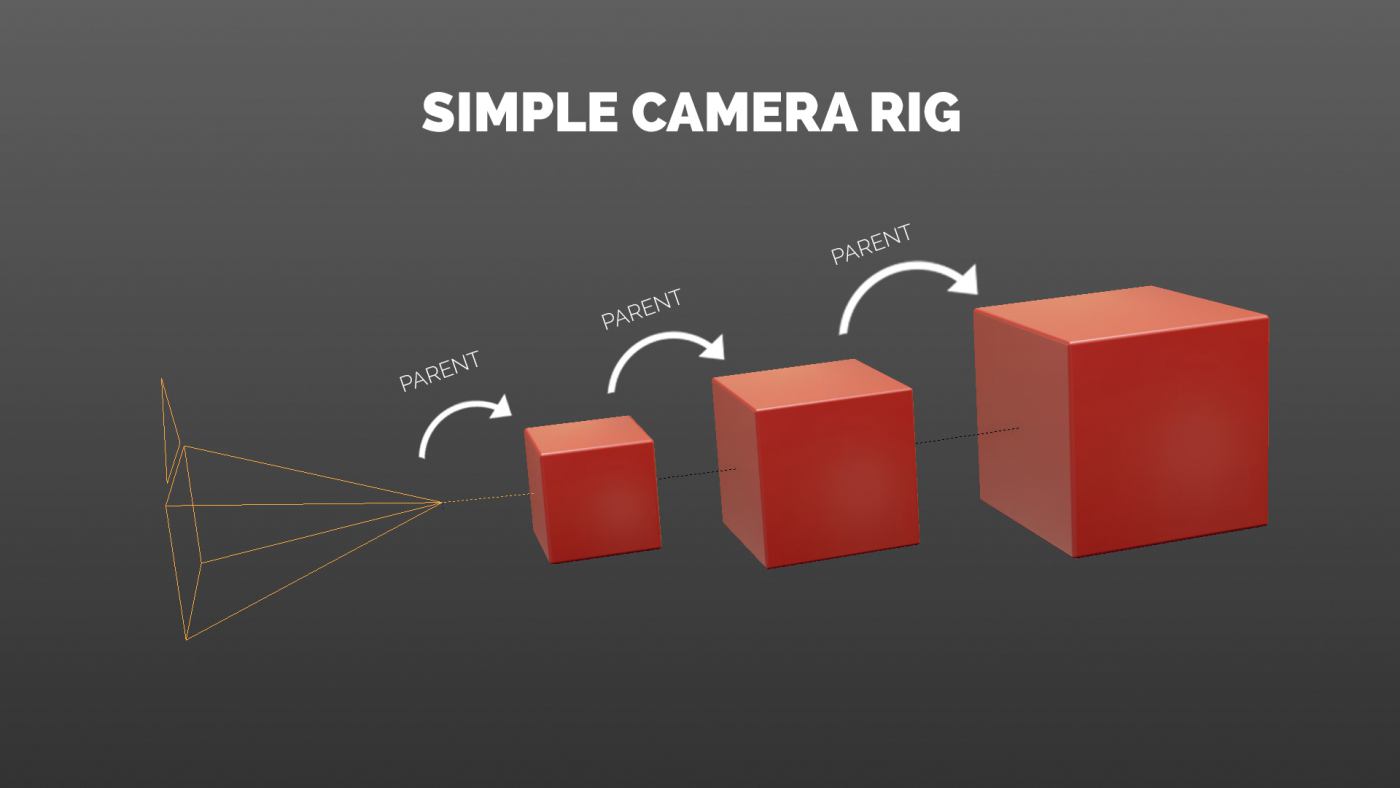
We’ll start by making a simple camera rig. After that I’ll be showing you how to set up a procedural shake and how to animate it like a nerd pro. Ready to go?
What You Will Learn
• How to create the simple camera rig
• How to use a procedural noise in animation
• Why constraints are so cool
You May Also Like
Use 3 Lomography Tricks to Make Sexy & Hipster Lighting (Mmmm… the Light Leaks)

Tone Mapping Your HDRI the Wrong Way (You’ll Love It)
Want mooooar tutorials like this? Subscribe to our Creative Shrimp Newsletter to get ahead in computer graphics and art. I usually send a weekly email with the latest stuff.
Thanks and looking forward to see your handheld camera animations in Blender. Upload them as a .gif to Giffy or to Youtube and post them here in the comments.
I guarantee you’ll find that it’s super fun.

Patrik Rosengren
Super nice Gleb!
Gleb Alexandrov
Thank you Patrik.
Tadd Mencer
I always love watching your videos and reading your stuff. It’s not just informative, but entertaining. Keep up the great work.
Julius Burton
Or you could camera track actual handheld footage. 🙂
https://www.youtube.com/watch?v=Q15m9bBx0DY
Michel Rochette
Thanks for the share Gleb !
Muhammad Farooqi
are you serious?????? how dare you to be so realistic 🙂
Adam Janz
Wow, I just had to say thanks for this tutorial, Gleb. It inspired a super simple flyable follow rig, of which I am still baffled how it works! 🙂
Camera > child of one Cube
Cube > Child Of Constraint (inherit Moving Object’s location for a “follow” rig)
Cube > Locked Track of Cam Target Empty (To: Forward Axis, Lock: Up Axis)
Cube > Damped Track of Cam Target Empty (To: Forward Axis)
Cam Target Empty > child of Moving Object
The bizarre thing is you can select the camera and fly it, orbiting around your Cam Target Empty, and the camera’s PARENT (the cube) updates to the correct location. If you translate or rotate the camera it won’t work correctly, but if you fly it, the parent updates. 🙂 If you need to pan up/down/left/right, just animate the location of the Cam Target Empty.
I praise God for guiding me to your tutorial!
Adam Janz
EDIT: the child of constraint will cause this camera rig to no longer be flyable. It works perfect as long as the cube is not depending on the moving object. I will need to investigate further if there is a solution to this.
Adam Janz
I thank God for showing me a great workaround! Create an empty with the same rotation as your moving object. Have this empty copy the location (constraint) of your moving object in World Space. Then make your cube (camera control) the child of this empty.
You still won’t be able to fly your camera rig, but you will be able to accurately move the cube along its local axes, which is the next best thing. To make it easier to select the cube rig when in the camera view, I duplicated the front face, then deleted only the face, leaving the edge outline. I then moved this outline in front of the camera and scaled it up just outside the camera’s view boundary, so I can easily select it while looking through the camera view.
Pingback: カメラを操作する方法 (Cameras) [Blender] – Site-Builder.wiki