
Want to know what it takes to create a fully fledged Steampunk world with bells and whistles, packed into 1 intense image?
Feel free to ask me anything in the comments to this Q&A session, and I will try to answer your questions.
You can read the full (and pretty hot) making-of in the 78th issue of 3dArtist magazine.
#QuickTip: right-click on the image and select Open Link in the New Tab, to open the hi-resolution image
STATION 45
Check out How to Create an Epic Steampunk Machine in Blender (15 Step Complete Guide)
Software: Blender, Cycles, Photoshop
Production Time: It took me nearly a month to move from initial idea to the final image. And I was caffeinated all the time.
Rendering Time: Freaking Long
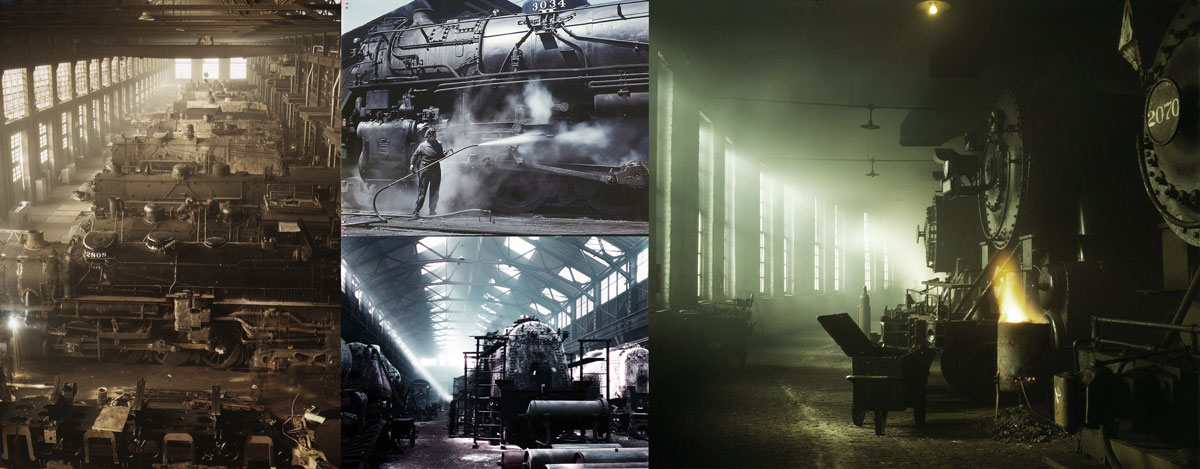
Inspiration: I’m massively inspired by Jack Delano’s photos of locomotives. Rhythm is remarkable.
Step-by-Step tutorial: Huge article published in 3dArtist magazine, issue 78
The Goal: to push myself to the limit. And at the same time, to make something crazy using Blender. Also, I hope that it will inspire you to create weird fantasy worlds.
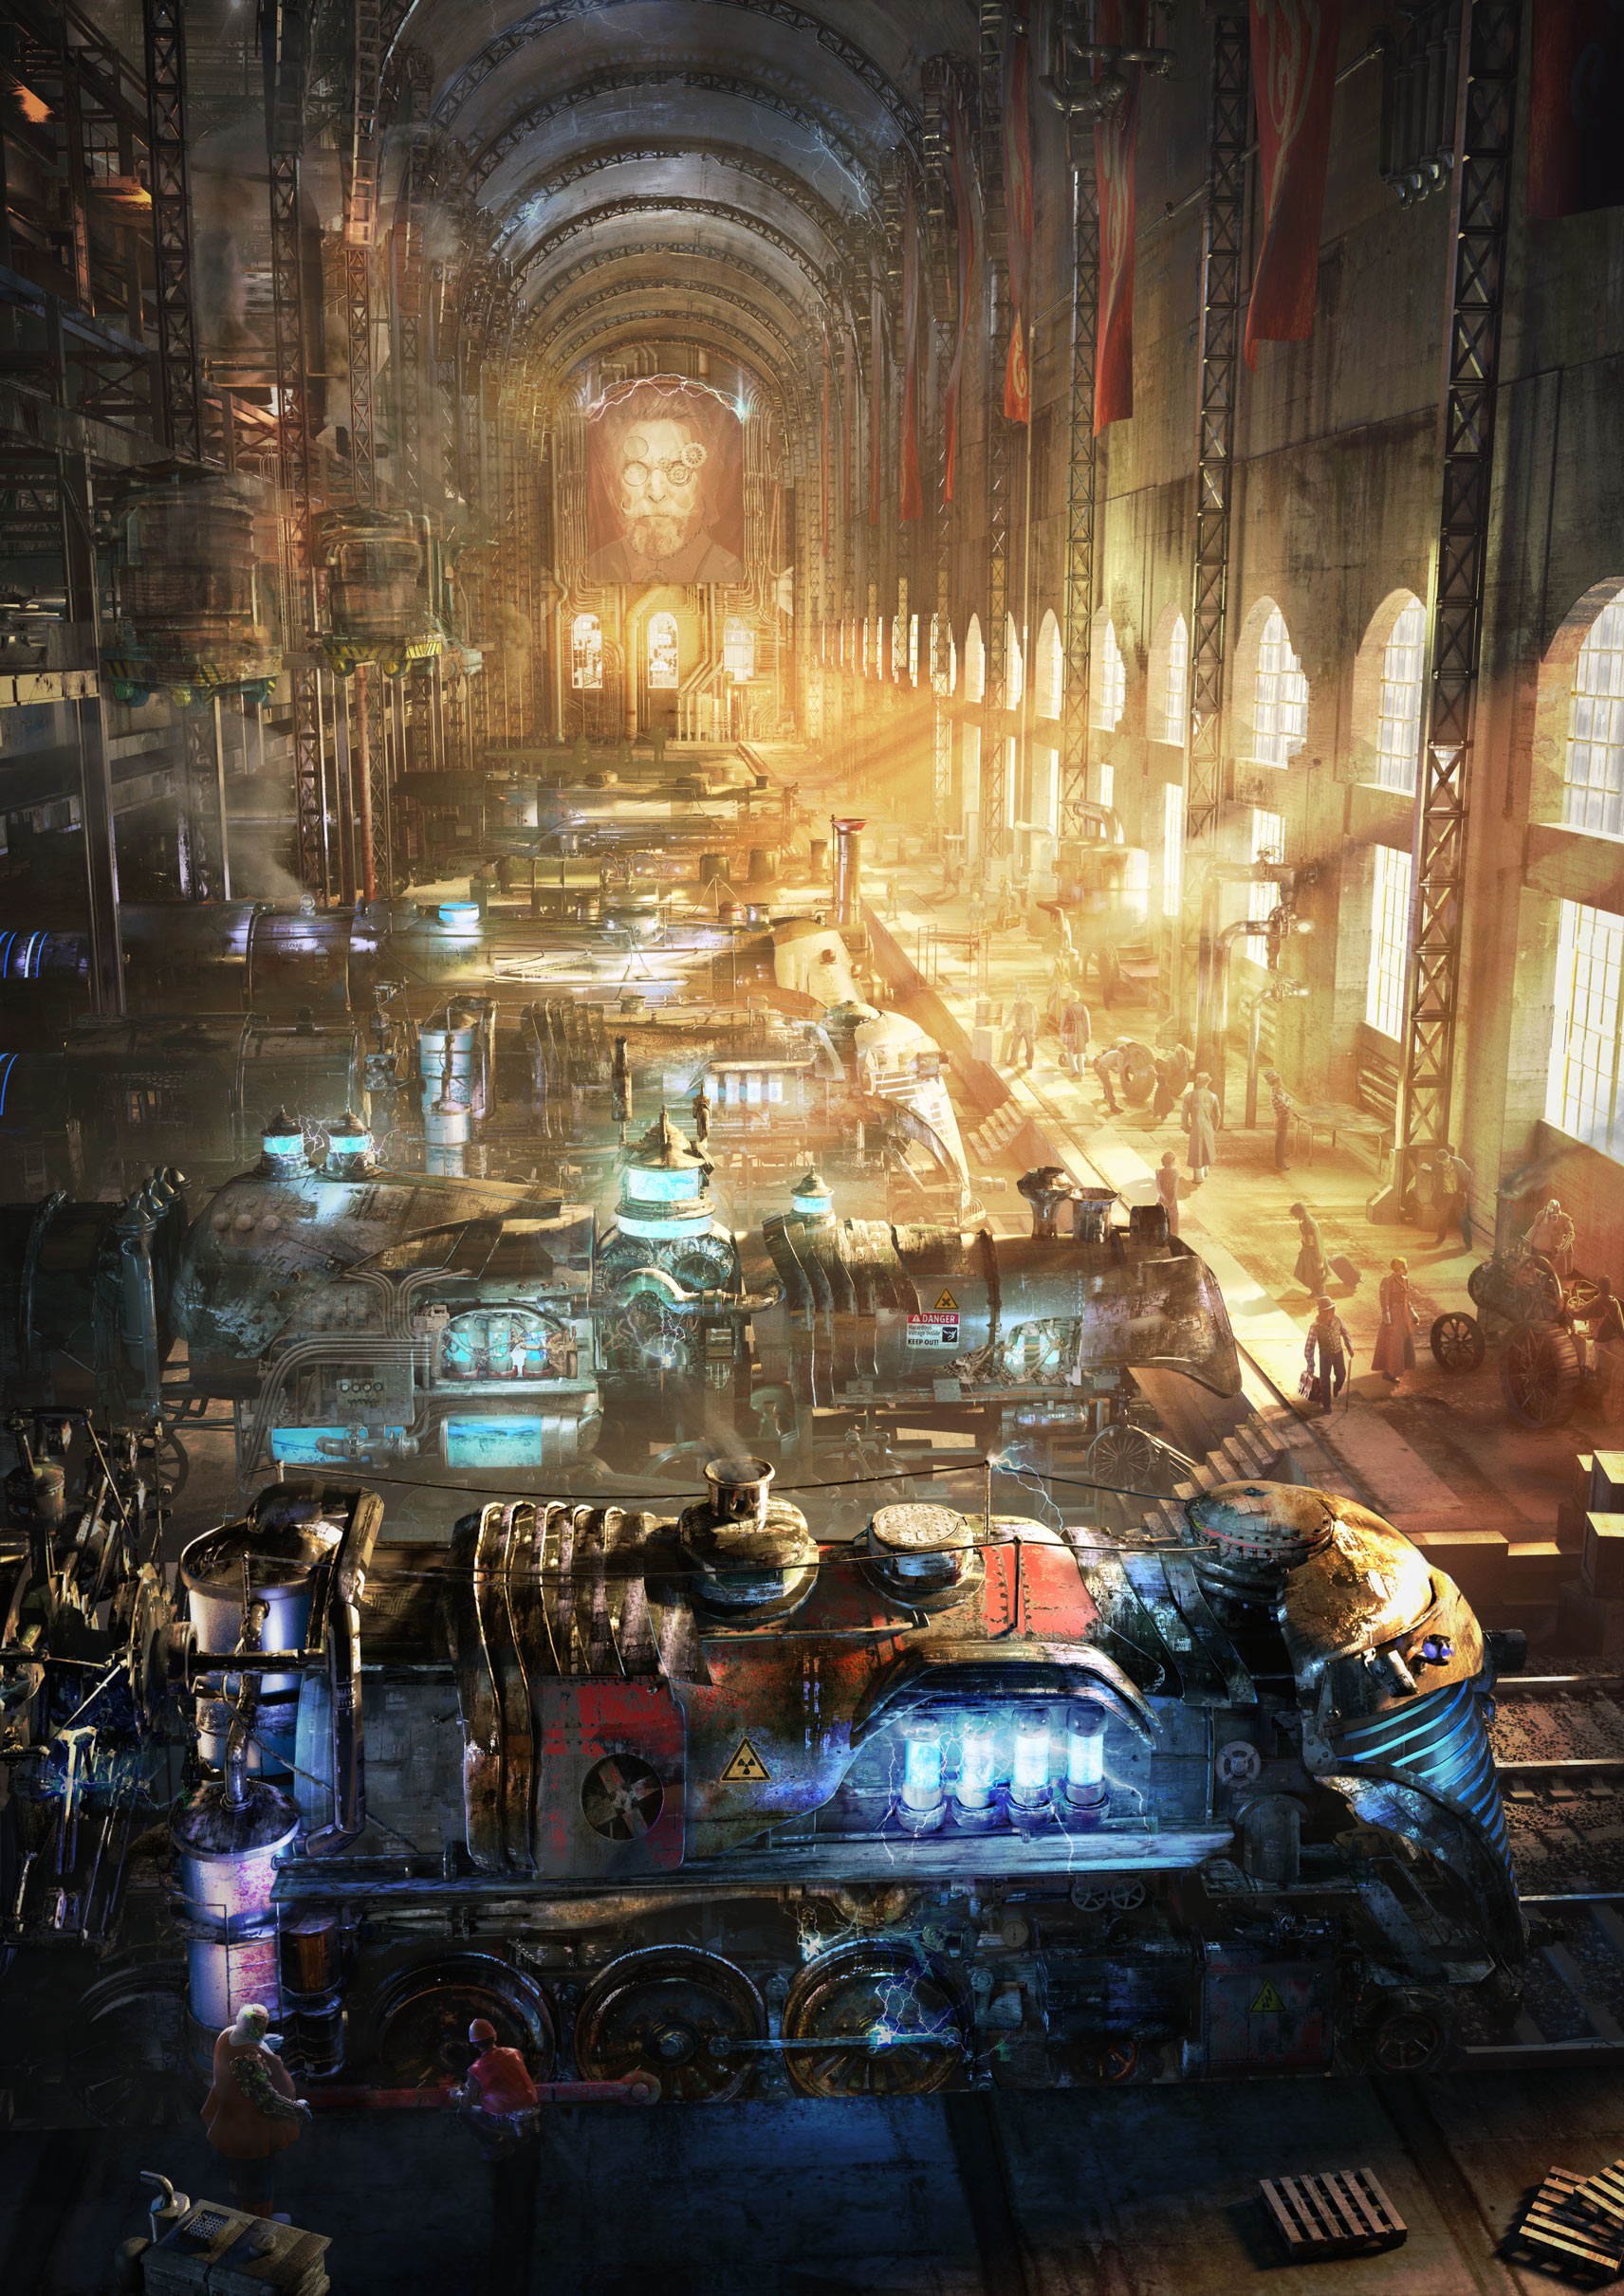
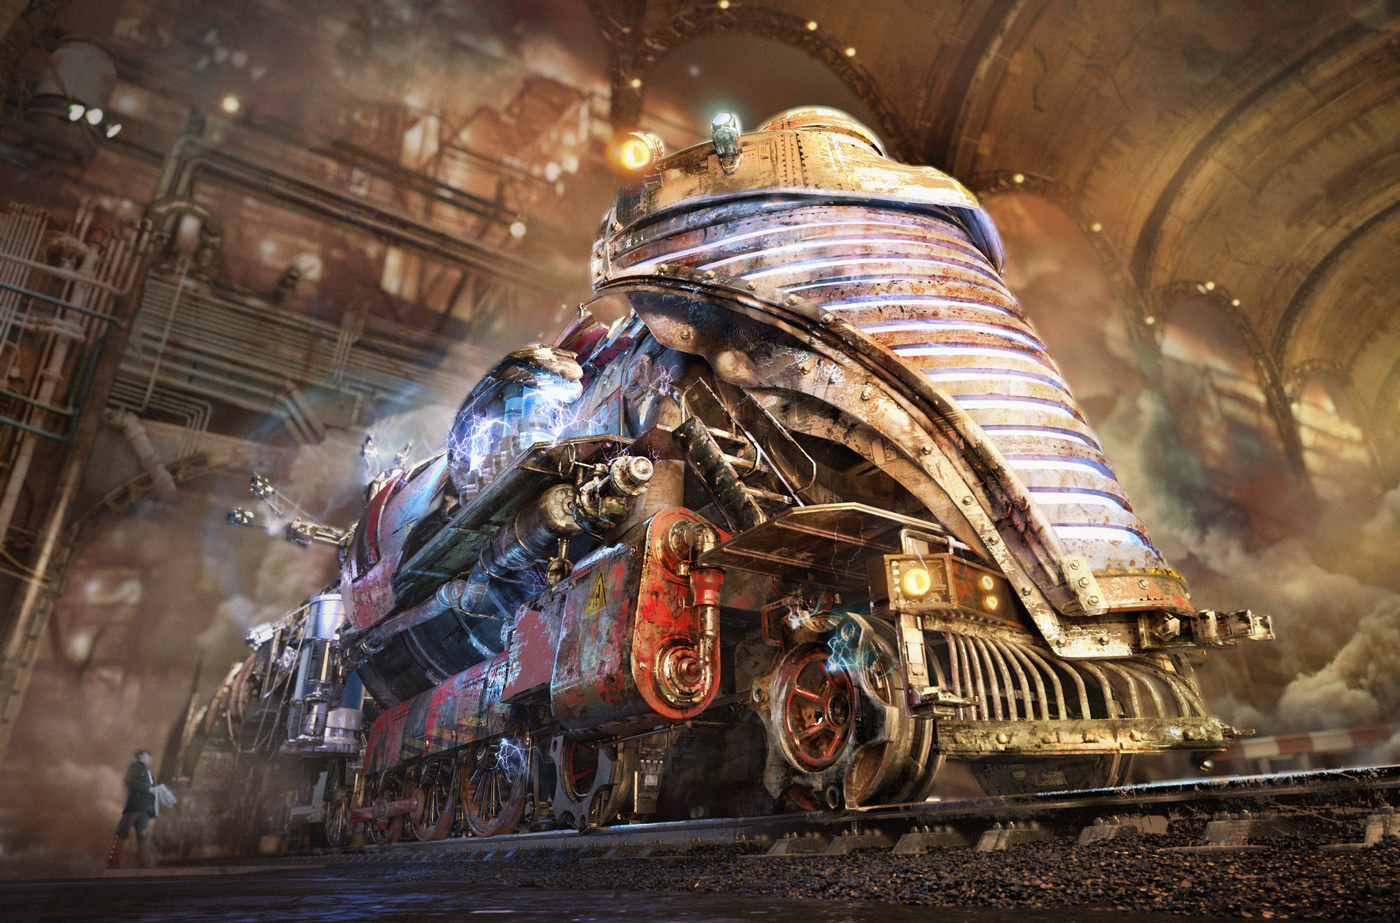
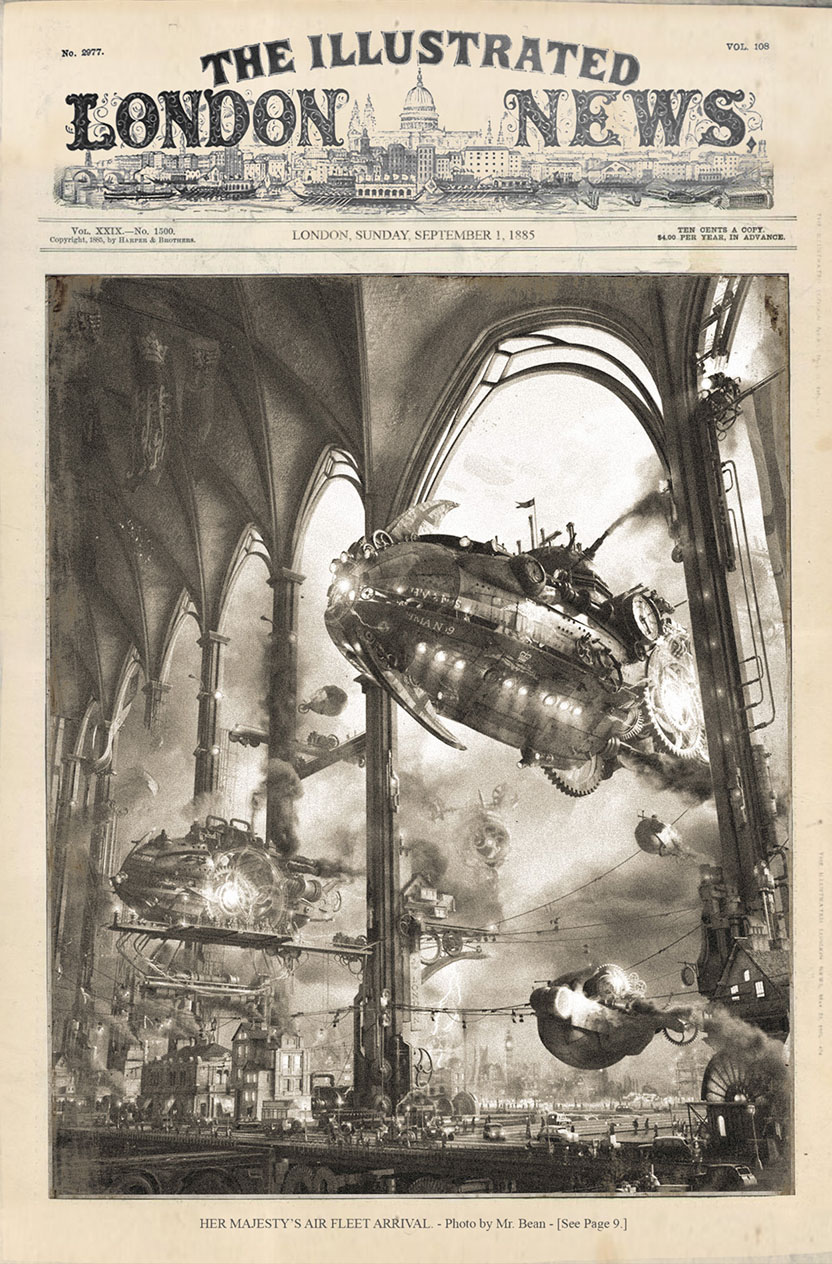
Returning to Steampunk World of Zeppelins
I’m always excited to revisit Steampunk world of Zeppelins. The world of bizarre crossovers between factories and cathedrals; steam and electricity, inspired by Tesla’s research; and a heavy machinery, of course.
Step-by-Step Tutorial in 3DArtist Magazine Is Now Live!
Check the 78th issue of 3dArtist magazine.
In this tutorial, we will be going step by step through pre-production, blocking out the main shapes. And then straight to detailing, setting up lighting and later on to matte painting, to learn the main principles behind efficient 3d workflow.
The aim of this tutorial is pretty straightforward, to help you cross the gap between imaginary worlds and a real canvas. We will accomplish it by studying what works and what does not, when dealing with millions of polygons and some electric trains.
You will learn how to:
- Develop idea and style of a fictional world
- Model complex 3d structures efficiently
- Set up lighting with dozens of light sources
- Enhance a final compose with a matte painting
CHECK THE LIGHTING OPEN PROJECT
Lighting Open Project project is my way of writing a book about lighting for CG artists.
Open, transparent, community-driven.
Every week I publish the tutorial, touching some aspect of digital lighting. Work in progress and other exciting stuff goes straight to social media. So be sure to like (on Facebook) and follow (on Twitter).

If you want me to stay updated with latest tutorials and news, feel free to subscribe to my newsletter. It’s that easy, yeah.
I appreciate you!

AgenZasBrothers
Hi Gleb,
this is unbelievable and truly a very impressive work! Congrats to this amazing composition, you blow my mind and that doesn’t happens very often! 😉
There are so many details, one can never look one’s fill.
Cheers!
Zacharias
Gleb Alexandrov
Thanks, mate! I wish I had even more time at my disposal. Say, more than 24 hours in a day.
AgenZasBrothers
I know this feeling so well. 😉
Ethan Blair
Hey Gleb,
Your tutorials and artworks have inspired and taught me about many things in CG art. After only a short time using Blender I was able to make this, form learning from several of your ideas and techniques. Thank you. (Sorry if this is irrelevant but I wasn’t able to post pictures in your message section) 🙂
Gleb Alexandrov
Ethan, pictures are always relevant! 🙂 Oh, I see that you had some fun with the screw modifier. Good job!
Giuliano D'Angelo
It looks like her majestie’s success deserve a sequel! 🙂
There’s a main difference I really like: here you’re trying to confuse the technique; so this is much more “dirty” and distorted. Quite impossible to recognize a 3d CGI origin.
May you give me 2 words on how you postprocessed that?
Gleb Alexandrov
Giuliano, I suppose that we have to blame volume light, fog and haze effects. I added quite a lot of atmospheric perspective in post-processing, using the mist pass and some paint-over.
Also, I rendered volumetric lights pass in separate scene, using Cycles scattering shader. And overlaid it on top of everything.
Maybe that’s the case.
Ethan Hansen
“Rendering time: Freaking long.”
Gleb, there are few words to describe your creative genius. This is one the most incredible compositions I’ve ever seen. I can’t even really imagine how many layers and how much memory this must have taken. My favorite part is the Jeff Bridges-esque propoganda poster on the far wall. Hats off to you, sir.
Ethan Hansen
I’m quite curious about how the people were composited/painted. Some of them are geometry, which would be a crazy amount of trouble to go to. I’ll have to buy the last issue of the magazine just to read that article!!
Gleb Alexandrov
Some people are based on a rough 3D models (foreground guys). And even the distant people were initially 3D models, as I needed the scale reference. And during post-processing I composited photos on top of them.
Photography:
40% of the people were played by me in various clothing.
other 40% by my wife
and 20% are based on don’t remember what
The hardest part was to align the photos with 3d in terms of angle.
Ethan Hansen
I laughed out loud when I read that some were actually you and your wife. I had guessed that earlier but thought that was crazy talk. Just makes your work more awesome!
hug0
What can I say?!
Boldozofuriozo
Thank youuuuuuuuuuuuuuuuuuuuuu!
Blender Crystals
Absolutely amazing work! Great job Gleb! It definitely inspires me to do more. Thanks you!
Mark Edwards
Beautiful Gleb, I think that’s my favorite piece you have done, makes me want to try harder myself!!
Gleb Alexandrov
That’s the point! 🙂 Let’s push the limits!
Pingback: Steampunk Movement • Composing of a Steampunk World in Blender: Time Lapse
Yulia Kalashnikova
Breathtaking! You are extremely talanted, just as I said before 🙂
Gleb Alexandrov
Thanks so much, Yulia.
Micah Denn
Breathless. I mean I actually had to put down my coffee and hold my breath whilst looking at it.
You just have pure unadulterated artistic brilliance flowing out of you.
Gleb Alexandrov
Micah, the way you formulated it adds +10 points to my happiness. Immediately.
Shanmukha Harshith
Awesome. Just awesome!
Marcin HRN
Hello Gleb!
Can you give us hardware specification which helped you to create this wonderful work?
Vicente Senger
Hi Gleb, amazing work as always. I don’t know if this idea ever crossed your mind, but someone as good as you, should probably apply for jobs as concept artist or illustrator, on the entertainment industry, films and games.I think they could make good use of your talent.
Java
This is gnarbuckle. How many hours does this take exactly?
Pingback: Composing of a Steampunk World in Blender: Time Lapse | Steam Punk Videos
Yulia Kalashnikova
I have just tried hair rendering in Blender. Unfortunately, my computer is uncapable to render even 200 children with minimal render settings and basic diffuse shader and all of the other things removed from the scene. Is there any way to overcome this problem with strand rendering?
Igor Leskov
Try to activate backculling in the hair properties. You can also model a lowpolygonal hair and assign it as a particle instance.
Yulia Kalashnikova
thank you 🙂 i will try to do that, unfortunately it is a close up, so i do not think that particle hair will do since i need a lot of believablity from strands 🙂
Igor Leskov
Your last chance is to use Geforce with 2 Gb memory or higher then.
Yulia Kalashnikova
Just in case any of the noobs (like myself) is having similar problems: be careful with render steps (avaliable under particle properties panel) for strands in Blender. My number of steps was 10, which gave me more than 1000 subdivisions per strand – too much geometry. So I went down to 6 steps and clicked B-spline checkbox. B-spline made hair smooth and allowed me to get away with less render steps (thanks to IkariShinji from blenderartis!).
Rombout
So you did model all the characters, I thought they where 2d or others props. Never new you also do character modeling.
Ps why have modeled quite some parts with triangles, is this to keep poly count low?
Grzegorz Wcisło
I thougth I would never see a more stunning image than “Her Majesty’s Zeppelins” but i was wrong 🙂 I wish i was that good 🙂 Could you take a look at my most recent work? Also could you recomment me a good cheap graphical tablet(I’m a poor high school student)? Thanks 🙂
Gleb Alexandrov
Gregorz, I like the lighting accent in your image!! Personally, I would make it even stronger (so it will influence the part of the wooden structure, and the sand below it) 🙂
As for the table, I’m pretty satisfied with my Wacom Intuos (not so long ago it was called Wacom Bamboo). It costs around 300zl on allegro: http://allegro.pl/listing/listing.php?order=m&string=wacom+intuos&bmatch=seng-v6-p-sm-isqm-1-e-0402
Ryz3D
Hey there, Gleb!
I also ordered a Wacom Intuos, but i really thought the Bamboo is too small. Can you sculpt with some percision or is it hard to hit the correct vertices?
Gleb Alexandrov
Personally, I’m okay with Bamboo (now it’s called Intuos, and what was once Intuos now is called Intuos Pro). I’m sculpting in Zbrush as well as painting in PS, and for my workflow this precision is enough.
Ryz3D
Thank you for answering me. I got the Intuos now and I now try to learn sculpting 🙂 Working great! I’m painting in Autodesk Sketchbook BTW.
Alejo Huertas Ramirez
Hi Gleb, I would like to know if the people on the comp and other details as the clock on the train, the “caution” message and other stuff are composed inside blender with a texture or if u put them in photoshop.
Thanks a lot.
PD: Its an Amazing image, thanks for share and inspire others (:
Satdhruti Paul
I’m 14(dont know if i’m too young for this but) i want to create bumblebee. From the transformers movie. Could u please give me a starting point.
Aakash Jaisinghani
frankly i would say go small or u fall.
L1ghtShadow
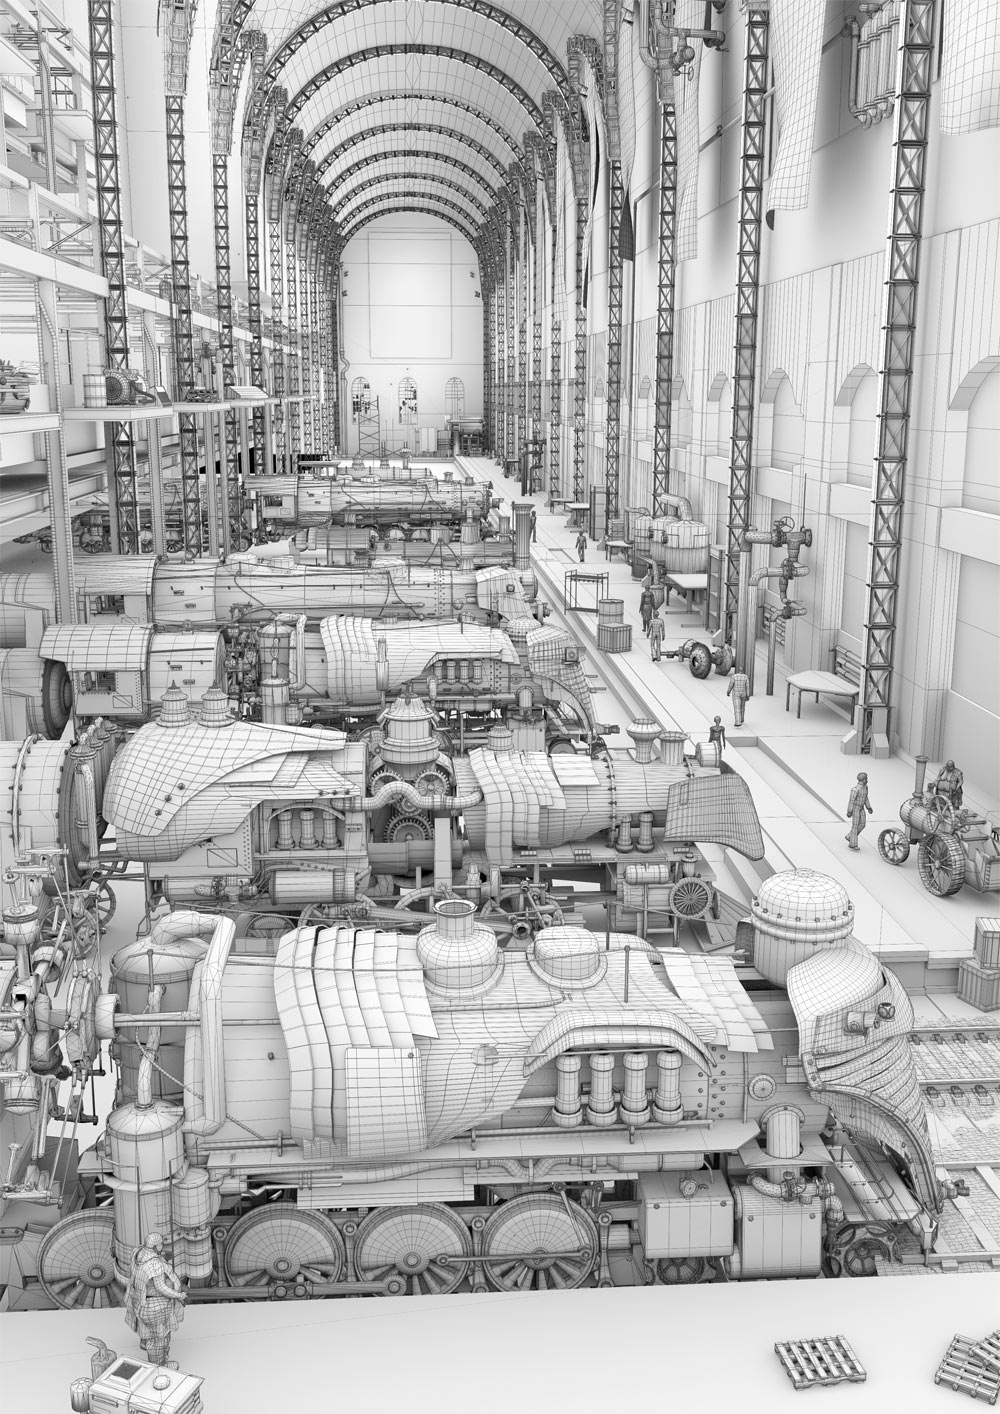
Hi Gleb, I just have a few questions. How did u get the wireframe to look like that? Whenever I use the Wireframe modifier it looks worse than how you did yours. I was already wondering how you got the topology to look so smooth. Did you use an addon after you modeled it? Thanks.
Gleb Alexandrov
First I rendered the ambient occlusion pass using Cycles, then I selected everything in the scene and activated ‘display-> wire’ in the object properties (I use the Display Tools add-on to mass change this property). Also I activated the gray Matcap in the viewport shading.
The next step was to render wireframe using OpenGl render (double or triple size for smoothness). After that, I composed the wireframe render on top of the ambient occlusion pass in photoshop in multiply mode. Hope that helps!
L1ghtShadow
Now that looks so much better! One more question, how did u get the topology so smooth? Whenever I model it always looks messed up and never looks smooth and flowing like yours.
Gleb Alexandrov
I need to see some sample of your topology first 🙂 Usually, I not pay too much attention to topology too.
L1ghtShadow
Here is a wireframe of something I quickly started. You can see on the side of the handle that it’s not flowing or smooth like how yours is. I tried using smooth vertex, but that doesn’t work well on hard modeling.
http://imgur.com/Xwe7asT
L1ghtShadow
So, any ideas? 😀
Gleb Alexandrov
Frankly, I think that the topology of your model is okay. All that matters is whether it looks good when textured/subsurfaced/rendered. And judging by the edge flow, it probably will look quite good. Just be sure to play with edge creasing to avoid too much smoothing while using Subsurface modifier.
L1ghtShadow
How do you render the ambient occlusion pass?
Karthikeyan Ramanathan
hi man…whts your system config..
Aakash Jaisinghani
This work is stunning bro.i would love to learn more from u abt lighting and a better comp.
Muhammad Farooqi
you know.. you are mad! …. and I love you