If you happen to be new to the baking process in Blender see the end of the article (problem 5!) for tips on generating a simple normal/bump map from both a shader and another object.
Hi, Aidy Burrows here, bump map creation can itself be a bumpy ride and as for normal maps? Who can say what normal really is anyway?!
Well, actually in this context probably a mathematician could easily tell us BUT! The point is from an artist’s point of view there are some bumps to navigate so the process can be smoother (gotta love a 3D pun to get us started!)
BEWARE! Before we let our guard down after some slick puns let’s not forget why we’re here! The dangers of bump/normal maps are that we don’t directly see them like we would a color map, instead we see more how the light bouncing off the surface has changed because of them.
That means it isn’t always immediately obvious what the problem with the bump/normal map might be, where the problem stems from or how to fix it. So to immunise ourselves to all of this we’re going to hold these problems betwixt tweezers for inspection!
CONTENTS
Problem 1 – Default image settings
Problem 2 – Color Spaces in multiple menus
Problem 4 – Oversharp bump artifacts
Problem 5a – Baking from a shader
Problem 5b – Baking from an object
PROBLEM 1: The default image settings i.e. 8 bit images aren’t optimal for normal/bump images.
Here are our default new image settings below, notice the unchecked 32 bit float checkbox meaning our new image will be 8 bit.
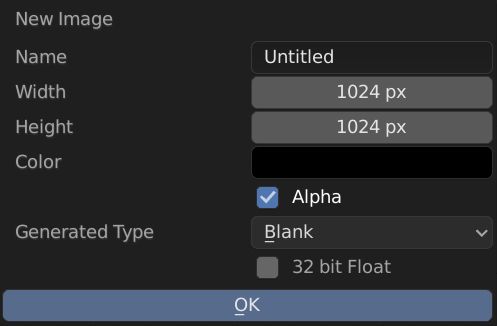
If we leave everything as is and bake with this default lower bit depth, we can get problems such as these…
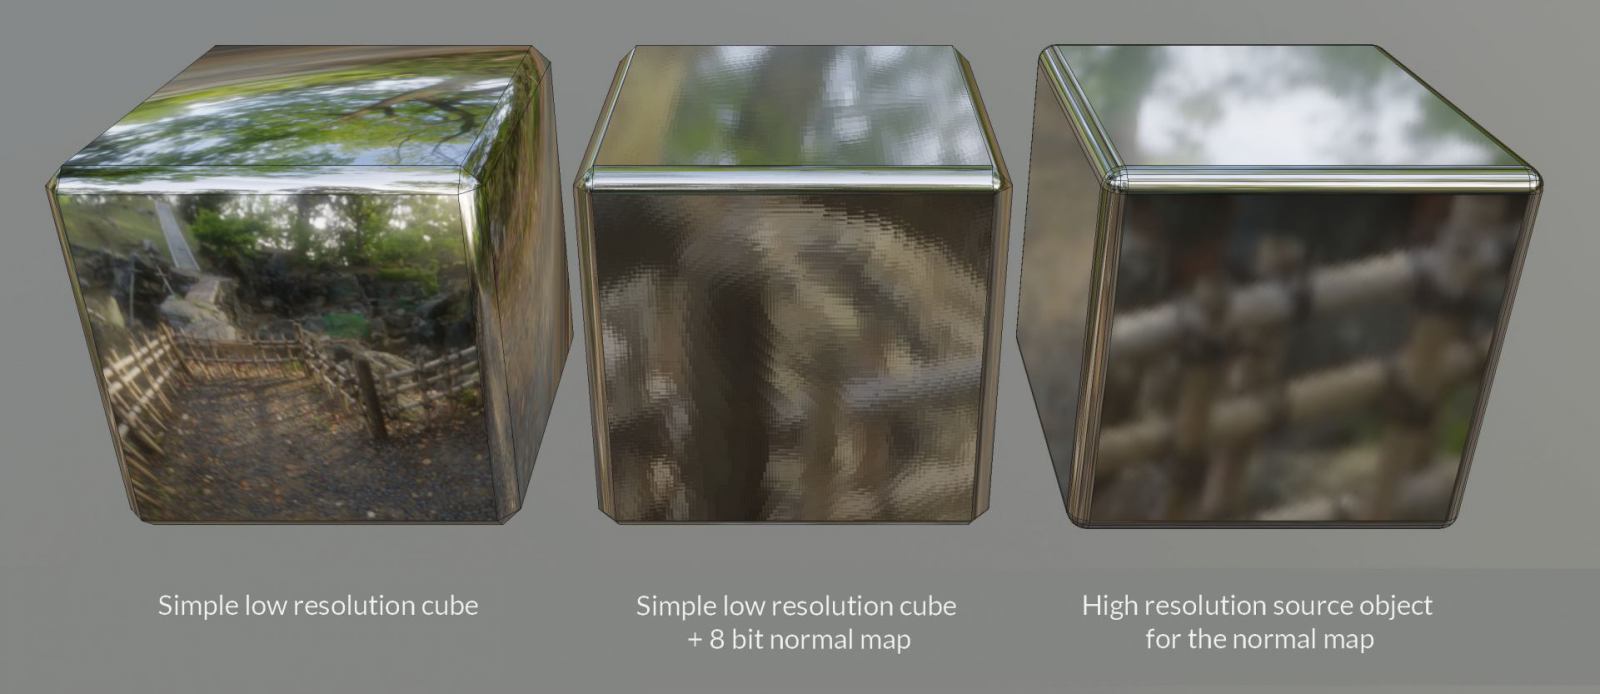
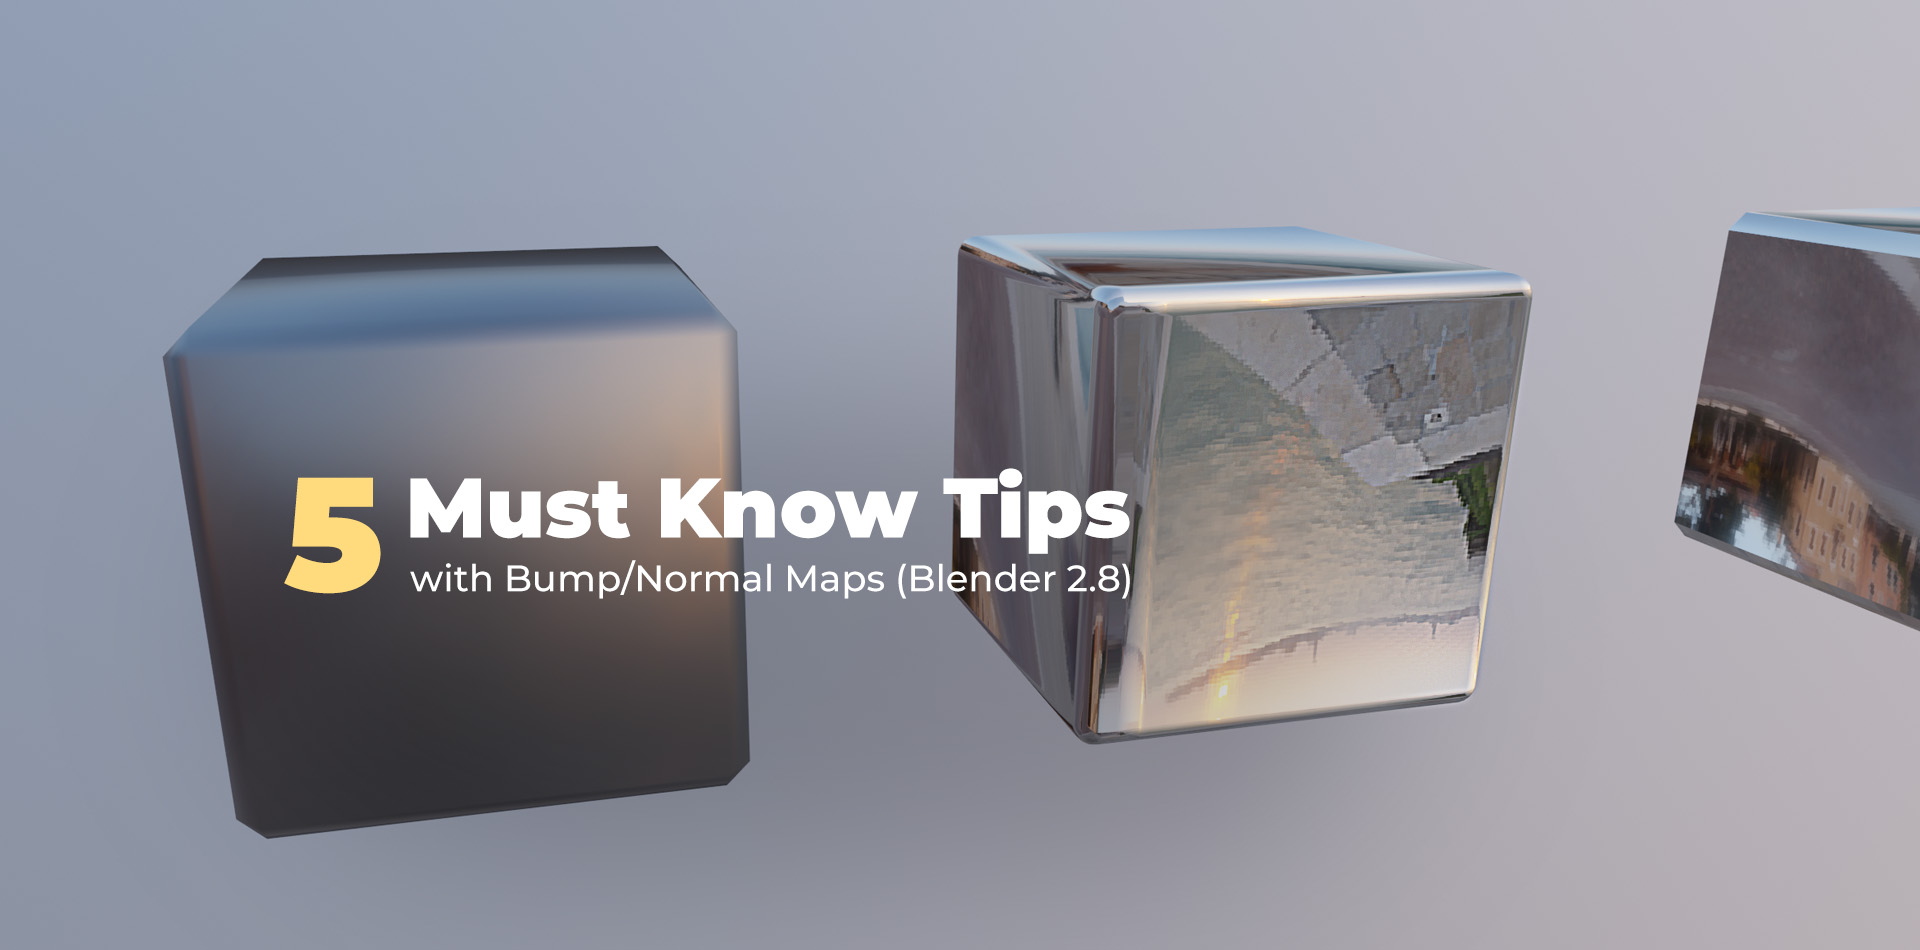
Notice the strange swirly mosaic tiled look to the middle cube. Those artifacts aren’t there without the normal map (on the left) or on the high resolution mesh that was used to bake the normals from (on the right).
Here’s another example using an 8 bit bump map on a simple plane…
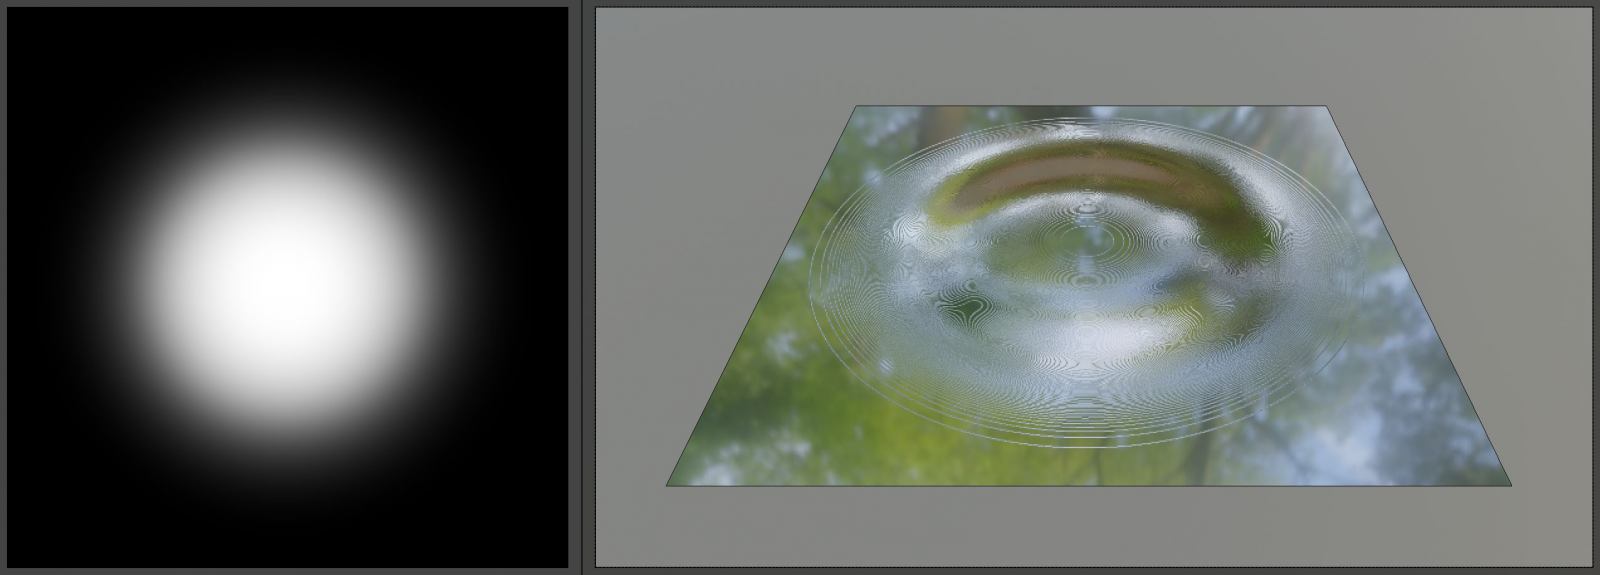
On the left is the texture we’re using as a bump map for the plane in the viewport on the right. Again we can see the ‘banding’ artifacts.
We are asking a lot of our textures here though seeing how the object is so clean, smooth, defined and shiny. If on the other hand your material is actually quite rough and/or grungy often we can hide these banding artifacts on the normal map…
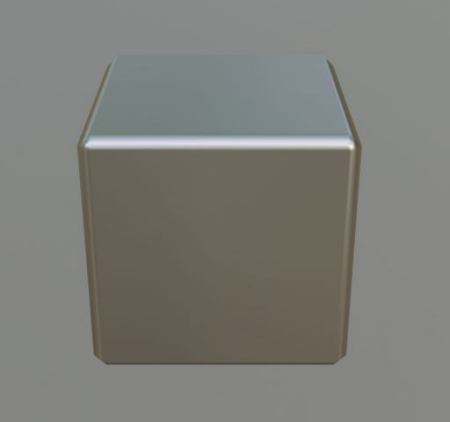
Above is that same central cube from before but instead of a very low roughness setting of just 0.05 here we’re hiding a lot of the artifacts in the 8 bit image with a roughness value of 0.4
So in conclusion for proper versatility make sure we have that 32 bit float checkbox enabled for bump/normal maps!
Now we have the bit depth out of the way let’s move on to…
PROBLEM 2: There are different ‘color spaces’ which can be set in different editors that we need to make sure we get right (again the default settings don’t help us here).
Here in this next image you’ll see 2 editors on top of each other. On top we have the image node selected in the shader editor and below the normal map texture being used in the image editor. This is what the cube was using earlier to show the 8 bit texture problem.
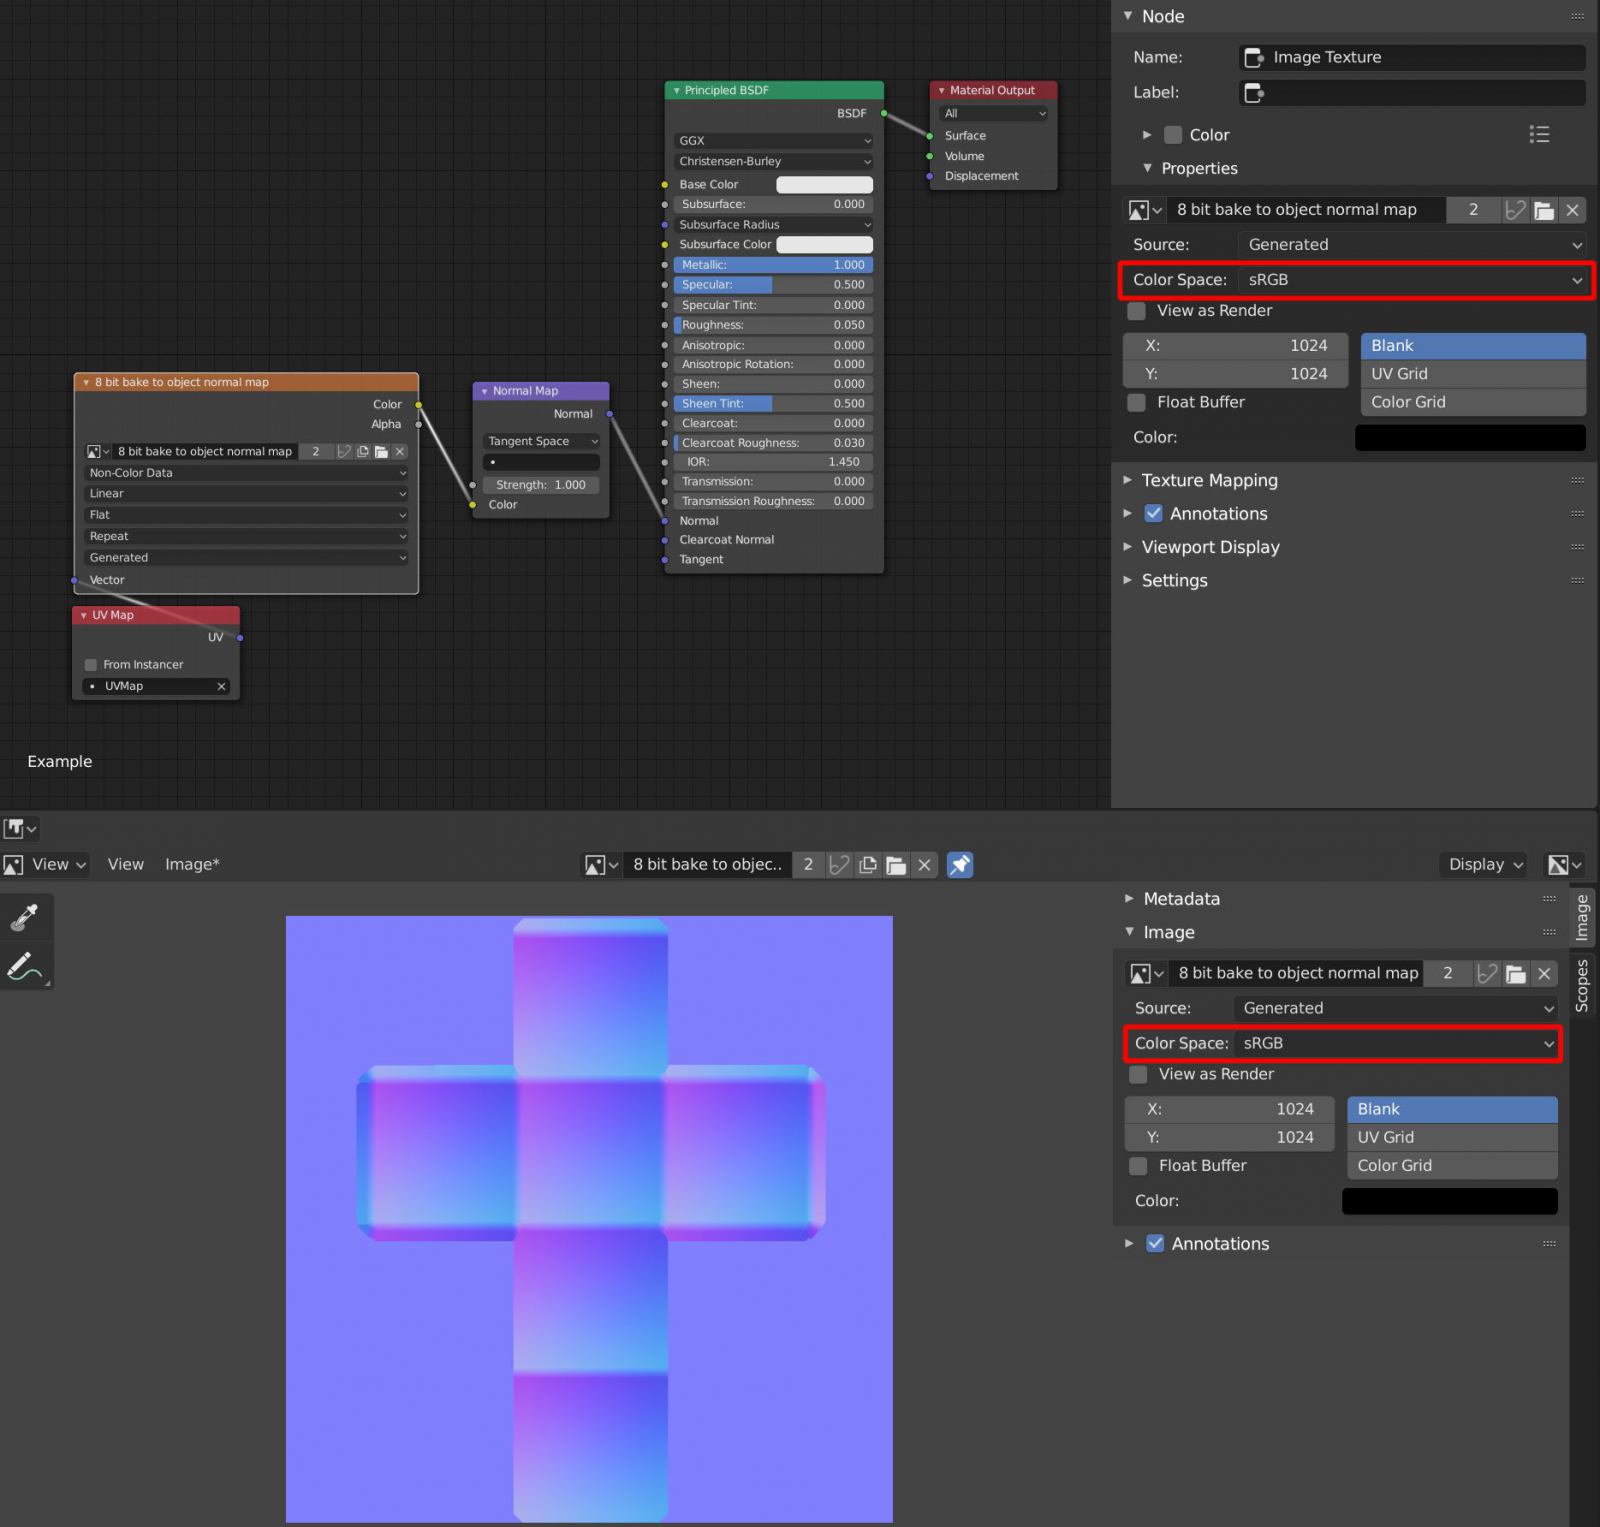
Notice in each of those editors we have the properties panel open (toggled with the ‘N’ shortcut key) and highlighted is where we can set the ‘color-space’ of the image.
Let’s ask ourselves, will this be plugged into any color sockets on our shader? The answer is – NO! So we need to remember this is ‘non-color’ data.
8 BIT
For an 8 bit image, Blender will probably default the color space here to ‘sRGB’. Which means that the image is not being treated as just data, so we need to counteract that. Luckily that’s pretty easy to do because in the image editor we have a pulldown menu that we can set to ‘non-color’.
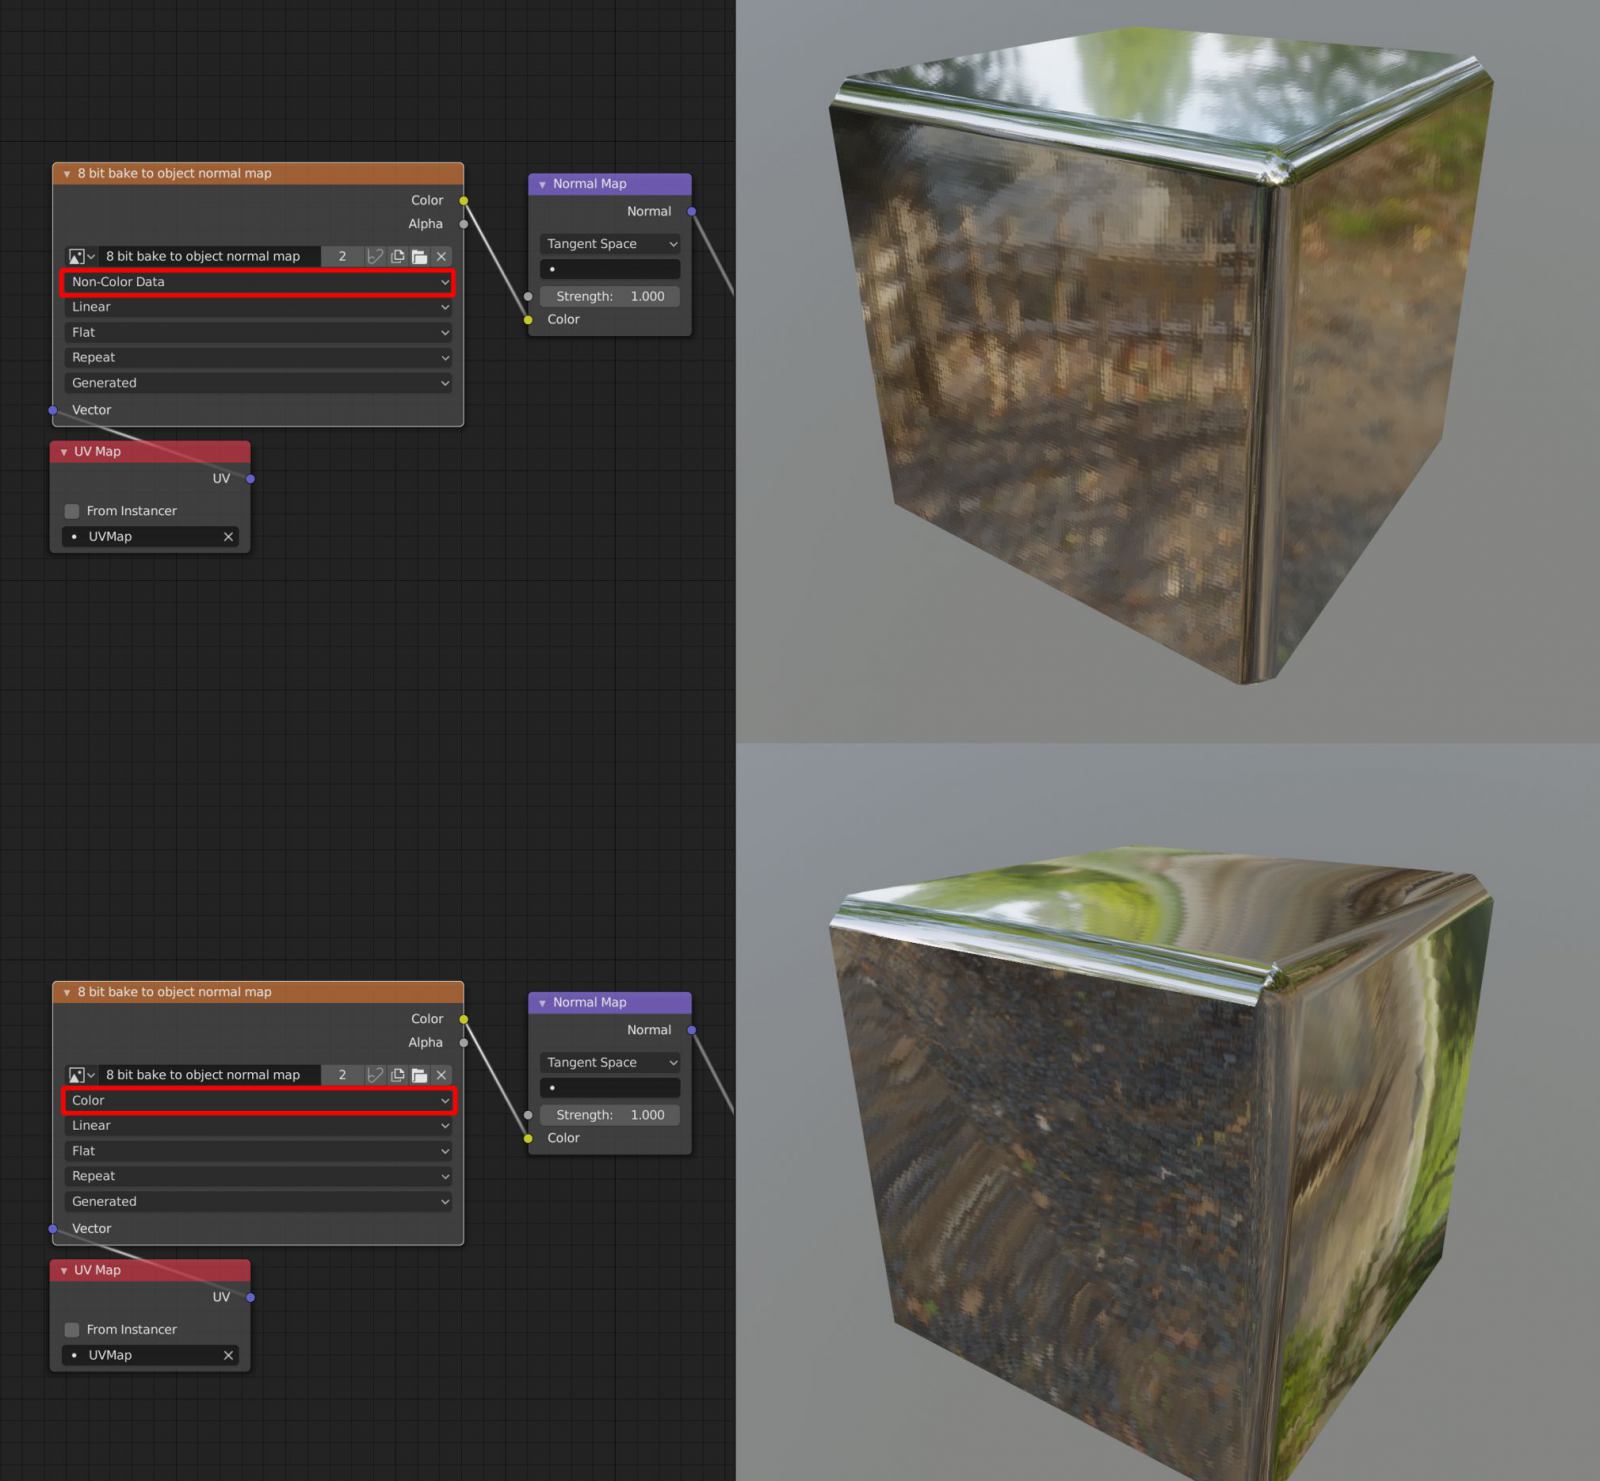
If we leave that image node set to ‘color’ instead of ‘non-color’ then things definitely don’t look right as shown on the lower of the 2 examples in the image above.
The thing to bare in mind there is that in order for this normal map to shade properly we need to explicitly tell Blender in the shader editor that this image should NOT be treated as a typical color image. That whatever values are stored in the red, green and blue channels have been altered (by the sRGB profile) to something we don’t want.
You might be wondering WHY are they altered? Well, very basically this is because it makes the texture more useable for the monitor and more pleasing and intuitive to the human eye.
As we know though this texture isn’t to be directly seen by the human eye, this is for altering normals, so we want to reverse the changes of that color space. That’s what the ‘non-color’ option on the image node is doing!
PRO TIP!
If we want to control this manually ourselves we can simply add a gamma node set to 0.454 (linear to sRGB) or 2.2 (sRGB to linear) instead of switching that non-color setting.
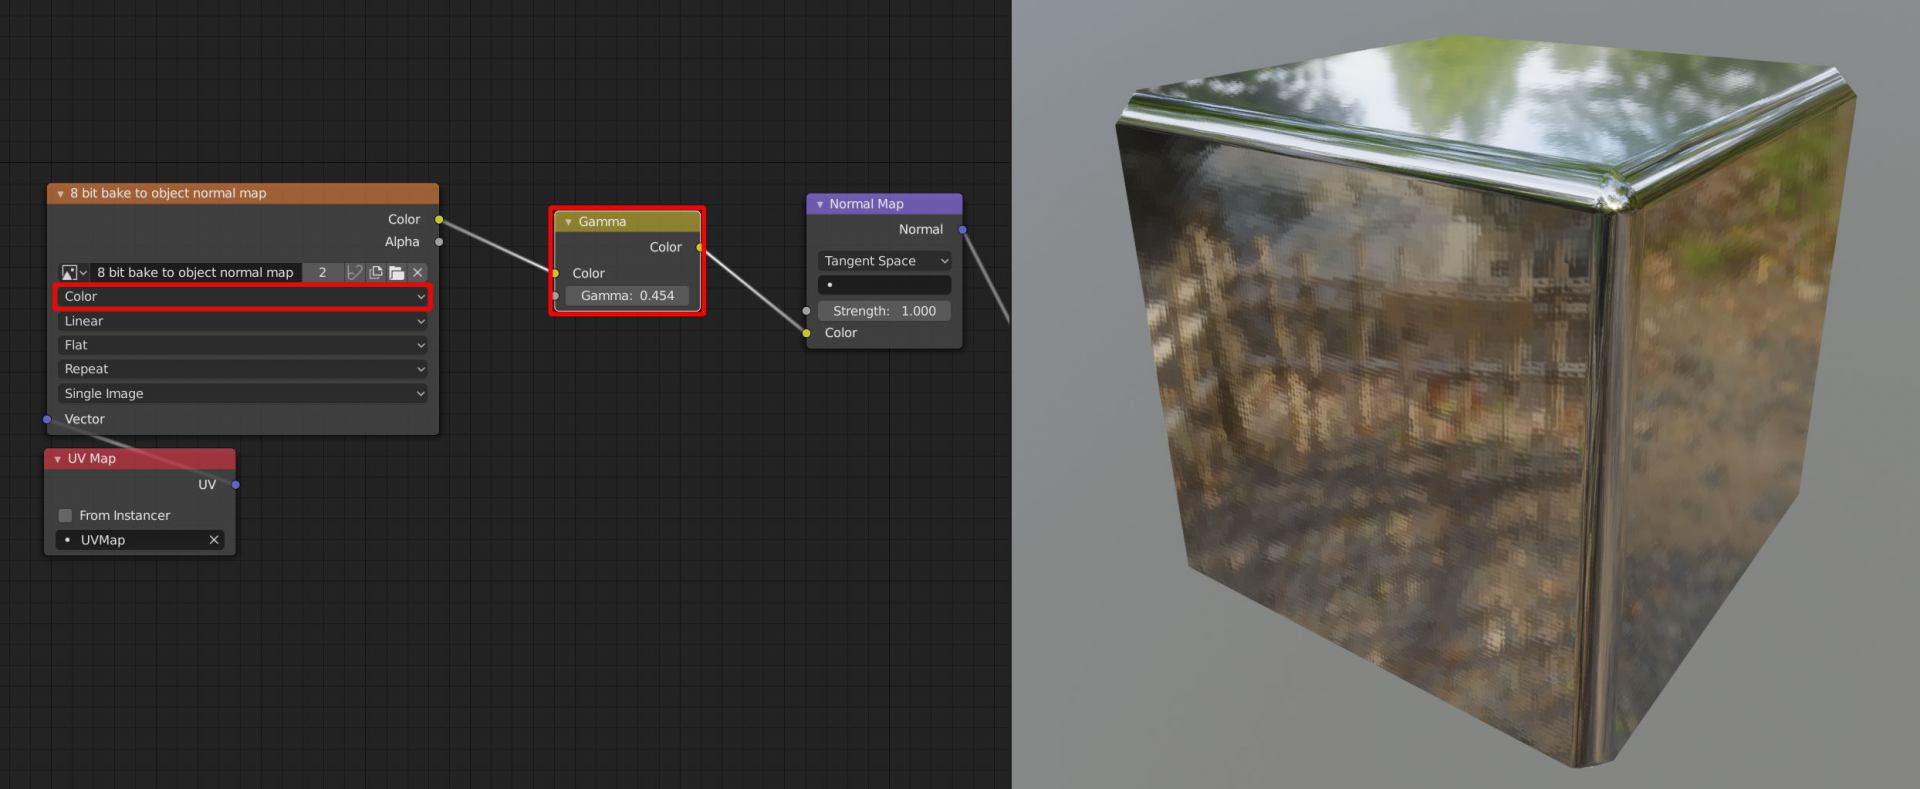
One final note on this (which may change down the line if this is a bug!) if you switch the color space in the image editor from sRGB to ‘non-color’ there. Then you may find that switching the color/non-color toggle on the image node in the shader editor actually has no effect at all. (If this isn’t a bug perhaps greying out that option to indicate it isn’t relevant in that case could help clarify things)
32 BIT
Here it’s probably worth mentioning that there may be a couple of things that end up being changed by the developers or potentially (and understandably) there are some bugs in the current 2.80 beta ointment. Whatever the case, what follows here should be the most robust and consistent way of working with 32 bit images to get what we need.
For a 32 bit float image, blender will probably default the color space to ‘linear’ instead of ‘sRGB’.
It is fine to use linear color space but as I mentioned there are some bugs lurking, i’ve had it sometimes flip on me where instead of setting the image node to ‘color’ i’ve needed to set it to ‘non-color’. Spooky! So I think seeing how non-color space is intended for textures like normal/bump maps anyway let’s just stick with that!
Note: If we change the color space in one editor it’ll reflect that change in the other editor.
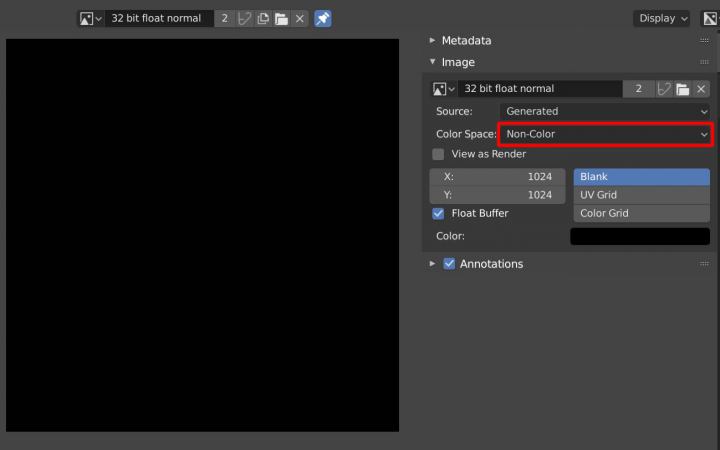
So use non-color space for 32 bit, but you may find (for now anyway) that the non-color/color toggle of the image node might then not do anything.
Here’s how a baked normal map will show up in 32 bit non-color space.

Remember as mentioned before if we want to control this manually ourselves we can simply add a gamma node set to 2.2 (sRGB to linear) or 0.454 (linear to sRGB) instead of switching the image node from ‘color’ to ‘non-color’. In fact, the color/non-color pulldown on the image node actually doesn’t currently do anything now that we’ve set the color space in the image editor to ‘non-color’. Again I suspect this bug may well be sorted any moment.
One interesting thing to note is that the 32 bit normal map looks a bit pale and lighter than we’re used to. It would be useful to be able to view it in the more typical darker shades like we had with the 8 bit image and I wouldn’t be surprised if that option returns soon too.
So in conclusion, this is fairly simple to remember as we’re setting the image itself to non-color and the image node that goes into the normal map in the shader editor to ‘non-color’. The only exception i’ve found is that when about to bake and generate the normal map itself, the image node that you have selected to tell Blender to bake to that image can be left at its default ‘color’ setting.
After we’ve created our working normal/bump maps, we’ll probably want to save them so that leads us to…
PROBLEM 3: Which file format/settings are best to use to save the bump/normal maps externally?
As we know, for an ideal texture we need the full bit depth. But what images can we save to and still expect to keep all that data in good shape?
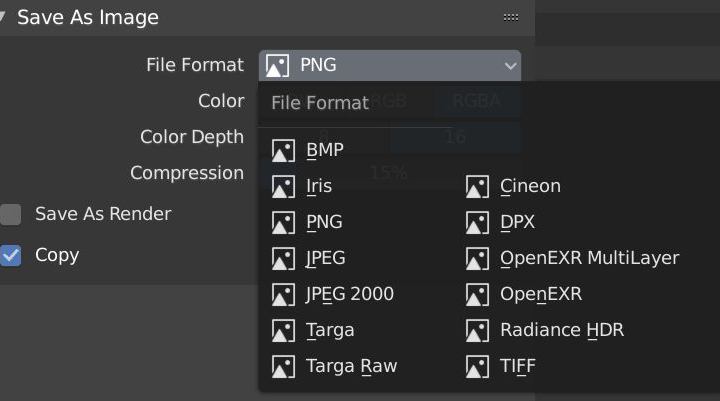
After we’ve generated our normal map, from the image editor we’ll want to go Image > Save a copy… (don’t use ‘save as’ because if you choose the wrong filetype there’s no going back!)
That will show us all our potential filetypes…
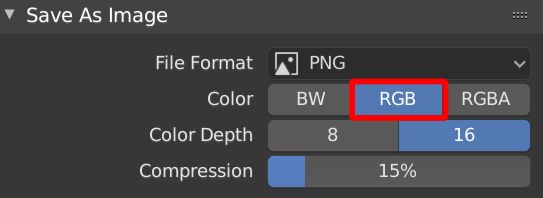
Note we’re only using ‘RGB’ so we’ll be saving using that, ‘RGBA’ would be required if we also want to save out the alpha channel which we’re not doing in these examples.
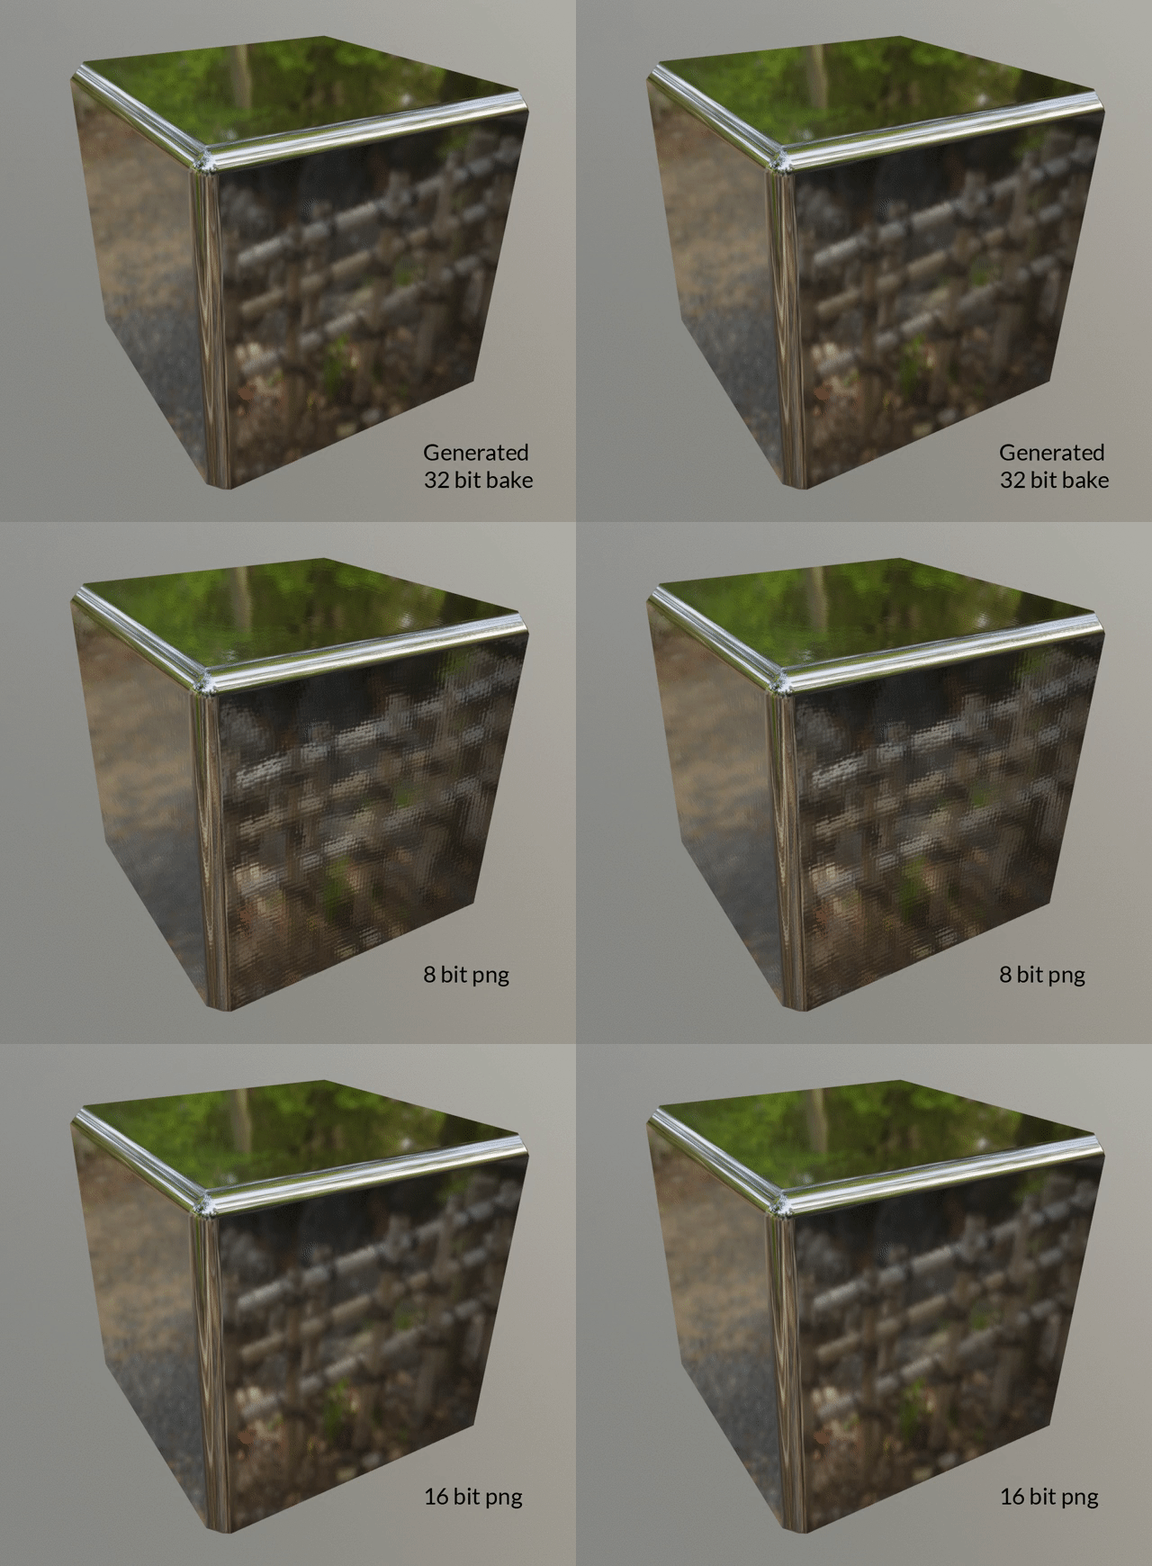
In the below comparison, let’s take a look at using the same normal map that was baked for the cube above (the unsaved generated 32 bit version) compared to the results of saving that out as 8 bit and 16 bit PNGs….
(note : if the gif image above seems to be skipped over, this may be a Firefox issue)
As we can see the 8 bit PNG image shows those artifacts we’ve spotted before, but the 16 bit PNG seems to be almost identical to the full 32 bit generated bake.
I did some further tests and noted some filesizes below. It seems pointless to upload the images and display them here as all 16 bit or above tests looked identical to the generated 32 bit bake too!
(all examples are for a 1024 x 1024 texture size)
8 bit png = 117 KB
16 bit png (default 15% compression) = 1,080 KB
16 bit png (0% compression) = 6,156 KB
16 bit png (100% compression) = 792 KB
32 bit (Full float) OpenEXR (no codec) = 12,305 KB (Largest!)
32 bit (Full float) OpenEXR (Zip lossless codec) = 4,350 KB (Smallest lossless option)
32 bit (Full float) OpenEXR (Pxr24 lossy codec) = 637 KB (Smallest lossy option! Not including 8 bit)
Note for OpenEXR there are even more codecs to try in the pulldown menu, so if space is a concern you may find different codecs squeeze that image file down even smaller and with no noticeable loss of what you need that image to do. Go hunt the best of both worlds!
For the PNG 16 bit file compression can be useful here. The same results but differing filesizes, low compression generates a faster file but at a larger size (nearly 10 times larger!), and vice versa for high compression, something useful to bare in mind if generating lots and lots of frames in an animation as that compressing time can add up!
If for some reason we need the texture in the highest possible fidelity we can possibly save out to, then this is where OpenEXR comes in for full 32 bit juicy potential. Again there is a cost to balance as the filesize is double the size of the uncompressed PNG.
For the codec option we can have ‘none’ for the raw info but that will be the largest filesize available. I’d recommend trying Pxr24 to see if you can get away with a much smaller filesize. I’ve tried this previously and had indistinguishable results from the raw version at a fraction of the size. In fact in this case that ends up being the smallest filesize of them all! (Not including the 8 bit image of course!)
PROBLEM 4: An undesirable sparkly/jagged overly sharp animation
Sometimes the bump node has a kind of look to the shading in Eevee that can be problematic in animations. So we may need to know in those occasions how to swap those bump/height textures out for a normal map instead.
On the left of the comparison there you should be able to make out that sparkly overly sharp look when compared to the right side, especially in the last few seconds. The best bet is to watch in full screen and make sure it’s set to playback at the highest resolution. Otherwise compression might be obscuring the truths!!!
So as shown a height map used for a bump node and that same height map converted to a normal map and then plugged in a normal map node will shade differently. That is something we may need to bare in mind, to the point where we may want to tweak the shader settings, the specularity of lamps and the bump strength to make them look more similar to each other.
So in conclusion, despite the extra care sometimes needed to alter settings and have the normal map give a closer overall result to what we were already getting with the bump node, it’s still worth it for the especially helpful way it can eliminate that overly sparkly/jagged/sharp look.
PROBLEM 5: How to even bake a normal or a bump map anyway?
There are 2 methods I’d like to go over for baking some simple normal or bump maps.
METHOD 1 – BAKING FROM THE SHADER
First let’s take a look at what is probably the simplest. Here I’ve got a simple 2D plane, on that plane is a whole network of procedural textures such as noise texture nodes working together to create the height map going into the bump node for this shader.
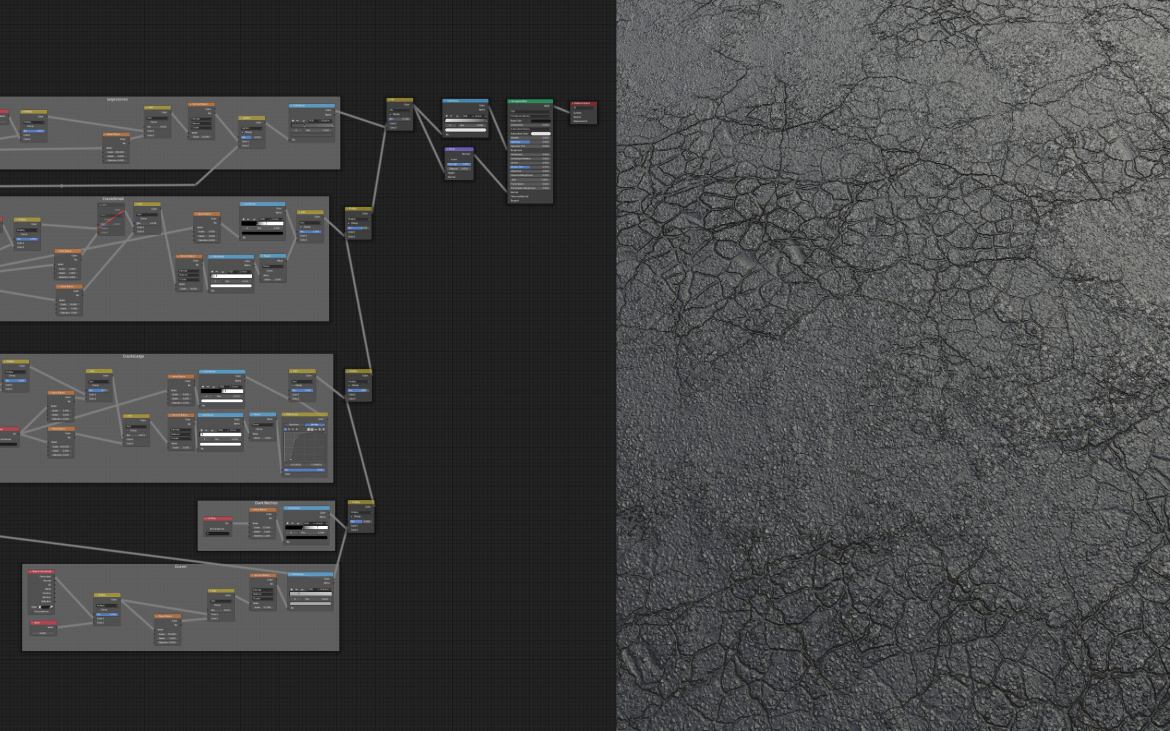
Instead of all those nodes (which create that texture on the right) I want to bake all that bump information down into just 1 single texture.
1. UV Unwrap
We may have some UV’s already which you can check in the UV image editor. However, assuming we don’t for some reason, or they need to be changed let’s head over to the 3d view. While in edit mode, press A to make sure everything is selected and then press ‘U’ for the unwrap menu (see below), for a simple plane several of these options will give us what we need.
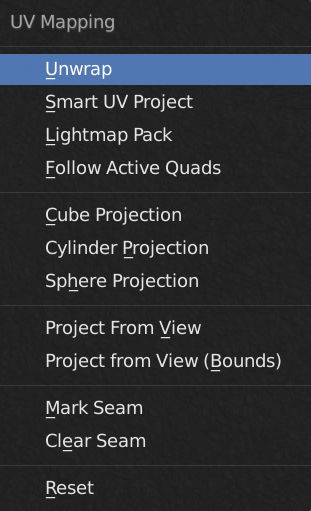
For 3D geometry the ‘Smart UV project’ option is a good one (again which also would work fine for the 2D plane), so if unsure give that a try.
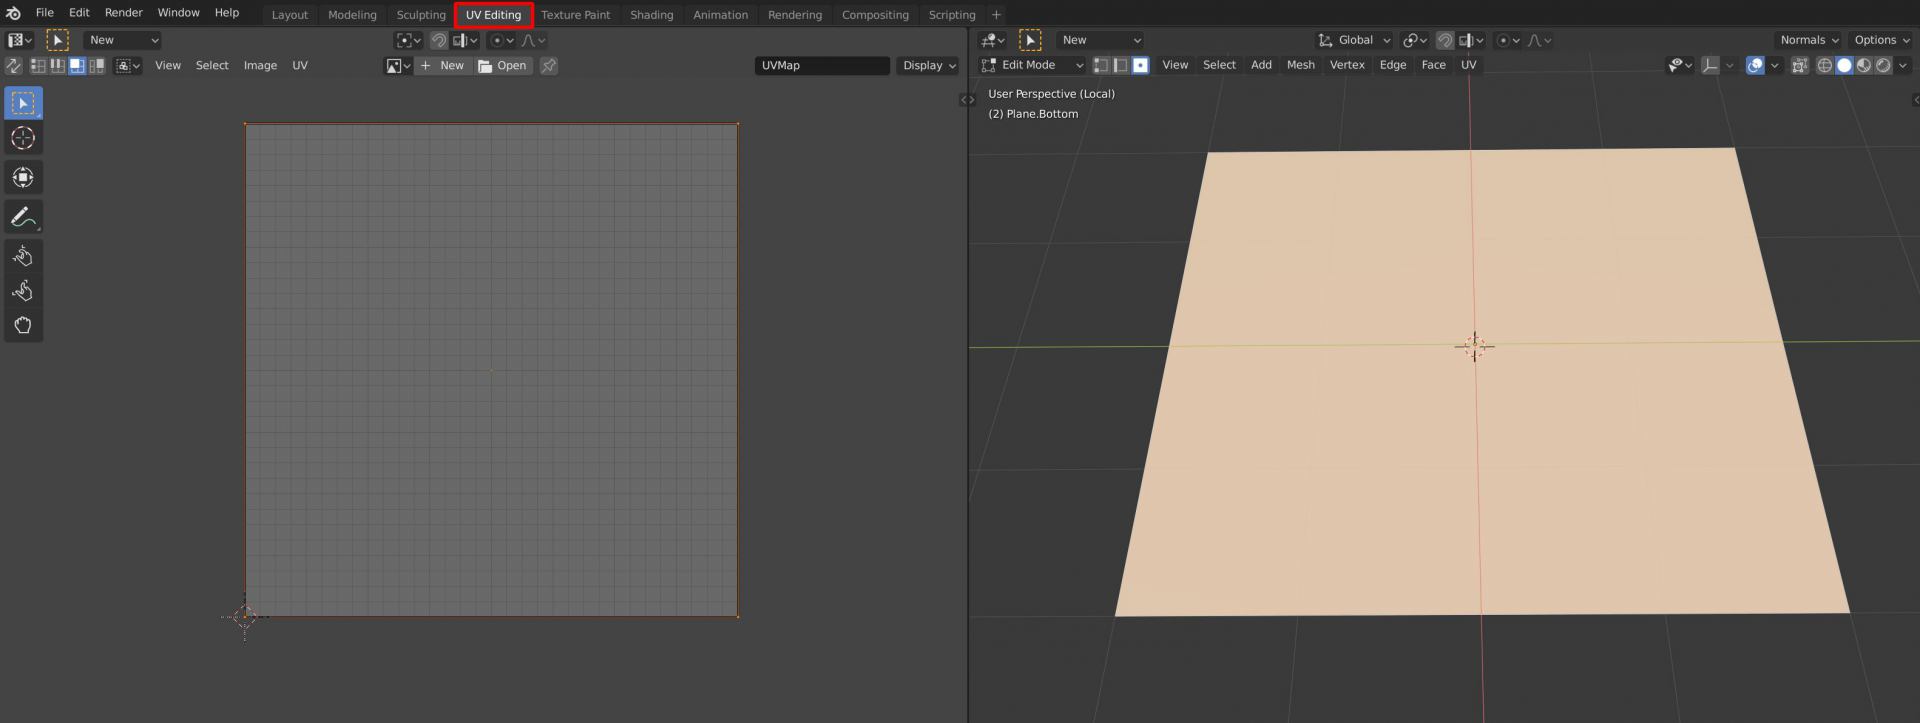
Here notice i’m in the UV Editing workspace and in the uv editor on the left we can see the orange selected outline of the uv’s filling the entire grid space. A simple plane clearly won’t waste any texture space!
2. Create an image to bake to
There are several ways to create images in Blender, let’s do it this time from within the shader editor. I’ll switch the workspace (from UV editing) back again (as the previous workspace had the shader editor on the left) and then I’ll zoom in to get a better look at the nodes and go Shift A > Texture adding in a new ‘Image Texture’ node.
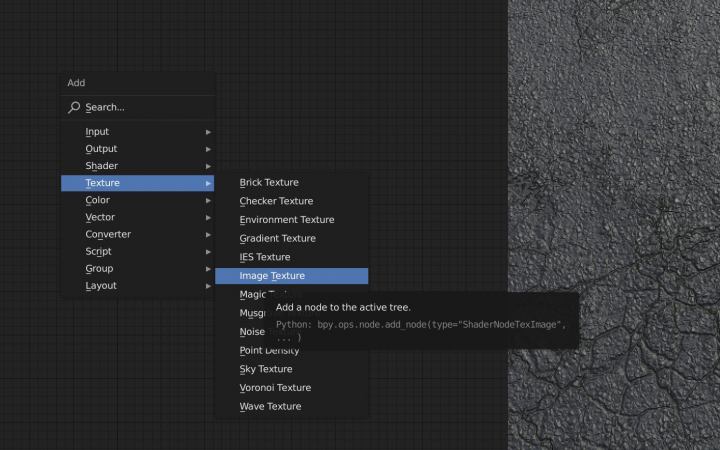
Click ‘New’ on the image node…
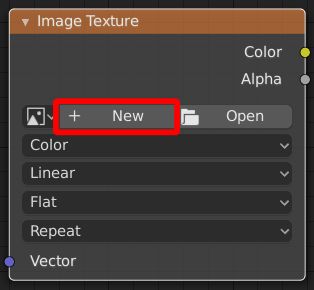
and from there we can name it, set the resolution and choose ‘32 bit Float’.
Once the new image is created, open up the properties sidebar with ‘N’ and find the ‘properties’ section, here we can change the color space from ‘linear’ to ‘non-color’. Note we can confirm this is 32 bit by looking at the checkbox next to ‘Float Buffer’.
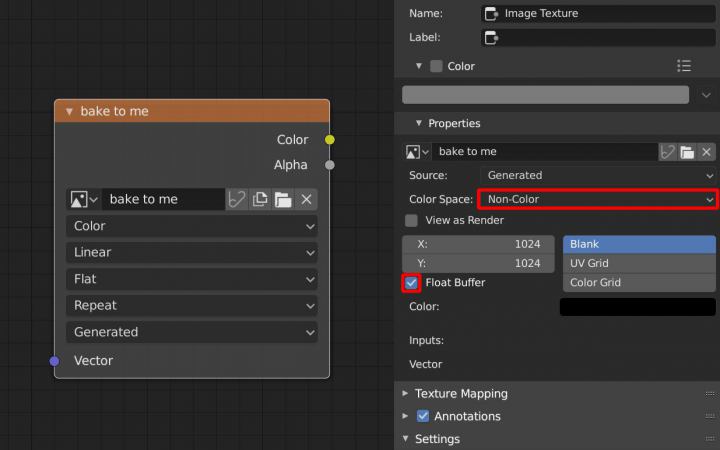
The image node doesn’t need to be hooked up to anything it simply just needs to be present in the shader editor so that we can select it and let Blender know this is the image we want to overwrite when we hit the bake button (in a moment!).
3. Bake
Ok, we’re ready to bake! Eevee doesn’t have options to bake as I write this so in our main properties window on the render settings tab we’ll make sure our render engine is set to ‘Cycles’.
Also on the render tab at the bottom we’ll find the bake settings themselves.
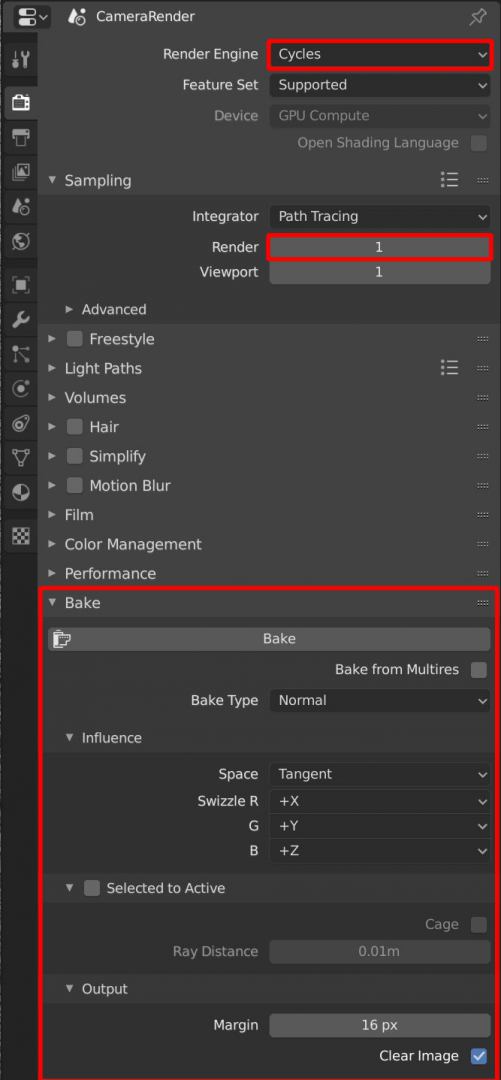
Note also the samples in the sampling section are only set to ‘1’, that’ll be useful in a moment but not relevant while baking our normals.
NORMAL
If I want to bake the bump information of the shader into a normal map, I can keep the shader setup as it is. In the bake settings simply select ‘Normal’ as the bake type.
Then with a quick glance that the correct image node is still selected in the shader editor (the one i’ve called ‘bake to me’ 2 images ago) we hit the bake button.
That’s it!
All’s that’s left is to save the result somewhere. (See Problem 3!)
BUMP
If instead we want to bake the bump information, then we create an emission shader and hook what is going into the bump node up to that emission shader and that would need to hook into the main material output.
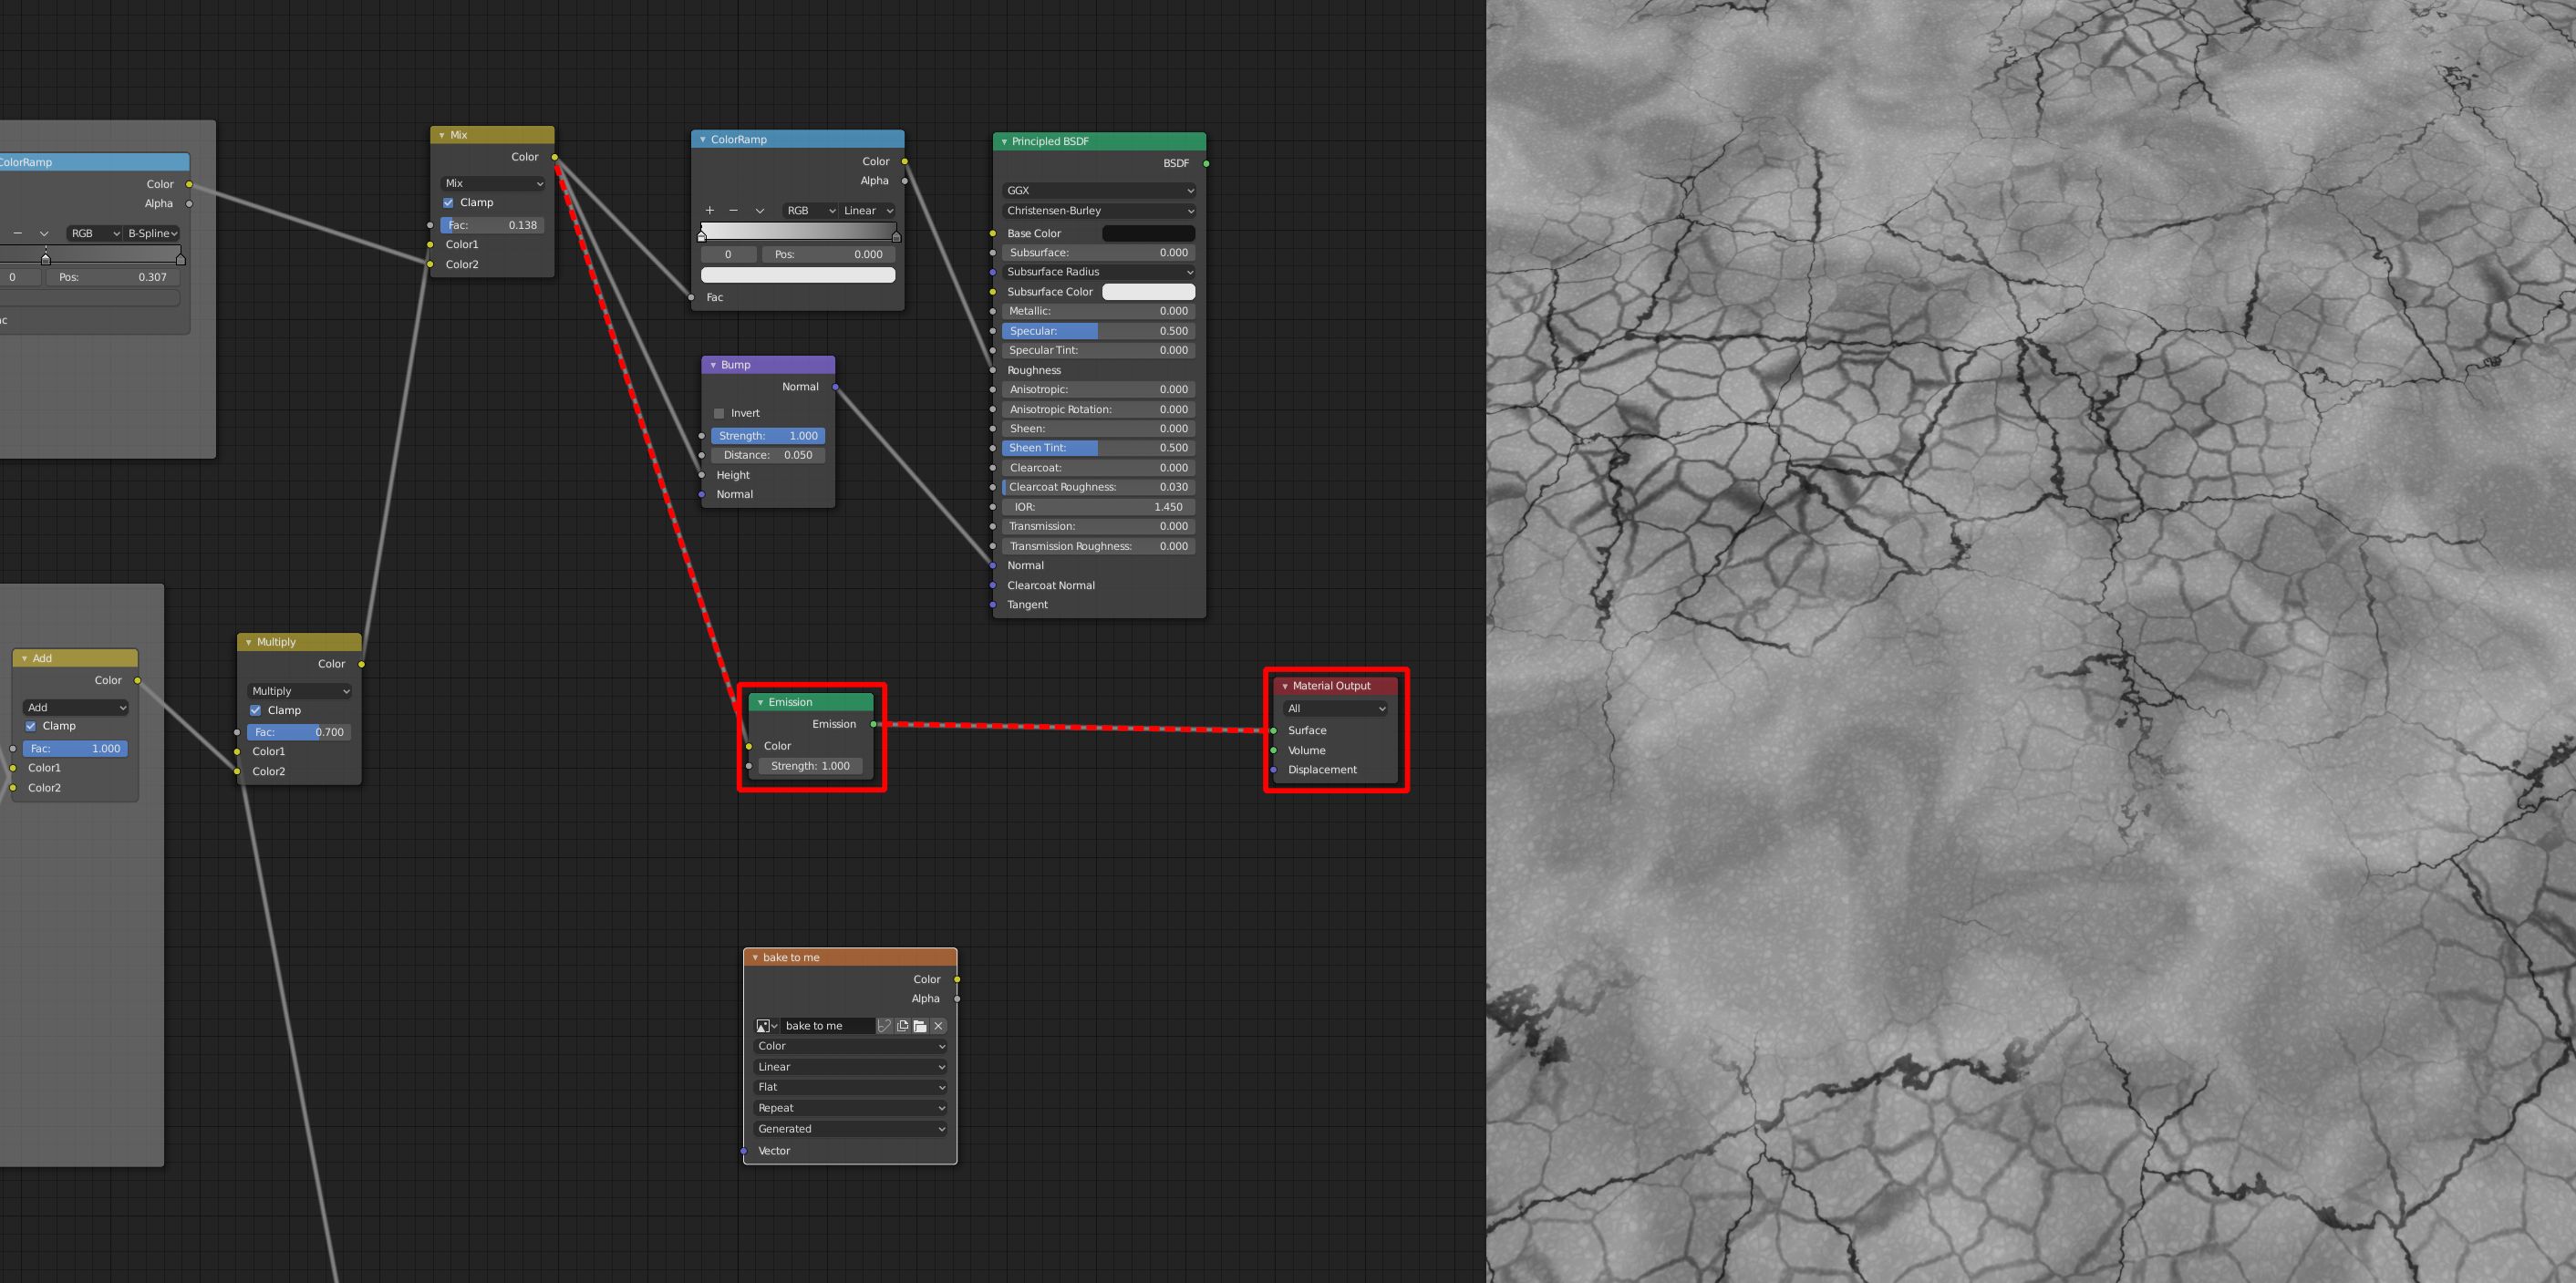
In the bake settings we can then select ‘Emit’ as our bake type and then as before we’re ready to hit the bake button!
Note: Something to keep in mind is that the rendering process for the Emit pass (and several other passes for that matter (but not the normal pass!)) will take the render samples into account. So since we only need one sample for the emit shader to give us everything we need, to save needlessly wasting baking time we can set that down to just 1 pass in our render sampling settings.
METHOD 2 – BAKING FROM ANOTHER OBJECT
The first 2 steps are the same as baking from the shader. So see above for more details.
1. UV Unwrap
2. Create an image to bake to
3. Bake
Here’s where things start to diverge a little, to bake from another object we’ll need to enable ‘selected to active’ in the baking panel and set the ray distance. In this example about 0.2 seems to work just fine. Though if after baking it doesn’t look quite right, try changing this ray distance setting to a higher value.
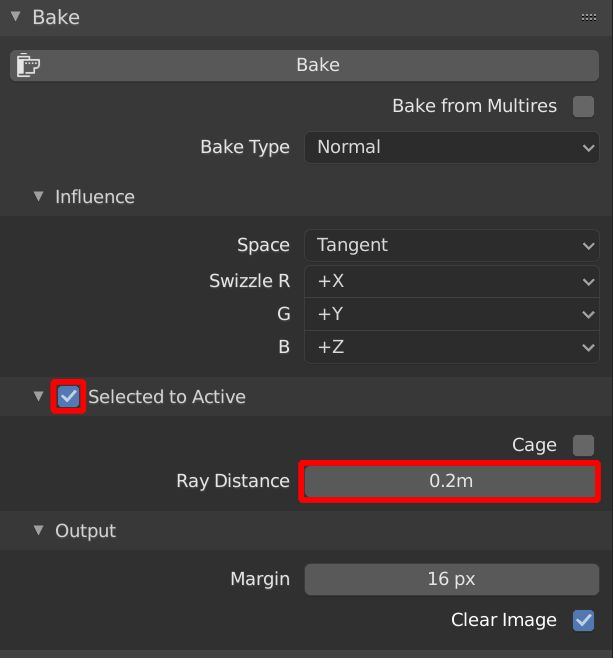
To actually perform the bake we need to select the object we want to bake from (typically some higher resolution mesh) and then shift select the object we’ll be baking to (so that it becomes the active object and therefore our target mesh).
Then as before make sure we have the correct image node selected in the shader editor and then hit that bake button!
It may feel like we’ve covered a lot, I think we should congratulate ourselves on putting in the time to read through all this. Sit back, relax and as a reward I suggest reminiscing about the good old times, like all the stuff we came across in this article. The main takeaways along this adventure were these :
- 8 bit (i.e. the default option) needs to be changed if we’re to get normal/bump maps that are useable in the majority of cases (i.e. shiny and clean and not grungy and rough surfaces)
- When generating your 32 bit float textures for your bump/normal maps, set them to non-color in the image or node editor
- When set to non-color in the image editor color space, the color space setting of the image node in the shader editor can be ignored. This maybe a little buggy though so keep an eye on this.
- If you want the most data of all saving into your image texture then use an openEXR format (Float Full) – Sometimes you can save a lot of space if you try a lossy codec such as Pxr24.
- If relying heavily on bump nodes in Eevee and find there is a lot of undesirable sparkly/jaggedness to the animation then try swapping the bump map out for a normal map.
- Reference for a couple of easy ways to bake out normal/bump maps.
See you out there on the open road to endless 3D possibilities!
Aidy on Twitter – game development veteran and overenthusiastic tutorial maker using a whole lot of Blender and UE4.


Pingback: Procedural Asphalt Texture in Eevee | Blender 2.8 • Creative Shrimp
Pingback: マテリアル (Materials) [Blender] – Site-Builder.wiki
Pingback: テクスチャ [Blender] – Site-Builder.wiki
Pingback: テクスチャ作成/プロシージャルテクスチャ [Blender] – Site-Builder.wiki
Pingback: 法線の取り扱い (Normal) [Blender] – Site-Builder.wiki
Pingback: Tips and intuitive Map Selection - Articles hub
Pingback: テクスチャをベイクする方法 (Bake) [Blender] – Site-Builder.wiki
Pingback: 法線マップをベイクする方法 (Normal Map) [Blender] – Site-Builder.wiki