In this tutorial (video and article) we’ll look at a mix of practical Blender techniques and timeless lighting principles used in cinematic character lighting – things like light direction, falloff, focal length and how to use HDRIs effectively.
Reading time: 15 minutes
Video length: 24 minutes
Introduction
This lighting tutorial is split into two sections:
- The YouTube video – a free chapter of the EEVEE course. A blend between EEVEE techniques and applied lighting foundations
- A written article: general photographic lighting tips and tricks for 3D portraits
Huge thanks to Yaw Onyina for the permission to use his astonishing Tribal Character 3D model (more precisely, .blend file) for this lighting tutorial.
Yaw is a medical doctor, 3D artist and data scientist crafting stunning portraits in Blender.

—
Character Lighting in Blender | EEVEE (4 Difficulty Levels)
—
Lighting Tips and Tricks for 3D Portraits
A theory extract
No matter the render engine – EEVEE or Cycles – here are the character lighting tips that will help you create cinematic-looking portrait shots.
Front light is flat
As a rule of thumb, If the light sits between the camera and the face – directly in line with the camera – the face goes flat. No nose shadow, no cheekbone. Think passport photo, but in the worst possible way. Of course, frontal isn’t always bad – Breezeh built an entire liminal world around the on-camera flash (even though not exactly for portraits).
Usually though, it’s worth moving the key light off-axis. Even a few degrees. Suddenly there’s shape.

Actually, the original light placement in that .blend by Yaw featured exactly that type of light direction. A bit fronty, yet slightly off-axis.
–
Focal length changes the face
It’s a camera decision, not a lighting one, yet focal length (and the distance to the subject) shapes the portrait just as much as where you put the light.
Short focal lengths (12-35mm) usually also means that you pushed the camera closer to the subject. And close cameras distort – the nose gets bigger, the forehead pushes forward and so on. When extreme, you get the potato face.
Long focal lengths (85mm and above) – aka the camera is far away – compress everything. It flattens the spatial relationship between the nose and the ears. It can make faces look more like faces. Arguably, it can look more appealing.

In 3D it’s worth trying different focal lengths, because the same light at 24mm vs 120mm reads completely differently on the face. The shadows and reflections land in different places and so on.
Quick tip: the lens compression effect really clicks when you see it animated. Search for “focal length compression comparison” on YouTube – watching it move can be the aha moment.

—
Big light = soft shadow. Small light = hard shadow
Large area light close to the subject: soft, gradual, flattering shadows. Small or distant light: harsh, crisp, contrasted shadows. For portraits, you almost always want soft. You can always pull back, but start soft.

—
Falloff
When a light is really close to the subject, brightness drops dramatically from face to chest. When it’s far away, everything gets lit uniformly. Neither is wrong! But pushing the light(s) too far away can flatten it out. And we usually try to avoid flat.
A bit of falloff adds life to a render.

—
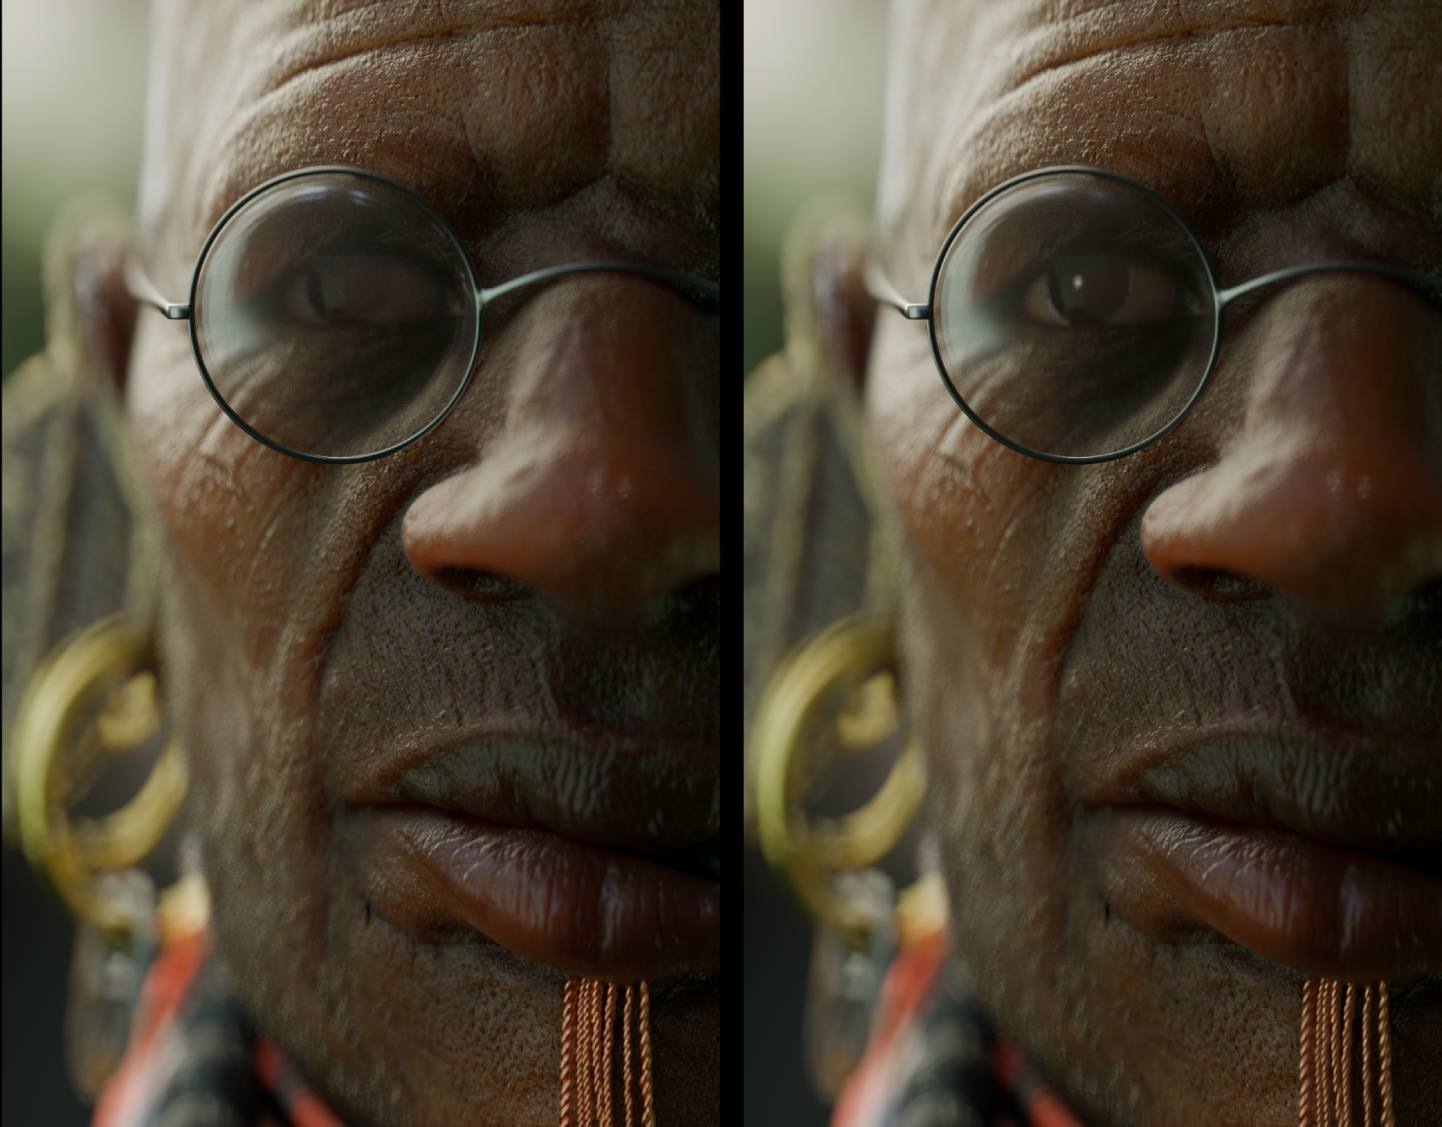
Skin subsurface scattering
Skin isn’t opaque. Light enters the surface, bounces around under it, exits slightly tinted – warm, red. That’s what makes a face look like a face. Without SSS dialed in, no lighting setup in the world will save you. With SSS, even a single-light setup can look gorgeous.

Quick tip: In EEVEE, realtime subsurface scattering work wonders not only for skin, but also for… alien skin.
Or simulating translucency in plants.

—
Try single-light setup
Before lightmaxxing, try nailing a single area light. If anything, it’s a great exercise. Multiple lights can muddy the waters and even fight each other.
Just one light, placed slightly above and to the side, can produce a portrait that blows people away. The shadows – especially the soft shadows – are doing the sculpting.
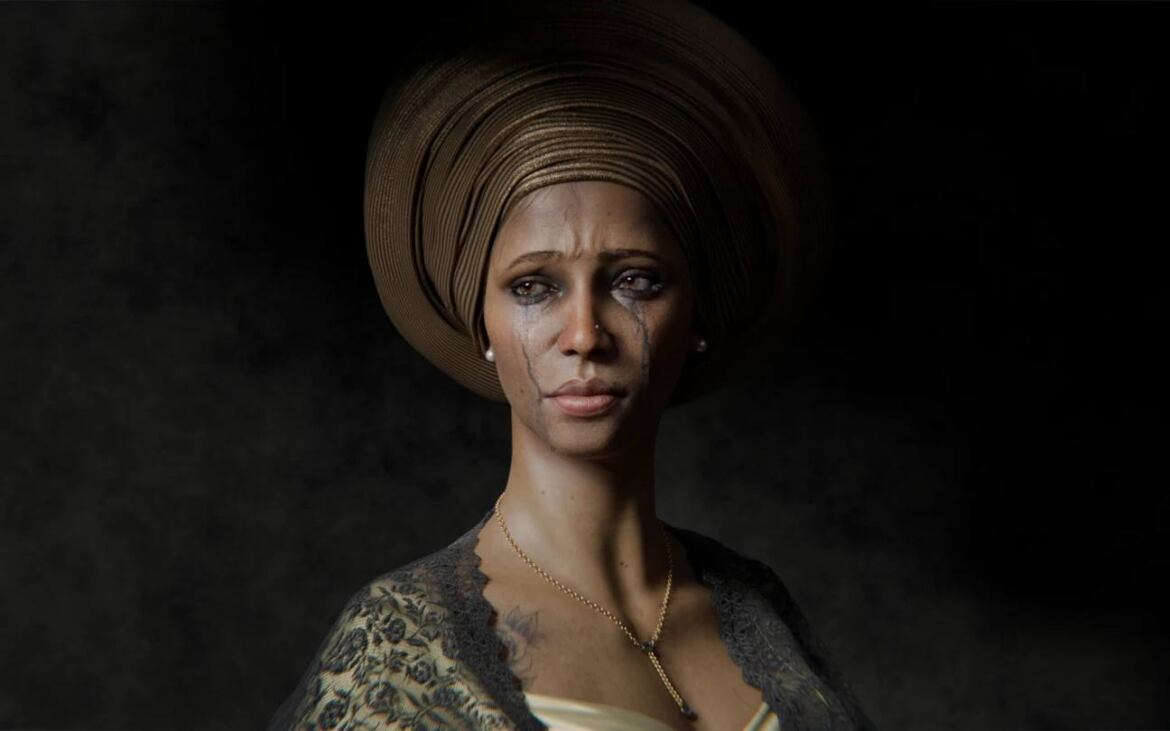
Despair – Portrait by Yaw Onyina
Quick tip: The subtle secondary light bounces created by Raytracing, and SSS add nuance to the single-light schemes. So it’s never truly one-light.
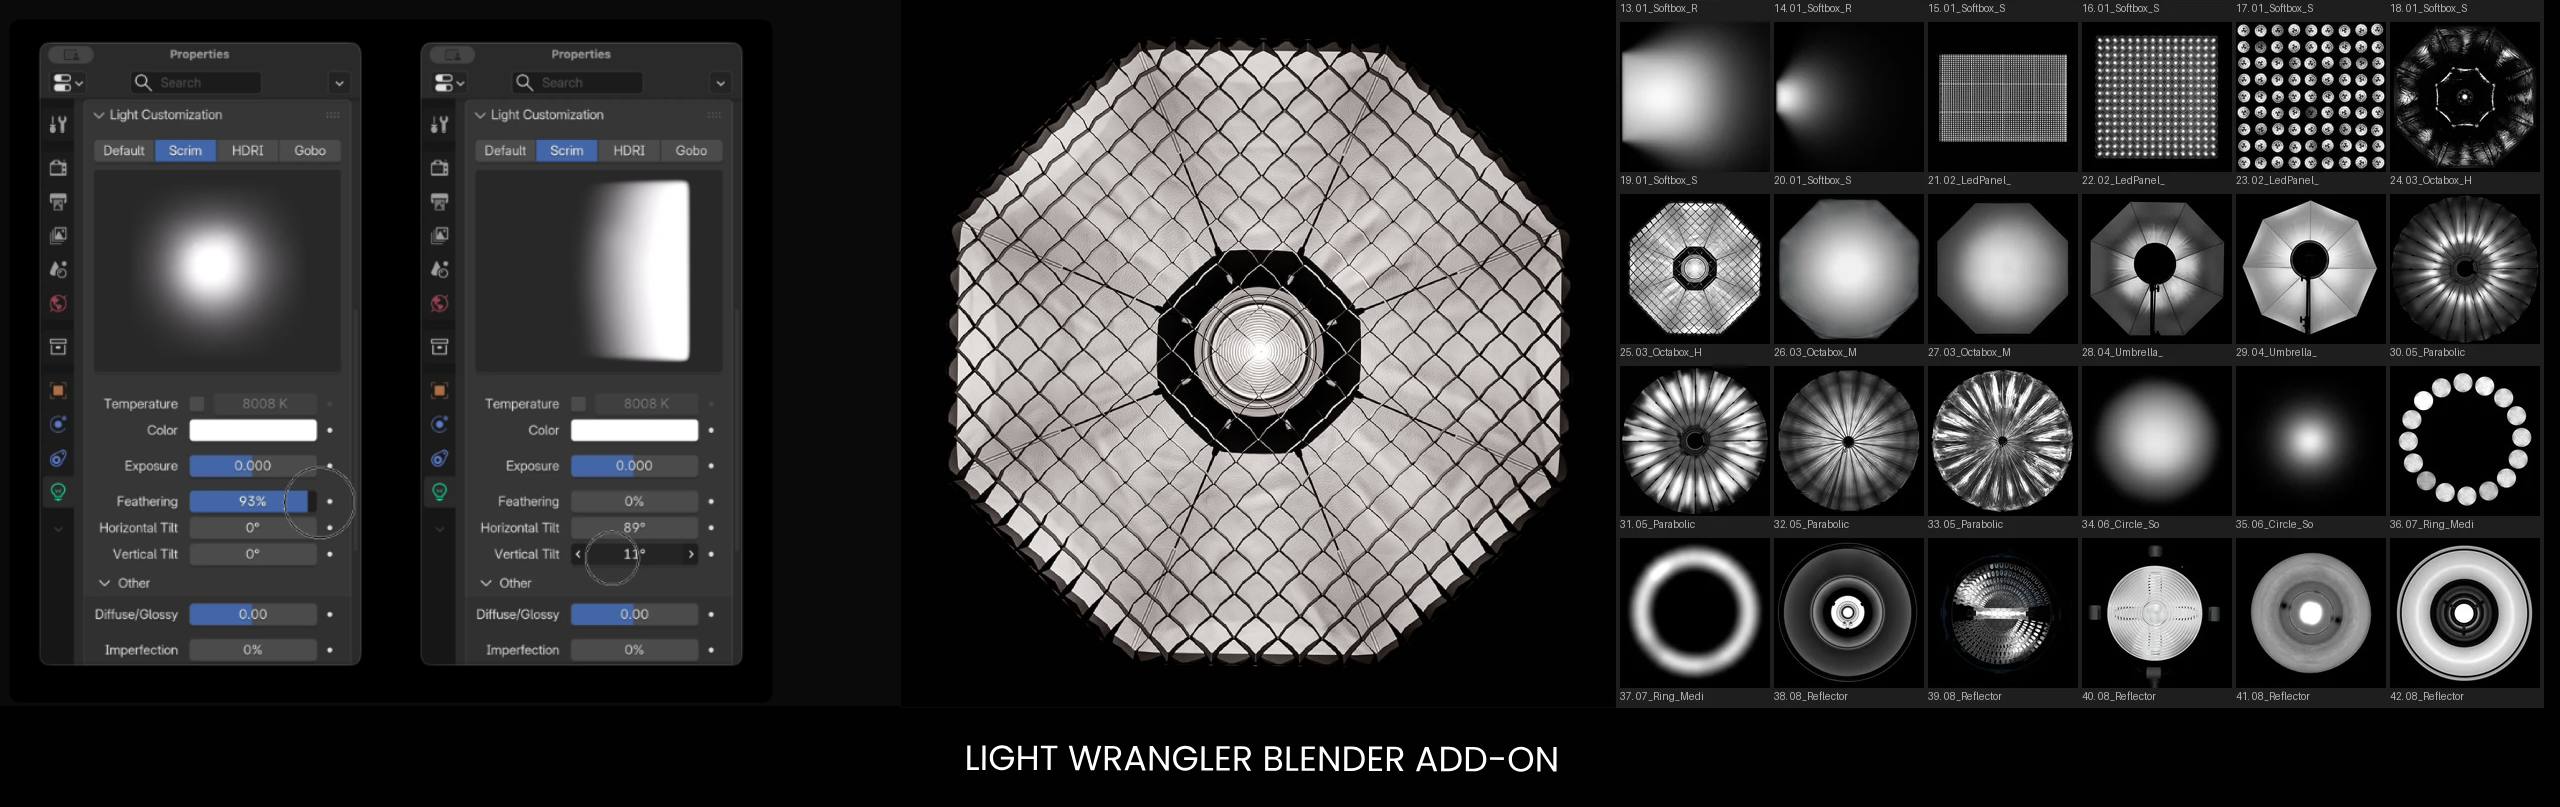
Quick tip #2: not all lights are the same: a gridded studio lights with half-frost diffusion are way different from… some other types of lights. In 3D too. The ‘Single-light’ setups are about light qualities.
There are add-ons for Blender which imitate real-world photographic lamps with different modifiers: grids, various softboxes and so on. Light Wrangler for instance.
—
Choose HDRi with a strong key
When using 360° HDRi environments for lighting your characters, find a strong key light within the HDRI. It can be anything. A big and bright opening in this Hangar HDRi, for instance.
E.g. Choosing this HDRi, I don’t care about airplanes. I care about big bright areas.

That’s your key light. Treat it exactly like positioning a studio light. Spin the panorama until the light sculpts the face from an interesting angle – off-axis, with shape to it. And don’t limit yourself to Z rotation only. Tilting on X or Y can throw up light directions that feel genuinely cinematic.

—
Decouple background and light exposure
Physical accuracy and ‘looking cinematic’ are not the same thing. A physically correct HDRI result often gives you a blown-out backdrop or an underlit face. So decouple them (using the Light Path node) – control the background brightness separately from the light hitting your character.
Slightly muted backdrop, well-lit subject. That’s often the sweet spot. Just don’t push it so far that the shot starts to look lit (as cinematographers say).

It’s a common practice, in cinematography, to expose for the background – to make sure it isn’t blown out, and then push more light onto the talent.
Quick tip: Patrick O’Sullivan channel – Wandering DP has many great lighting breakdowns. “Exposing for the sky” is a recurring topic there.
—
The double HDRI trick
Use one HDRI for the backdrop – the story, the location, the mood. Use a completely different one to actually light the character. They don’t need to perfectly match visually (however, it’s good if they’re in the same ballpark as for their colors). What matters is that the lighting HDRI has good light quality and direction (read: the well-defined key light). A hangar door. An overcast sky. Whatever casts the right shape on the face.
Pick the backdrop for atmosphere. Pick the lighting HDRI for how it sculpts.

—
Match your lights to the environment
When you go Full Cinematic Setup and layer studio lights (all these Blender lights) on top of an HDRI, color match them. Cool environment? Cool lights. Greenish scene? Your fill can be quite green and it’ll sit naturally – the HDRI will motivate it. Sample colours from the HDRI. Use them as your palette.

—
Eye light / Catch light
Add an eye light. Eyes without a catch light can look glassy. A small area light, placed far enough to register as a glint is enough.
—
Add a kicker
A kicker – or backlight, or rim light – is a strong light placed behind and to the side of the character. It traces the edge of the head, the shoulder, the jaw. It helps to separate the character from the background. With it, the subject pops.
It’s not that you always need backlight. But it can be super effective. The trick is motivation. The kicker needs to feel like it could exist in the scene – a window behind the character or just a bright spot on the backdrop.
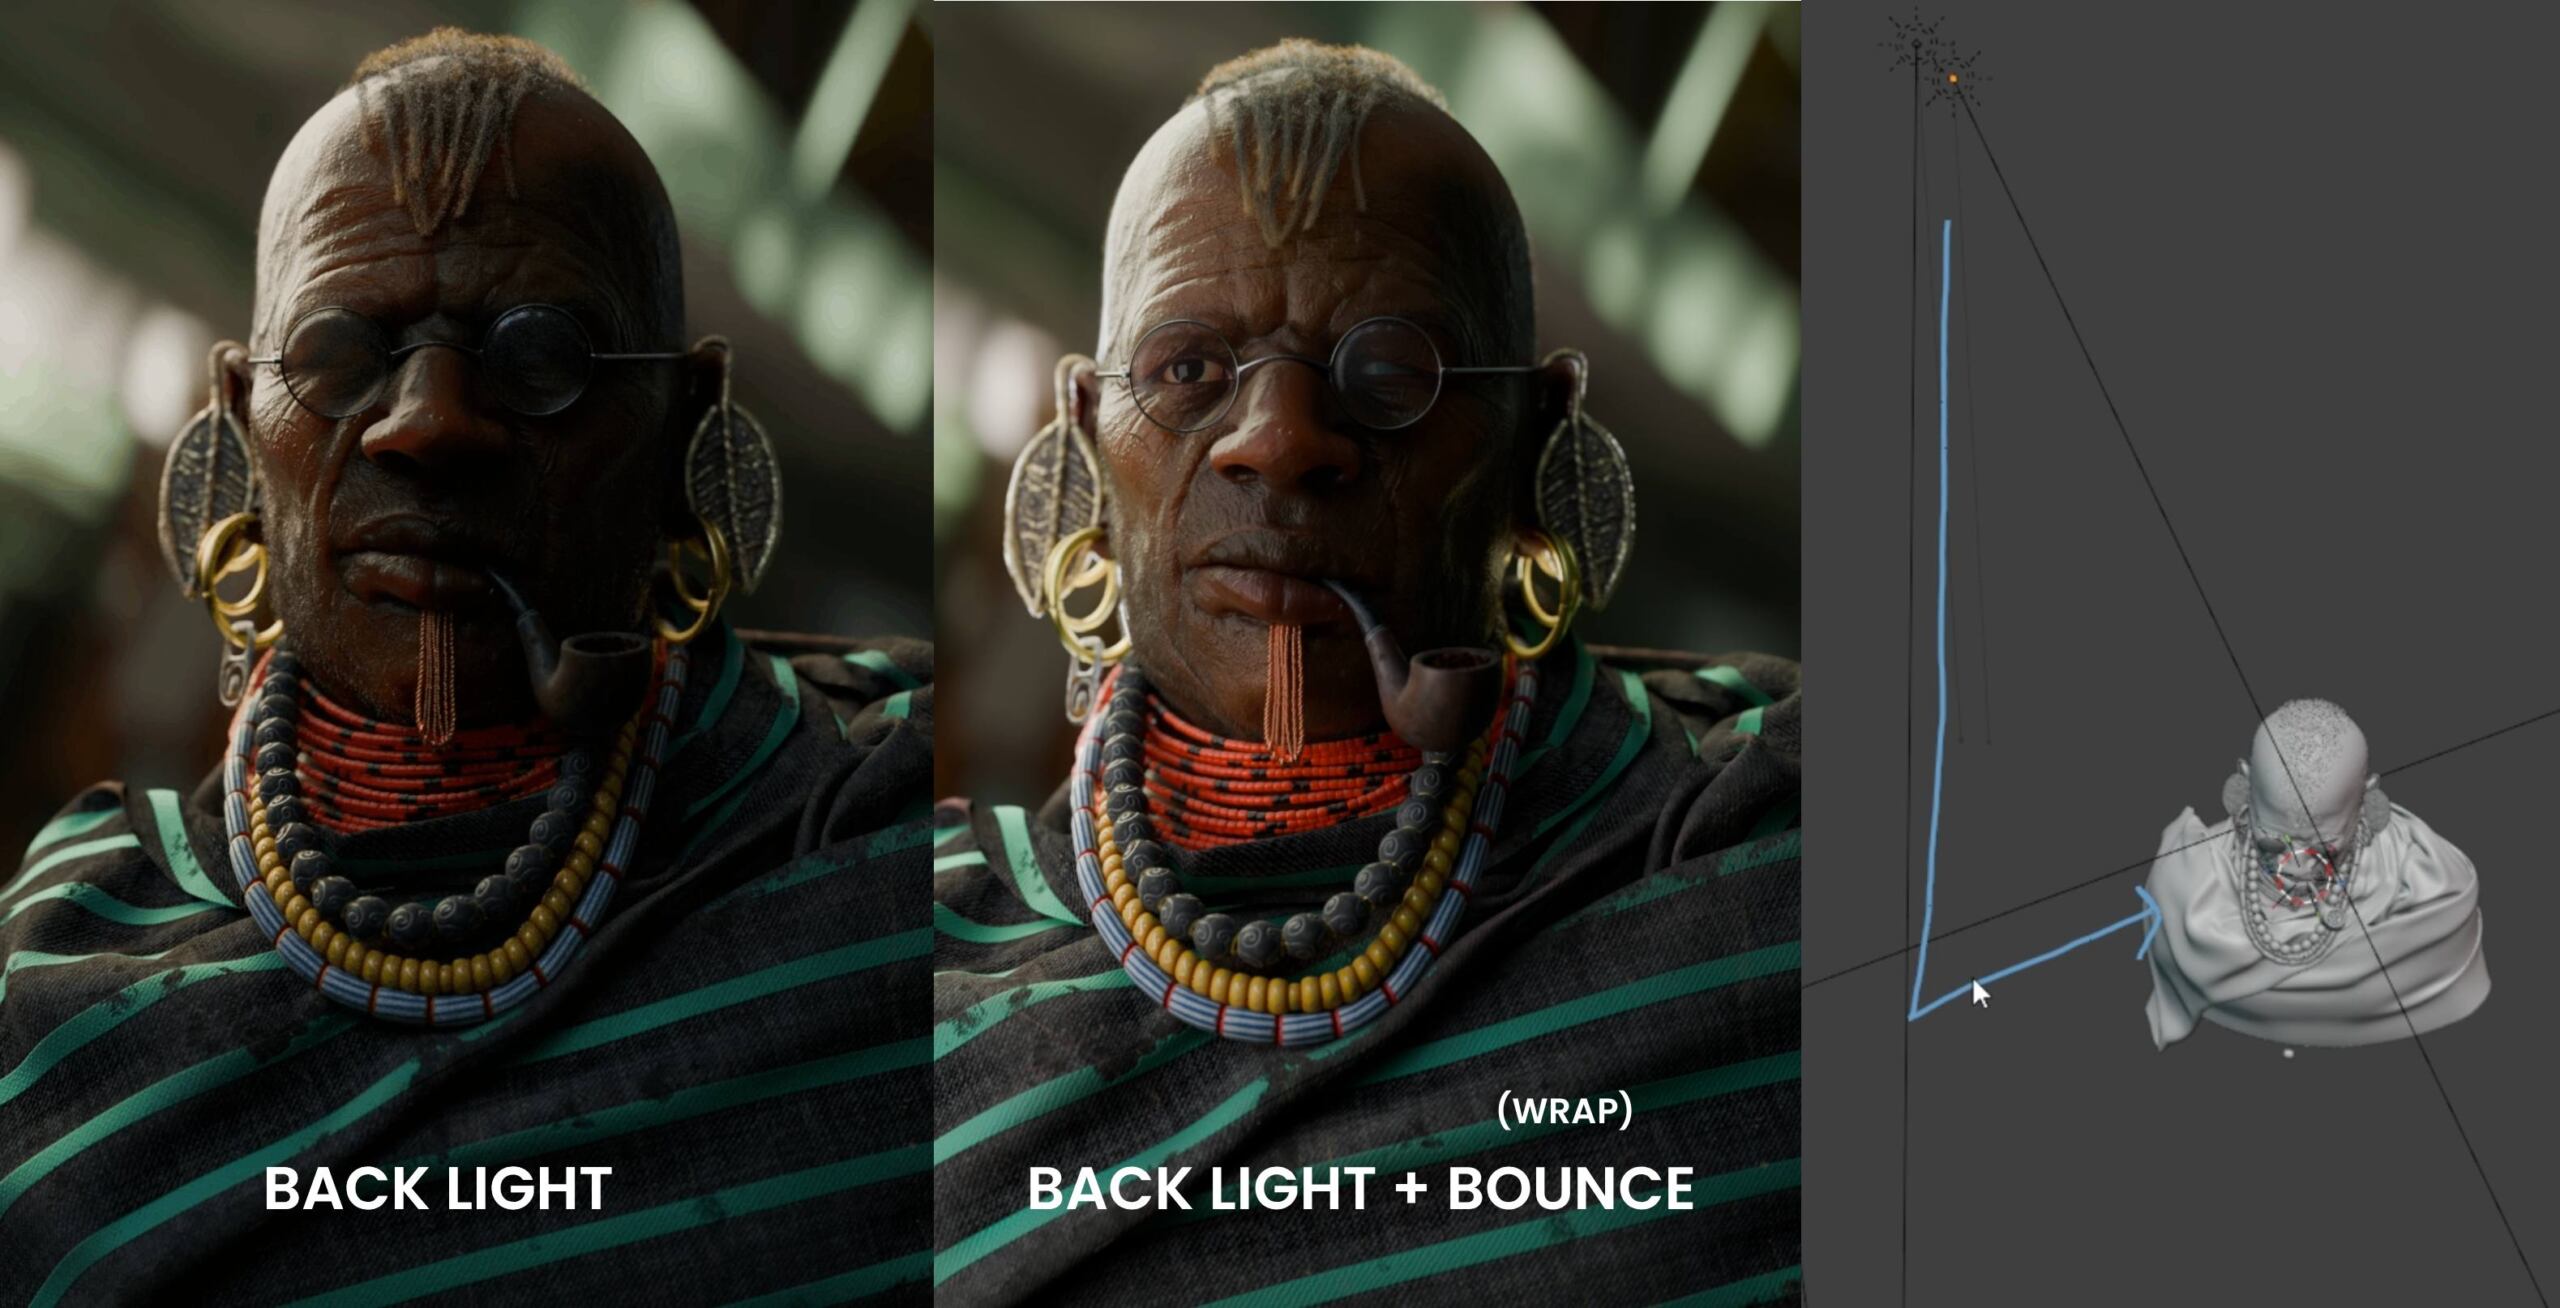
You can even start with the backlight – making it a Reverse Key Light setup. And then wrap the light around the back of the head, onto the face, using a bounce card or an area light.
The trick is motivation. The kicker needs to feel like it could exist in the scene – a window behind the character, or just a light blob in the background plate.
Quick tip: It works beautifully in real-world cinematography, outside CG, when you have just one lamp, but still want to have both the kicker and the key light.

—
Haze
A thin layer of volume scatter gives the scene depth in a way that’s immediately cinematic. My outie is a cinematographer and he’s very generous with using haze machines on set. Haze helps to pop the character out of the background.

—
Shallow Depth of Field
Adding depth of field can help make a portrait feel more photographic and dreamy.
A very shallow depth of field (low f-stop, say f/1.4–f/2 or in Blender, or even crazy low values like f/0.1) puts almost – everything except the tiny sliver of depth – out of focus. It can look truly cinematic.
Experiment with the bokeh ratio for vintage lens weirdness or an anamorphic squeeze.

—
Post-pro and Color Management
Not a part of lighting per se, post-pro and color management settings are not to be neglected.
View Transform in the Color Management settings: AgX or Filmic are solid defaults. ACES 2.0 has more punch and contrast. Avoid anything that oversaturates highlights if you’re going for photorealism – Khronos PBR works well for product shots where you need to preserve brand colors, but tends to make skin look like it’s been Instagrammed.

Film grain / sensor noise: a small amount grounds the image. Like It’s the silver halide reacting to light thing. Chromatic aberration: Tiny amounts only – just enough to push that ‘analog photography feel’ further.

—
Start with one light. Get it right first.
Everything above is additive. A single well-placed light with decent SSS settings – or a single HDRi rotated the right way – will beat a messy ten-light rig every time. Learning the fundamentals – direction, size, falloff, skin response is still what makes a portrait work.
Once that foundation is nailed, adding extra lights becomes a creative choice rather than trying to fix a flat-looking image.
Actually the light setups in Yaw Onyina’s character portraits are usually quite simple – yet they work beautifully. Not least because the models themselves are exceptionally well made – but tsss… that’s another story.


Desheveled Sailor by Yaw Onyina – 3d Generalist and Medical Doctor
—
Bonus EEVEE tips
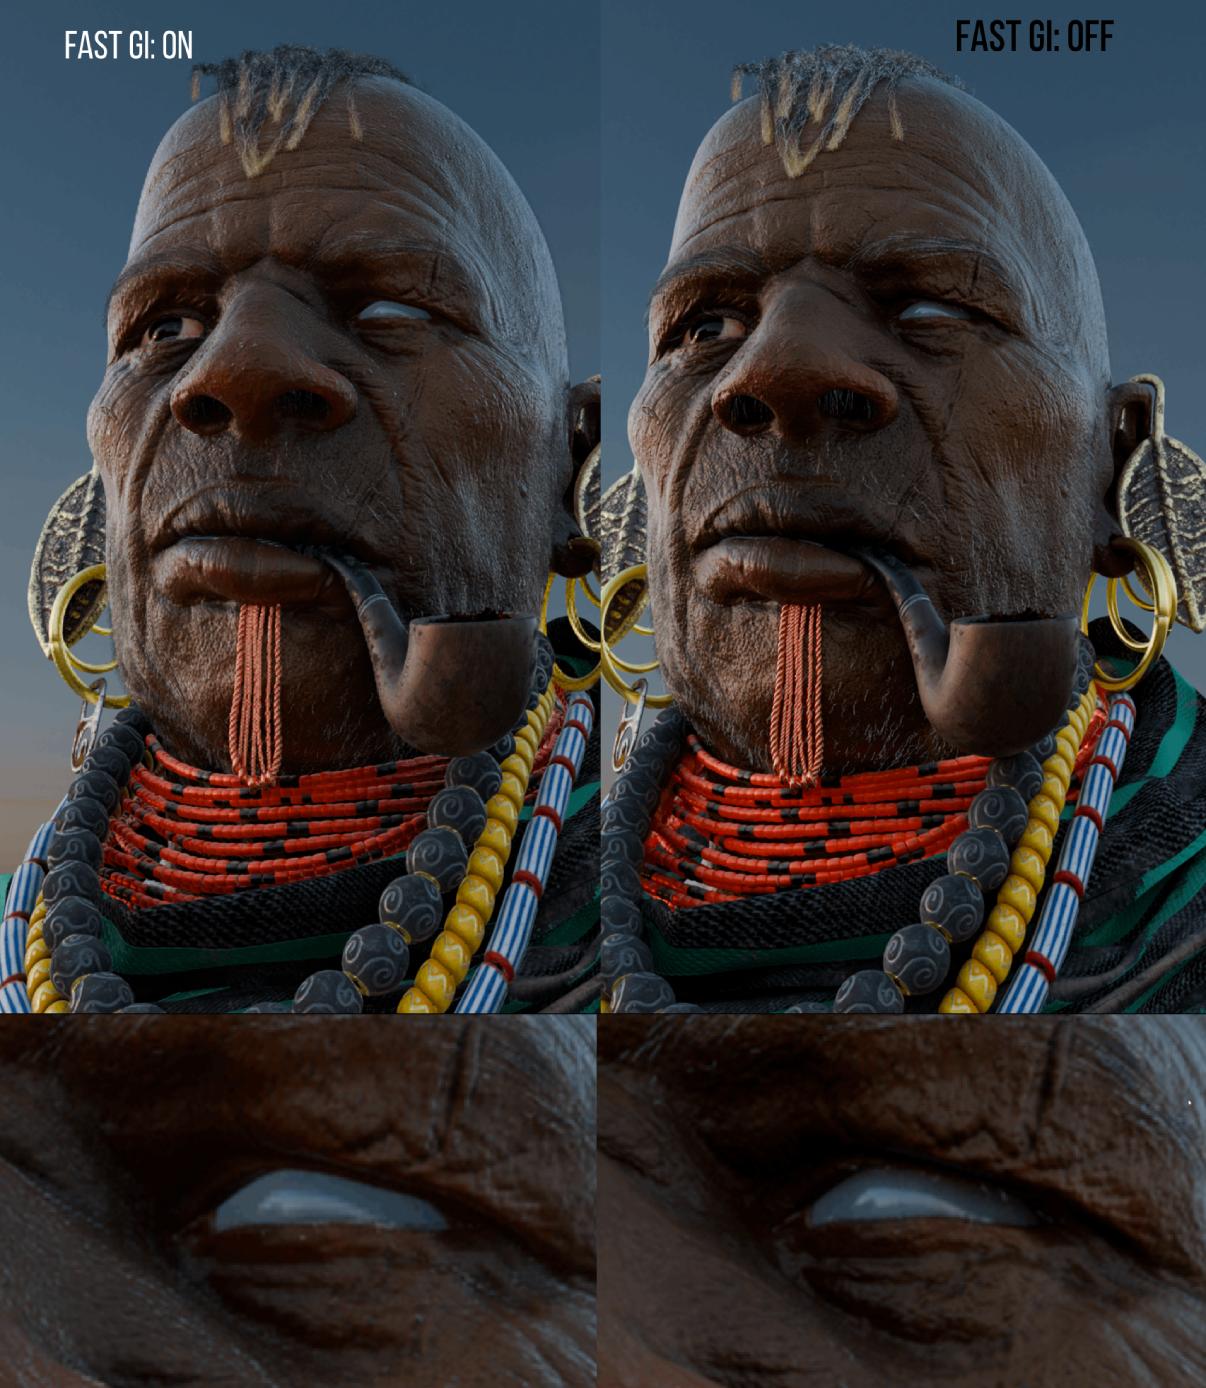
Turn off denoising and Fast GI for portrait work
Two Eevee render settings that quietly ruin HDRI portrait quality: denoising and Fast GI approximation. Denoising smooths things out, but it also smears fine detail – skin pores, hair strands, contact shadows. Switch it off and the image gets crispier in a good way.
—
Environment Shadow Threshold
Fine tuning the Shadow Threshold in the Environment settings can have an interesting effect. Higher threshold means softer, more ambient lighting. And lower threshold means harsher shadows.

—
Shadow jitter: the microshadows
When you use a soft area light, turn on shadow jitter – both in the light settings and in the global render settings. Without it, you lose the tiny shadows under the nose, along the eyelids, beneath the chin and so on. Those microshadows are what make a face look… more photographic.
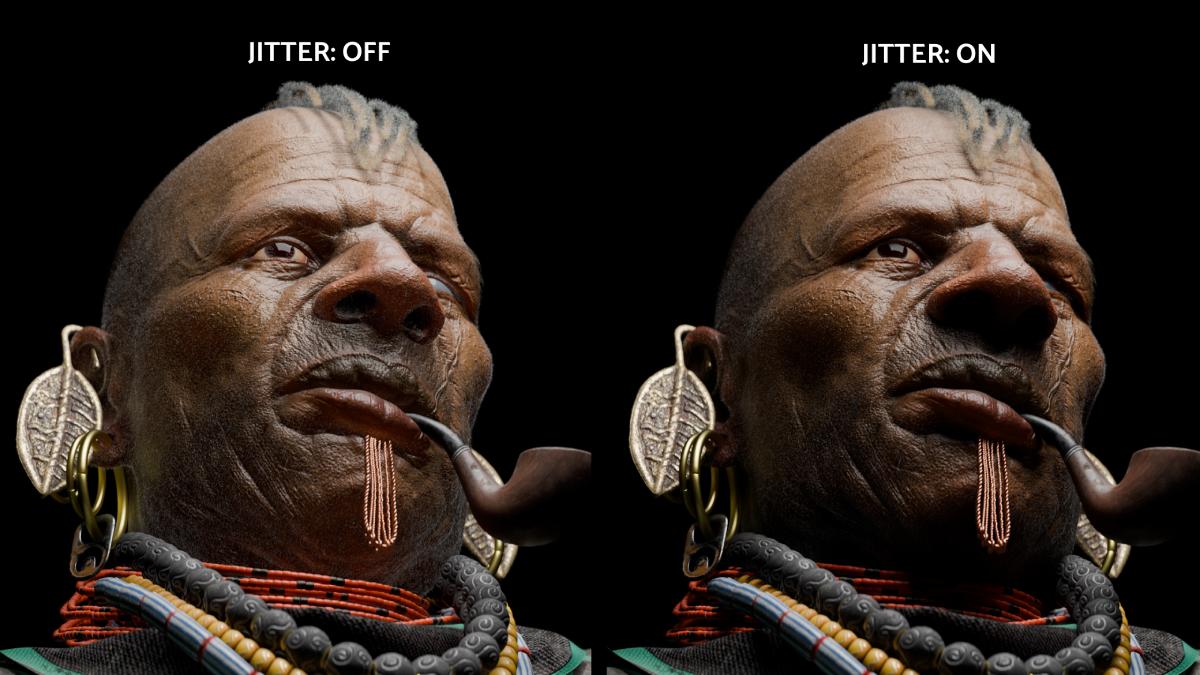

For sharp, small light sources like a sun lamp, jitter doesn’t matter as much – it’s the big soft lights where you really feel the difference.

—
Links and Resources
HDRIs and Textures
Free CC0 HDRIs up to 16K. One of the best sources for lighting environments (used throughout the video – South Africa outdoor, workshop interior, hangar).
Blender
EEVEE
EEVEE Realistic Lighting and Rendering course
Post-processing and Color Grading
Free minimal post-processing setup for Blender’s compositor
Courses
CreativeShrimp.com/courses – Deep-dive Blender courses on Eevee, photoreal lighting, and rendering. That’s us 🙂
Cinematography
Wandering DP – cinematography lighting breakdowns
Lighting Techniques
Reverse Key Lighting – Creative Shrimp tutorial
Light Falloff – Creative Shrimp short
Photography Inspiration
Breezeh – flash photography aesthetic (liminal walks)
Hyperrealist Art Inspiration
Books
Direction and Quality of Light – Neil Van Niekerk
Commercial Photographer’s Master Lighting Guide – Robert Morrissey
Light Science and Magic – an Introduction to Photographic Lighting – Fil Hunter
Master Lighting Guide for Portrait Photographers – Cristopher Grey
Credits
Yaw Onyina – the author of the Tribal Character model
Photontown Studio – Omar Hewady and Ahmed Naguib’s studio. Facial animation specialists. They made the animation in this video and honestly, they nailed it.
