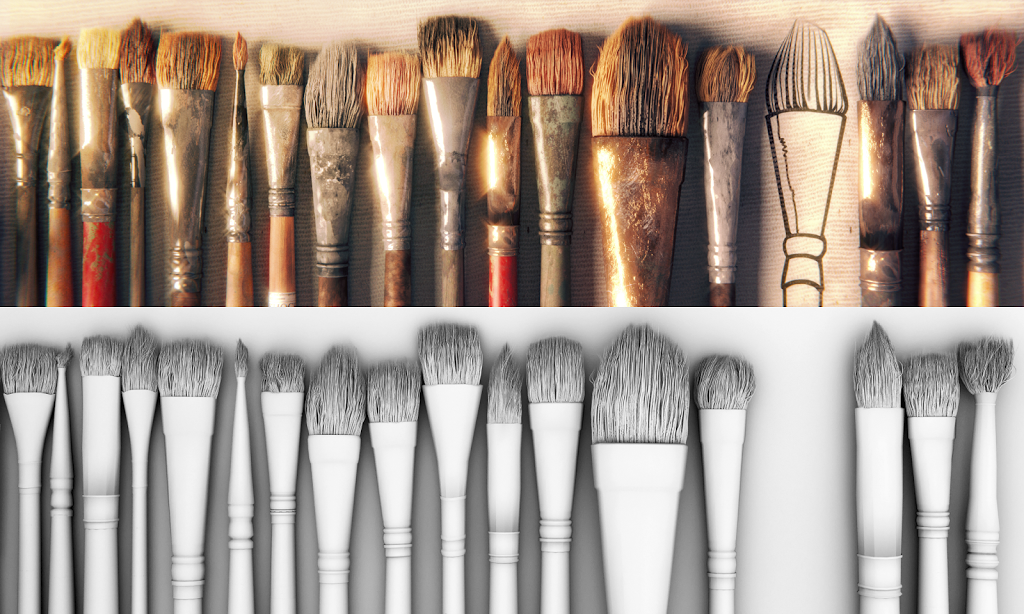
Render that pretends to be a photo
Gleb Alexandrov here and it’s time for another Making-of. Today we’re going to talk about “The Brushes” – still life render which pretends to be a photo.

[icon icon=”star”] Featured in official Cycles Demoreel 2014
[icon icon=”star”] Excellence award on 3dTotal
[icon icon=”star”] Render of the Week on Blendernews
[icon icon=”star”] Featured at Blenderartists Forum Gallery
This time, the idea wasn’t preceded by a concept painting. It came purely from aesthetic experience.
There is a jar with brushes on my table. It’s so routine and usual that it’s almost invisible. But once I noticed something unusual about it. At this time of the year, about 11 o’clock in the morning sun peaks through my window. One day brushes were lit so brightly and looked so joyful that in that instant rather dirty jar became something worth rendering.
[toggle title=”Show wireframe”]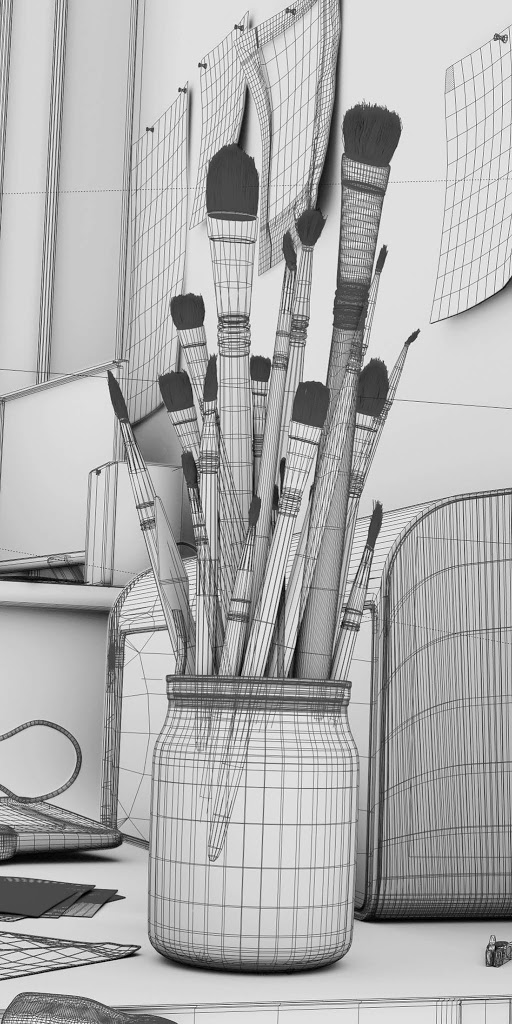 [/toggle]
1 Blocking out the scene
In terms of modeling the scene is quite simple, nothing to brag about. I’ve started with blocking out the basic shapes – this is very important stage of the production. Better get it right now, while the scene is light and easy to manage.
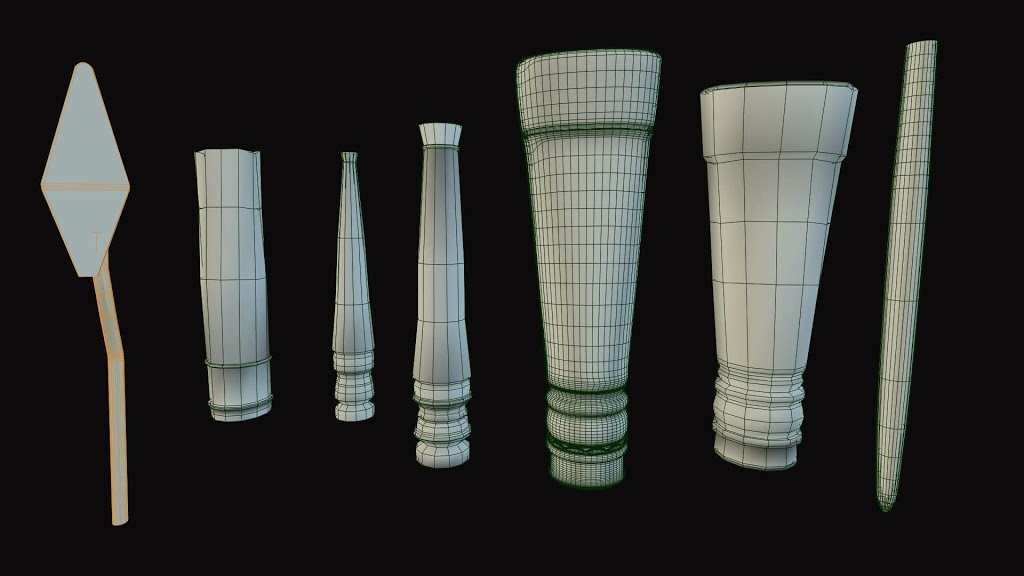
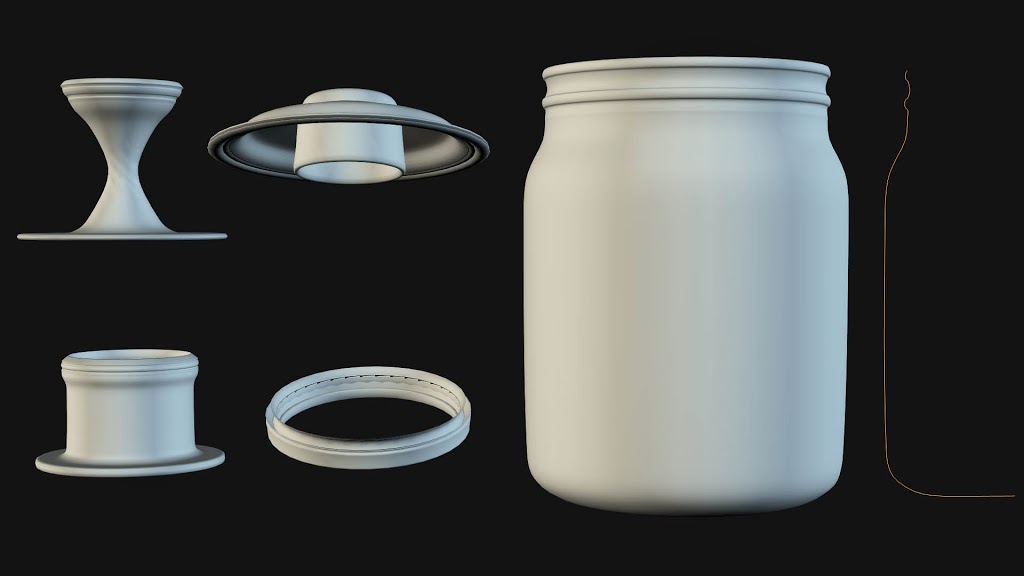
Screw modifier makes wonders, really worth learning.
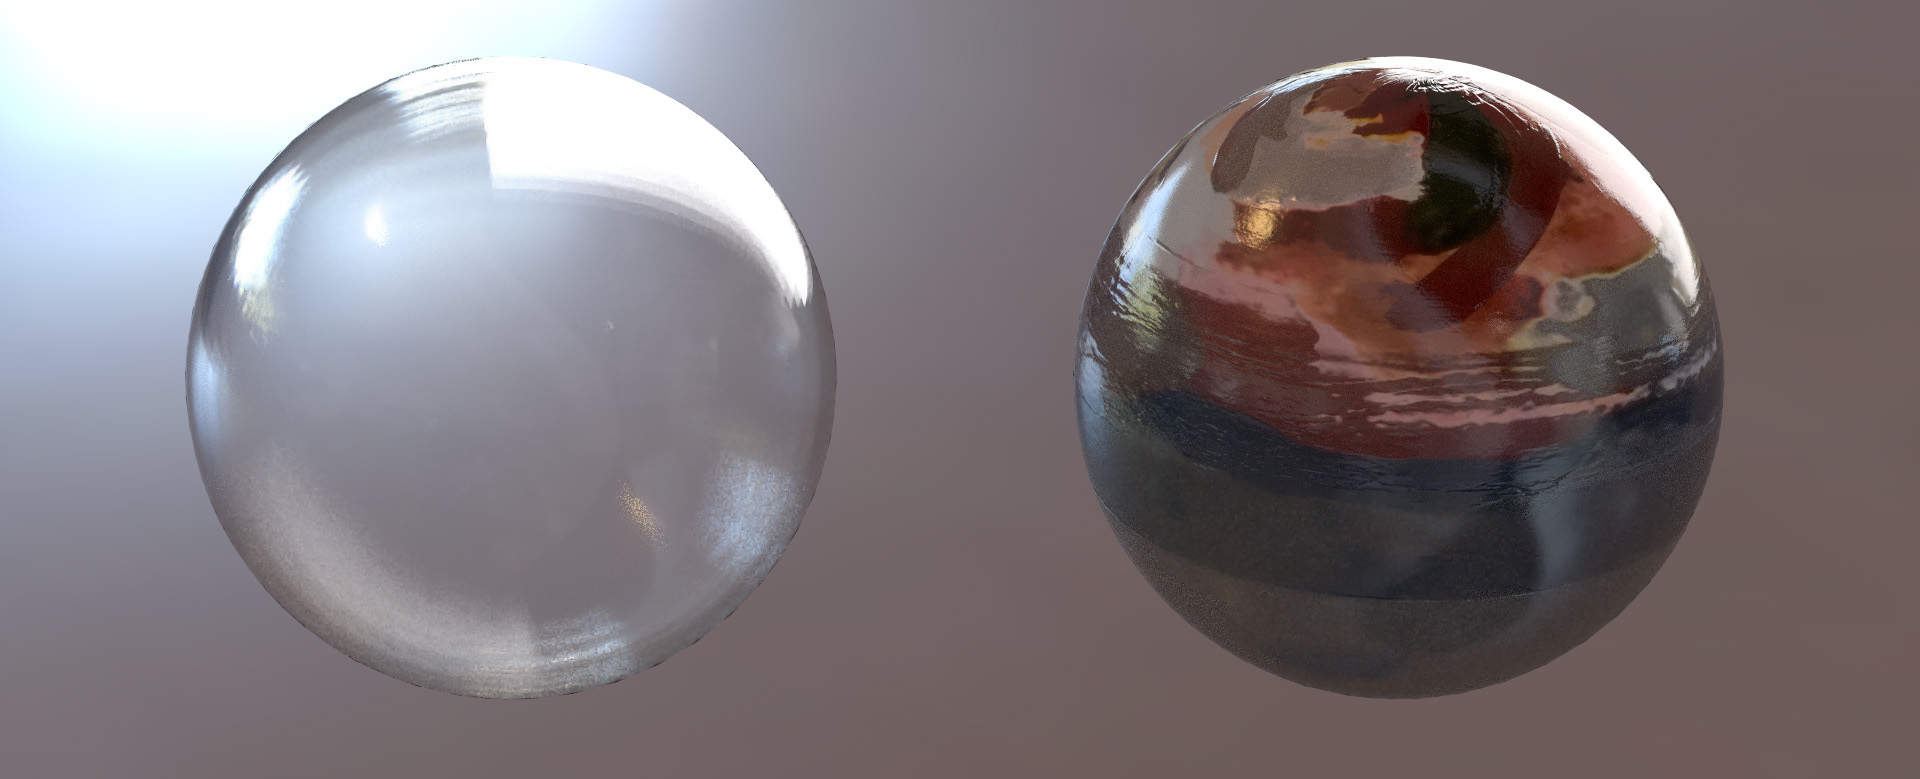
2 Basic materials
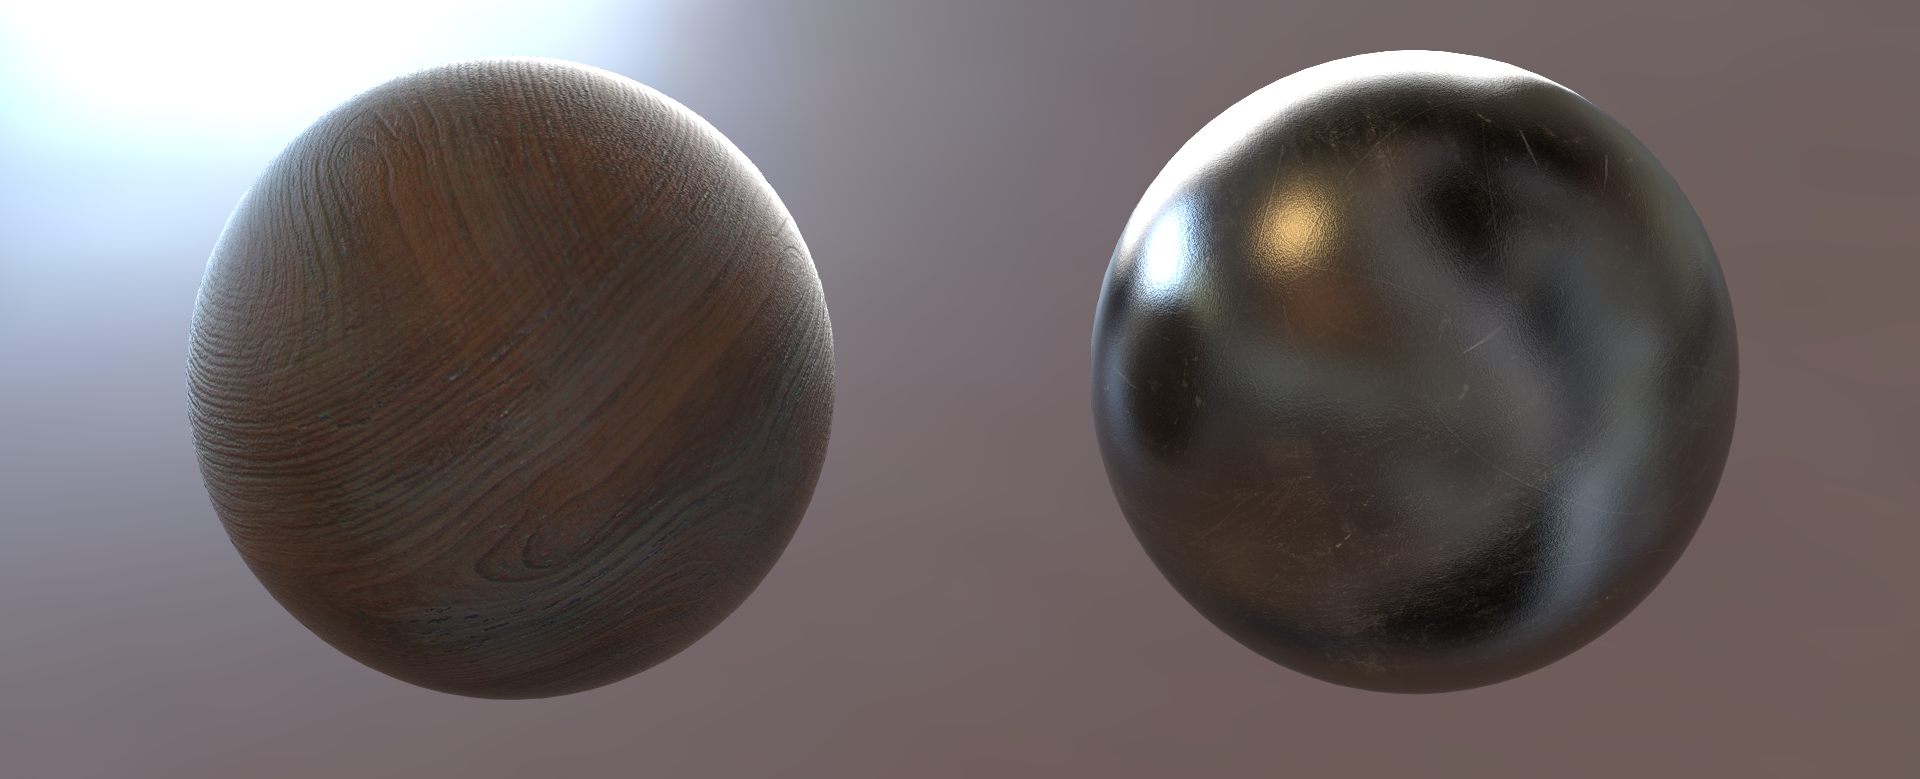
During the the block-out phase simple materials were used. Typically, they consisted of just 1 seamless texture and were quite primitive in terms of shader complexity: just the mix between diffuse and glossy.
So, 1 mix shader and 1 texture is enough to represent the main qualities of wood (steel, glass)
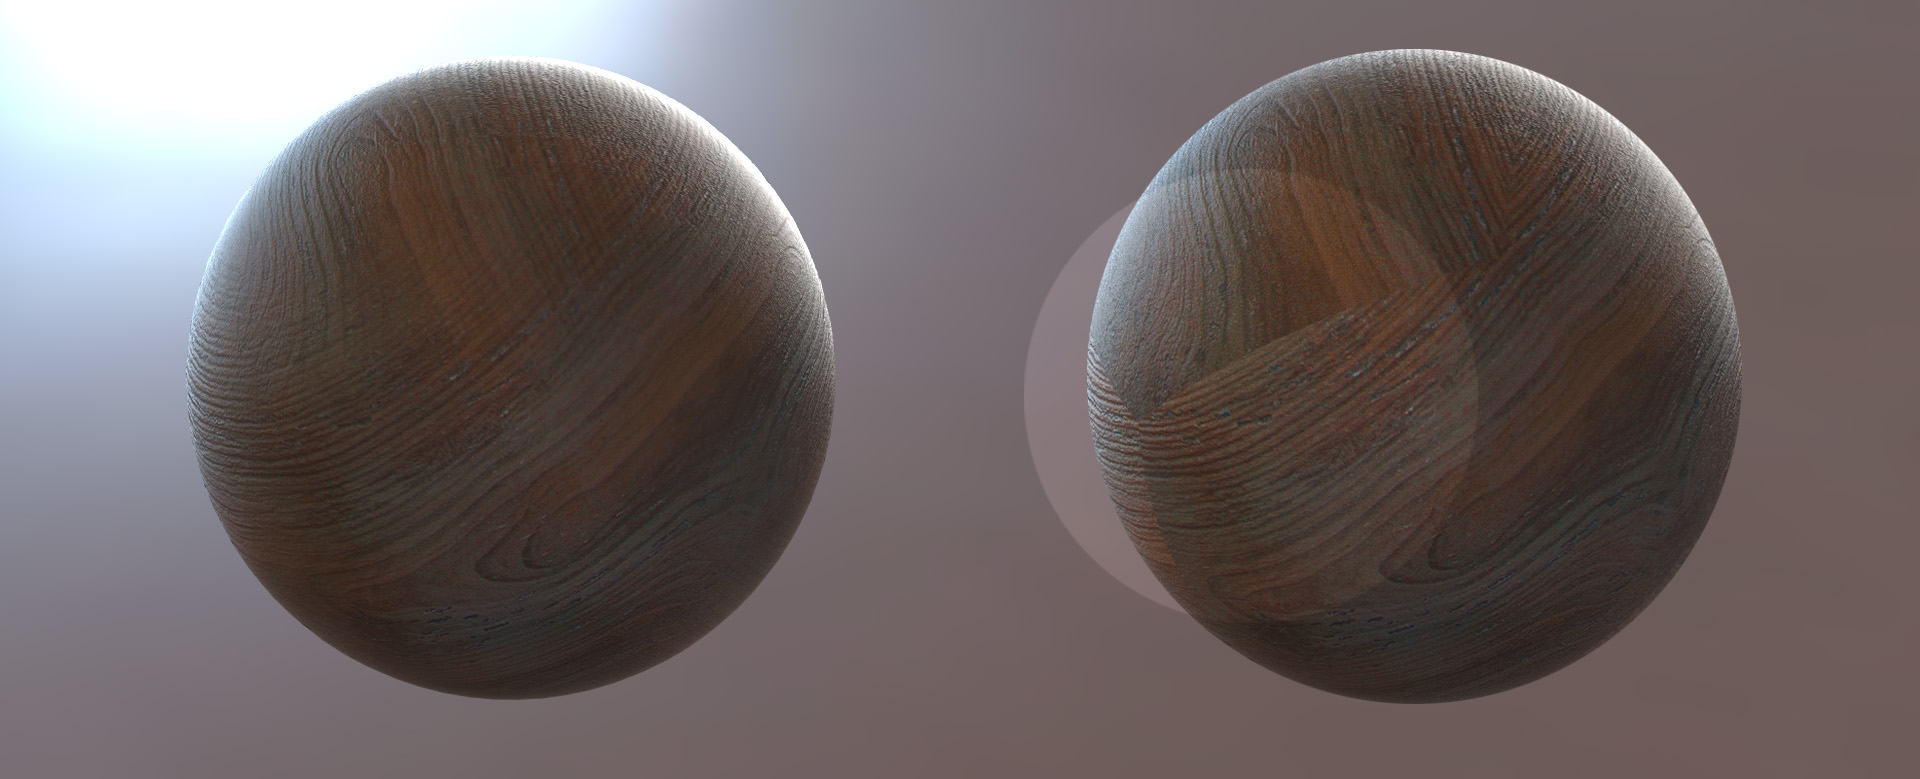
3 Procedural UV coordinates
Along with uv- coordinates for texture mapping we can use Generated or Object coordinates. Thus, we can leave UV-mapping untouched and still be able to control the texture using Mapping node.
To project texture evenly and from several directions at once, use so-called Box mapping. With the help of the Blend parameter textures seams can be hidden.
4 Material layers
Go ahead and add the layers to the basic materials. To achieve the compelling look, I’d suggest to add at least 3 supplementary shaders in every material: dirt, paint, scratches.
Use black and white mask as a mix factor.
[box title=”Decals” bg_color=”#8fb4c4″ icon=”info” icon_style=”border” icon_shape=”circle” align=”center” text_color=”#ffffff”]
[/box]
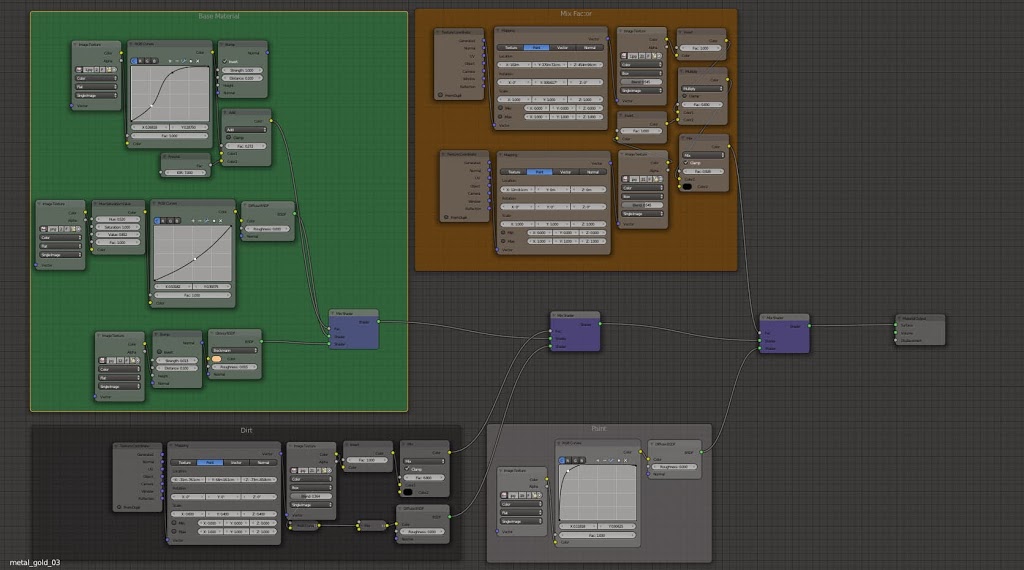
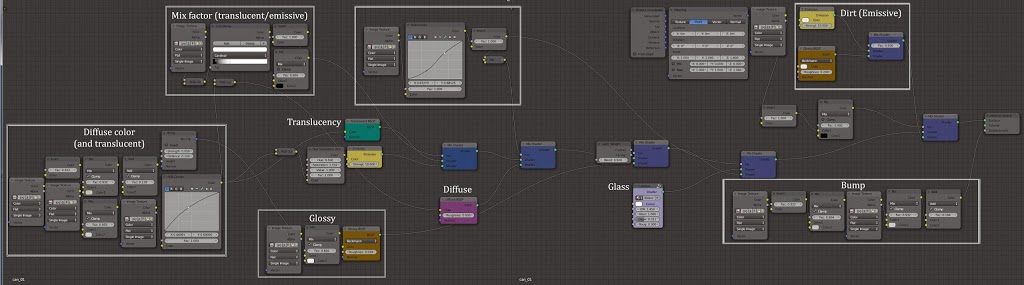
5 Painted glass material
It’s pretty complex material, so let’s decompose it.
1 Two basic materials – glass and paint
2 Both of these materials have several composite materials
3 The glass material consists of a glass and dust, dirt, fingerprints
4 The paint material consists of a translucent, diffuse, reflective, emissive shaders. Consequently, it uses diffuse, bump, translucency texture, etc.
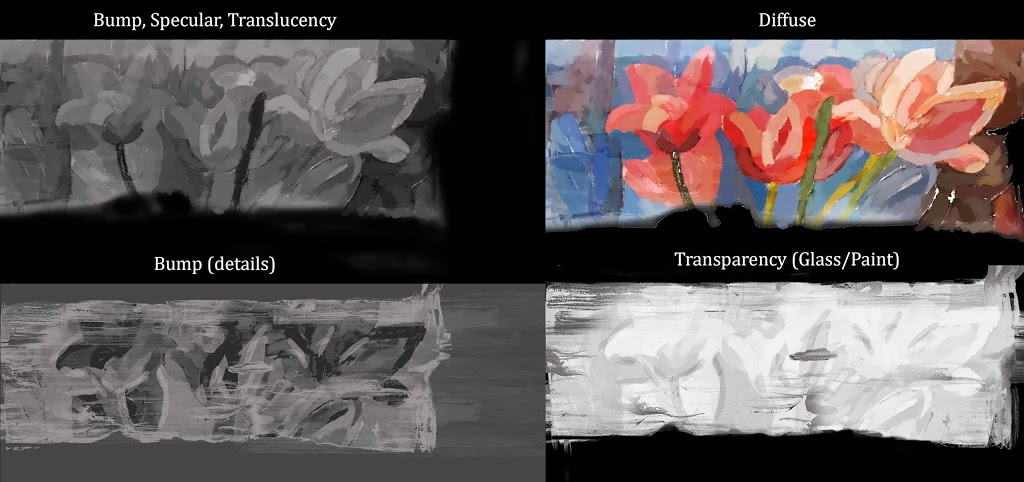
5 Transparency texture in the paint material determines what areas are translucent (covered with a thin layer of the paint), and what areas are opaque.

6 Displacement map is also used as the normal map
[box title=”Glass shader” border_width=”2″ border_color=”#9e9e9e” border_style=”solid” icon=”download” icon_style=”border” icon_shape=”circle” align=”center”]
Recommend trying out Cycles Dispersion Glass shader by Harri Collis.
[/box]
6 Lighting
The key light source is nothing more than a sun lamp with a soft shadows (sample size 12 cm).
To achieve a rim light effect, I created a plane and placed it at the window. Brush tops were lit separately with a spot light.

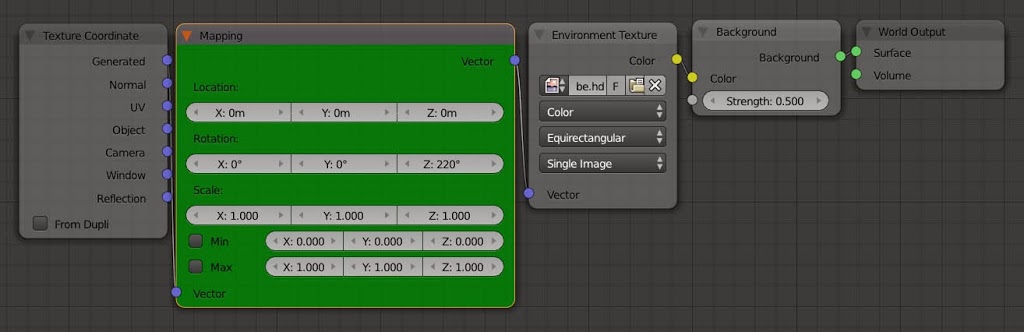
Spherical HDRi image softly illuminates the scene from all angles and creates virtually no shadows – it’s good for us in this case. What is very important about HDRi, that the reflective parts of the brushes and also the jar begin reflecting the bright areas of the HDRi. These reflections accentuate objects‘ volume and make a metal act like a “metal”, if you know what I mean.
Rotated HDRi using mapping node, searching for the most effective angle.
[box title=”Decals” bg_color=”#8fb4c4″ icon=”info” icon_style=”border” icon_shape=”circle” align=”center” text_color=”#ffffff”]
While Cycles is already a fantastic renderer, it still doesn’t have something similar to Directional Light yet (sun and spot lamps are similar in function but also not quite the same). So for now we had to add spot lights or invent obstacles between the object and the sun to restrict its area of influence.
[/box]
7 Hair simulation
Let’s briefly explore the process of creating the hair.
[custom_list icon=”circle”]
- 1. Create a plane. It will serve as an emitter for the hair.[space size=”20″]
- 2. Create a particle system.[space size=”20″]
- 3. Hair length and density. The optimal value is almost impossible to guess, we should prepare ourselves for the inevitable return to this stage.[space size=”20″]
- 4. Adaptive rendering – hair geometry adapts to the resolution and depends on the minimal bending of the original geometry. These values influence the polygon count during the rendering. It‘s important to remember this to squeeze the scene in memory limit for a fast GPU-rendering.[space size=”20″]
- 5. Cycles Hair Rendering. Ribbons[space size=”20″]
- 6. Set Children to Interpolated. Display – 2-5, Render – 2-5. Final values depend on desired hair density and computer characteristics. While children are activated, every parent hair is spawning several child hairs.[space size=”20″]
- 7. Set Kink to Curl mode.[space size=”20″]
[/custom_list]
[toggle title=”Show screenshot”]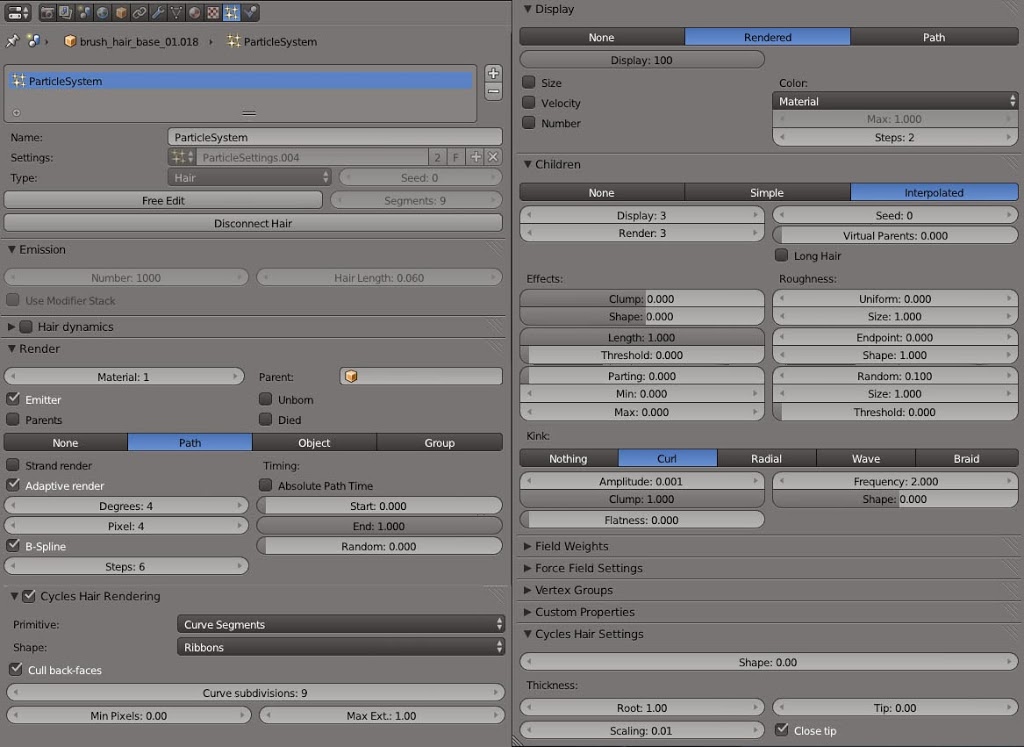 [/toggle]
7 Hair styling
Now we’re switching viewport to Particle Edit mode and trying ourselves as a stylists, cutting and combing hair.
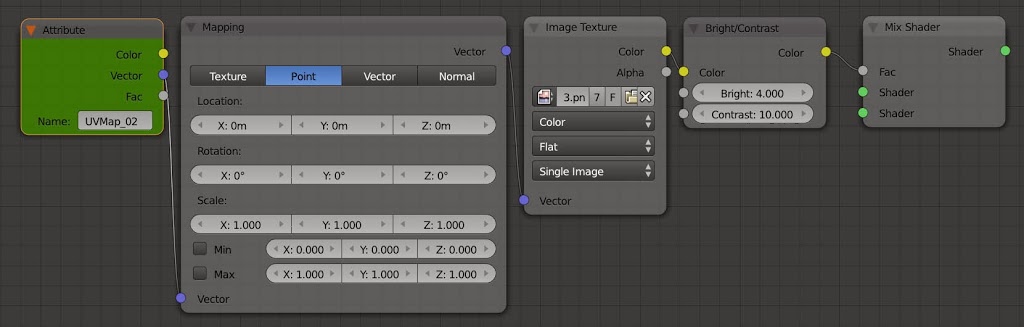
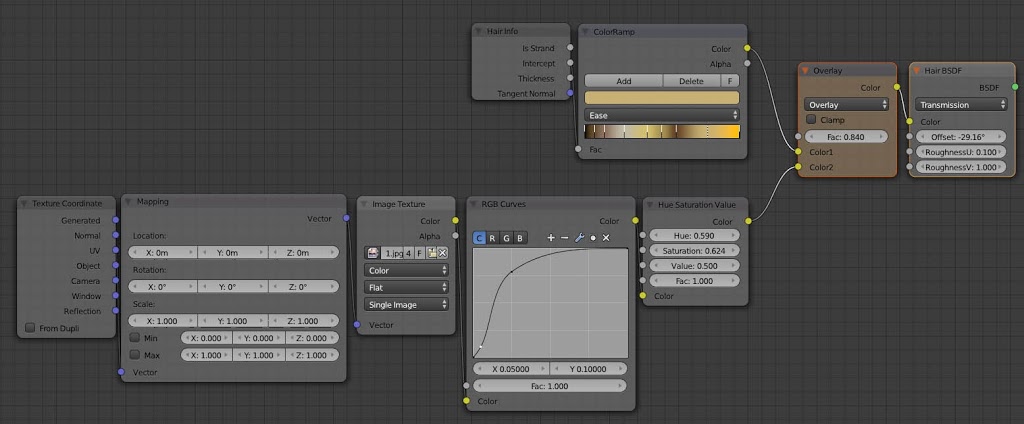
8 Hair material
There is now a special shader for hair — in Blender 2.69. My impression is that it’s somewhat slow to render – but anyway, it looks great. Who cares.

The node called Hair Info in material editor is essential when texturing hair.
Using Intercept attribute and Color Ramp (gradient), we can control the gradient of the hair color – from the roots to the tips. Note that the gradient may haveseveral “stops”.

Combining this information with the capabilities of uv-coordinates, we can confidently dye our hair – using length (Intercept) and location relative to the particle emitter (UV).
9 Render!
We want photo-real render, don’t we? Leave the caustic enabled and the maximum number of bounces untouched.
[box title=”Path tracing” bg_color=”#8fb4c4″ icon=”info” icon_style=”border” icon_shape=”circle” align=”center” text_color=”#ffffff”]
When trying to render this scene out, used classical path tracing, and not the branched version, as it was more conventional for me.
Perhaps now would have done otherwise, since branched path tracing coupled with manual tweaking of the light source samples solves the problem of noise in shadows. Spot lamps and perhaps any lamps generate much noise if there is a lot of obstacles between them and the camera.
[/box]
[toggle title=”Show screenshot”]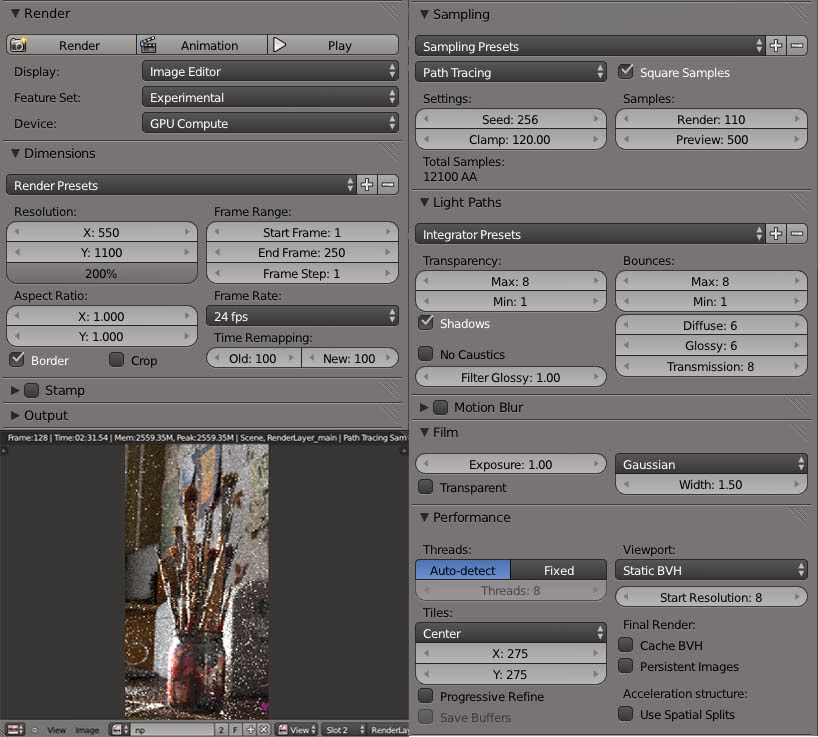 [/toggle]
10 What could be done better?
Render was infernally slow: on my computer (i7 3690, 16gb ram, nvidia 650m) it was rendering about two days in the resolution of 1100-2200 (12,000 samples).
Reasons:
[custom_list icon=”circle”]
- too complex and sometimes bad-planned materials[space size=”20″]
- the bounces number was too high (2 for diffuse and glossy should be enough in many cases)[space size=”20″]
- high hair density and high number of curve segments in hair render[space size=”20″]
- classic path tracing in interior scene with lots of light and reflections and with lots of objects between the sun and the camera[space size=”20″]
[/custom_list]
Though, there was a lucky coincidence — guys from Renegatt (GPUBOX software) helped me out to do a few test renders and a final render. Thanks a lot!
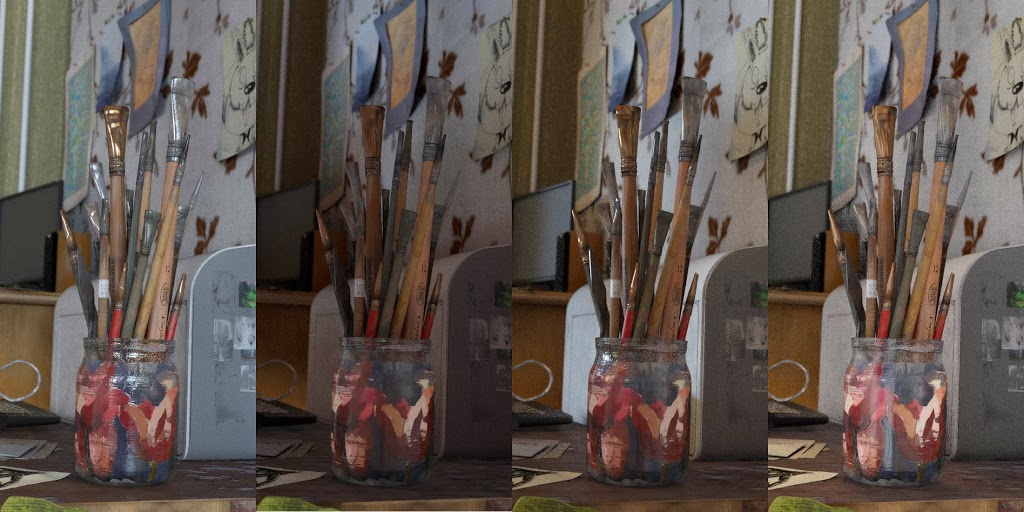
11 Composing and post-processing
Blender compositor is actually fine. While it has some flaws (rendering speed?), it does its job.
At the beginning of the article, we could see how the processing sequence can be done.
[toggle title=”Show screenshot”]
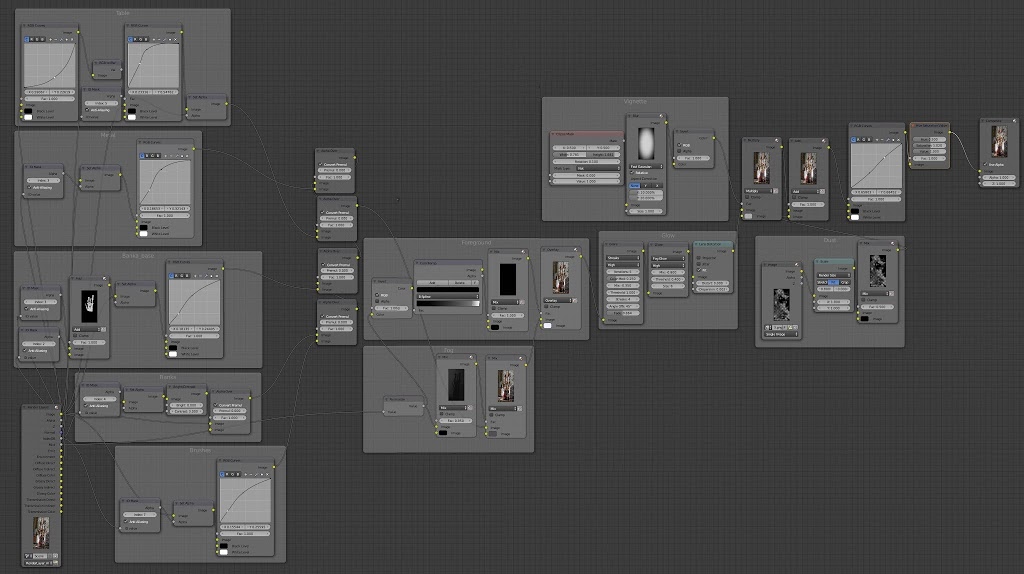
[/toggle]
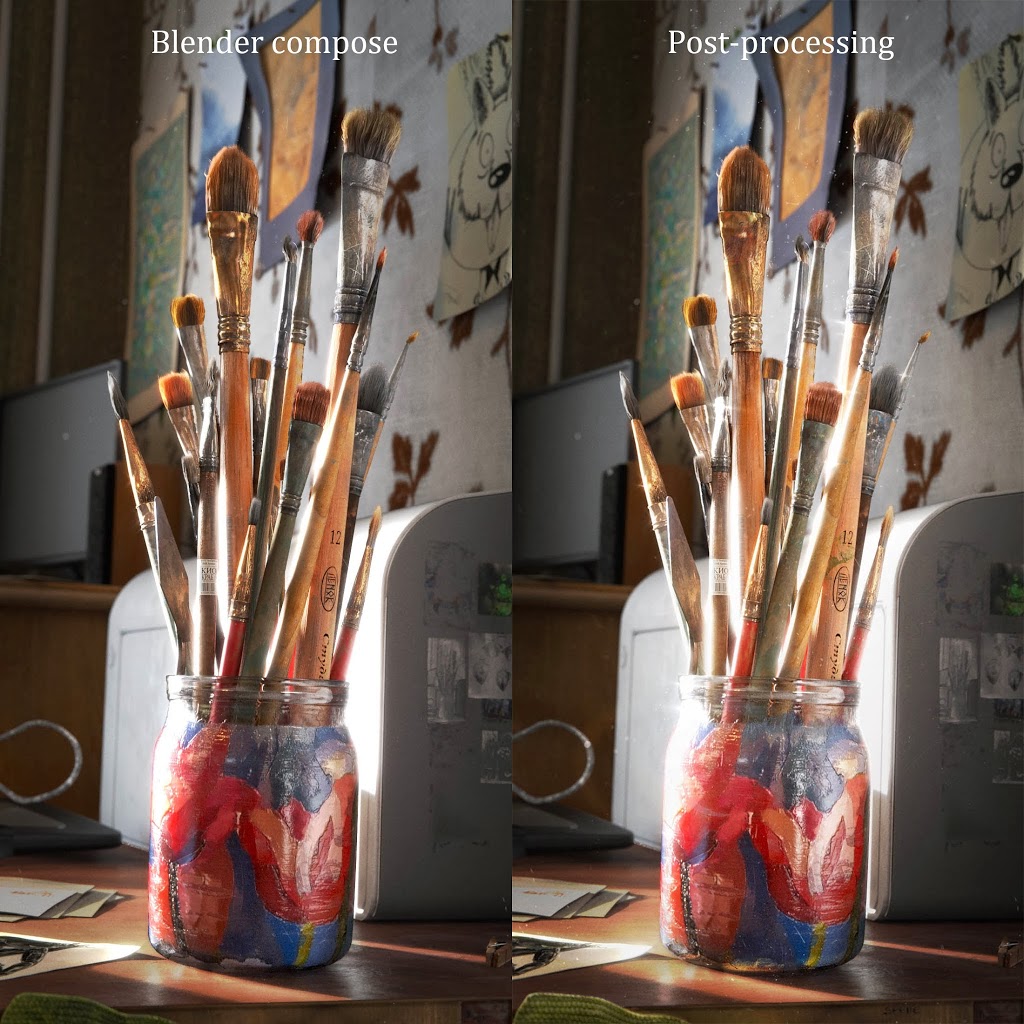
Last stage is cosmetic treatment. Brightness tweaks, lightening / darkening – basically, what we want here is to enhance the colors and get that extra ‘oomph’.
Thanks for reading! Feel free to ask questions, comment, share and subscribe.

Pacificway
If there was only one site to follow it would be yours. Very inspirational
Gleb Alexandrov
Pacificway – you made my day! I’ll continue to develop this site further, along with youtube channel. Hope, that you’ll like, how it comes out.
El Member
That was pretty detailed, thanks for sharing Gleb!
Gleb Alexandrov
Thanks for the comment!
bensimonds.com
Brilliant render and a nice making-of! Thanks for this.
Gleb Alexandrov
You’re welcome, Ben. Read your article about HDRi lighting setup and downloaded the scene – nodes are looking useful. Cheers!
nastys
You could use Multiple Importance Sample and other tricks to reduce noise and render with 5000 samples or less.
Gleb Alexandrov
Nastys, you’re right, it can (and should!) be optimized in a few ways. Importance sample is one. Another is Branched Path tracing, which probably could lower direct light noise.
Данила Прямоносов
Подскажи где в нодах Chromatic aberration?
А то непонятно)
Gleb Alexandrov
Во вкладке Distortion – Lens Distortion. Там параметр Dispersion. 🙂
Данила Прямоносов
Вижу, спс)
RALLY Guru
Thanks for tutorial!
Gleb Alexandrov
No problem, mate!
Eli Spizzichino
The screenshots of the node setup are very low res can’t really read much. Can you re upload or provide a blend?
Jean
Thx for tutorial.
Is there any chance to get the material setting of the papers you used please ?
Jean
Thx for the tutorial.
Is there any chance to get the material setting of the papers you used please ?
Romi Lizada
Hi Gleb you’re a monster in Blender I’m your new fan here in the Philippines I’m learning from your tutorials. YOU’RE GREAT 🙂
Romi Lizada
Hi Gleb you’re a monster in Blender I’m your new fan here in the Philippines I’m learning from your tutorials. YOU’RE GREAT 🙂
Rachel Brown
I’m so happy I found this tutorial! I’ve been inspired by this render for so long and I only recently discovered the tutorial. I am beyond happy <3
Pingback: Making-of the Brushes • Creative Shrimp – TUTO3D
Pingback: Making-of the Brushes • Creative Shrimp - TUTO3D