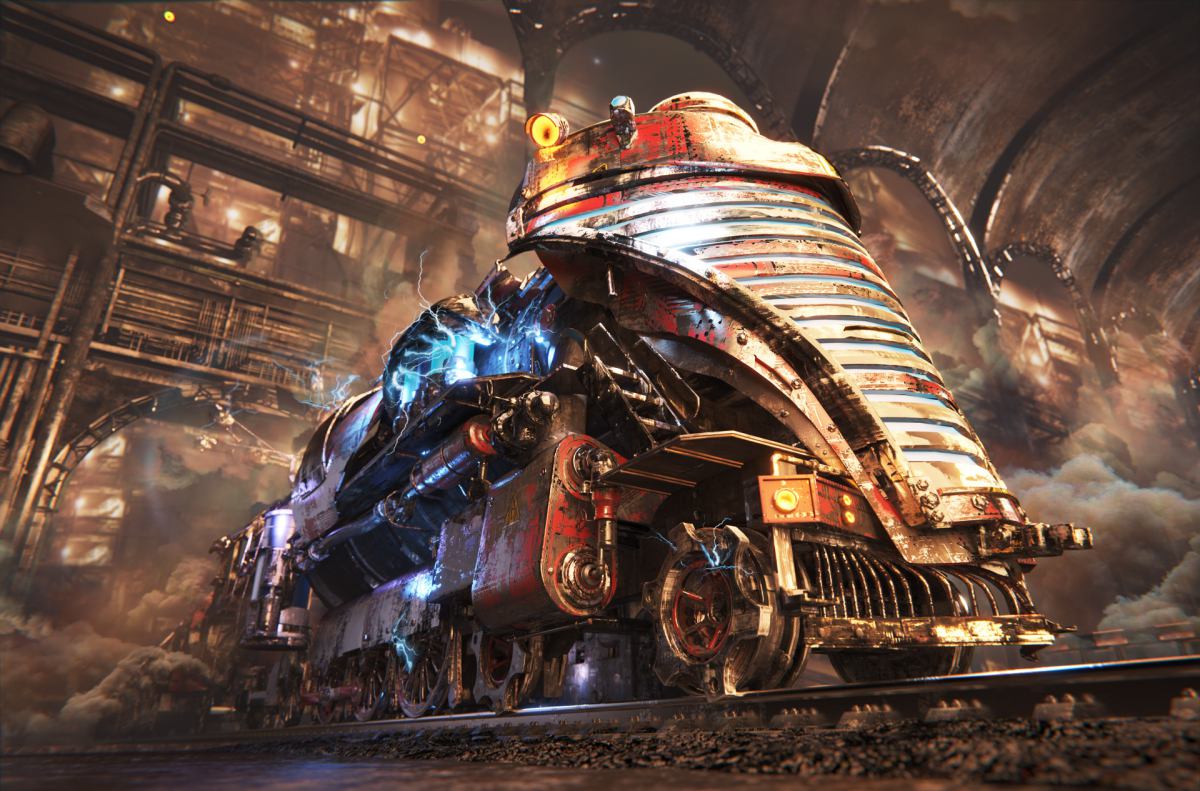
Have you ever tried to create an epic steampunk machine of your childish dreams in Blender? That heavy metal bastard that screams epic awesomeness.
As cool as Charlize Theron with a short haircut.
If yes, then you know how hard it is.
Actually I felt frustrated too when I tried to create something gorgeous on the wheels. The first few attempts looked hilarious. Imagine a toy shot using a macro mode.
But eventually (years passed!) I developed a workflow that helps me to create steampunk machinery in Blender.
After watching this 15 step steampunk tutorial you’ll be inspired to created your own steel monster.

[space size=”25″]
Download the sources from Blender Cloud
[space size=”25″]
Steampunk Tutorial Step by Step
1. Invent a Time Machine
Get inspired.
One more time. Get inspired.
If you need to invent the time machine, travel to future and see your work published in a magazine, do it. Or just drink some coffee.
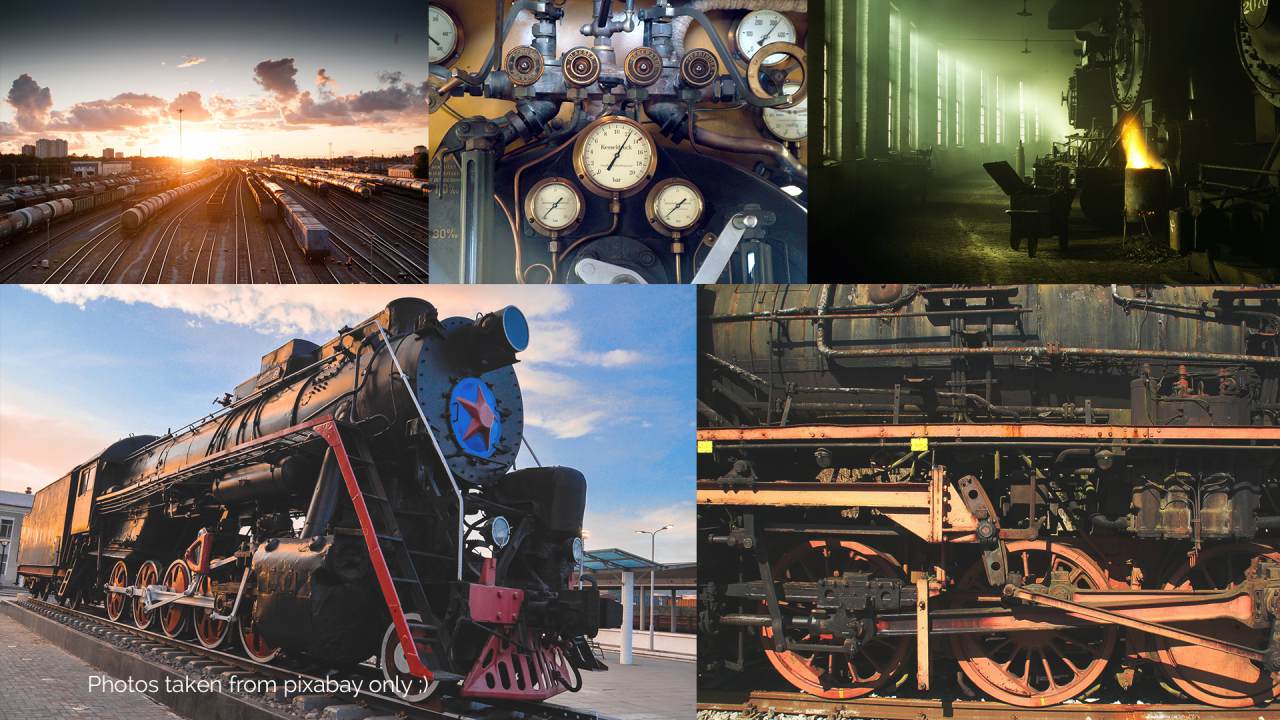
2. Find a Great Reference
Good is not enough. You’ll need a great references of locomotives.
So take your time and visit Pixabay and Flickr.
Search by keywords that sound steampunk to you.
Locomotives? Hell yeah!
Steam? Hmm…

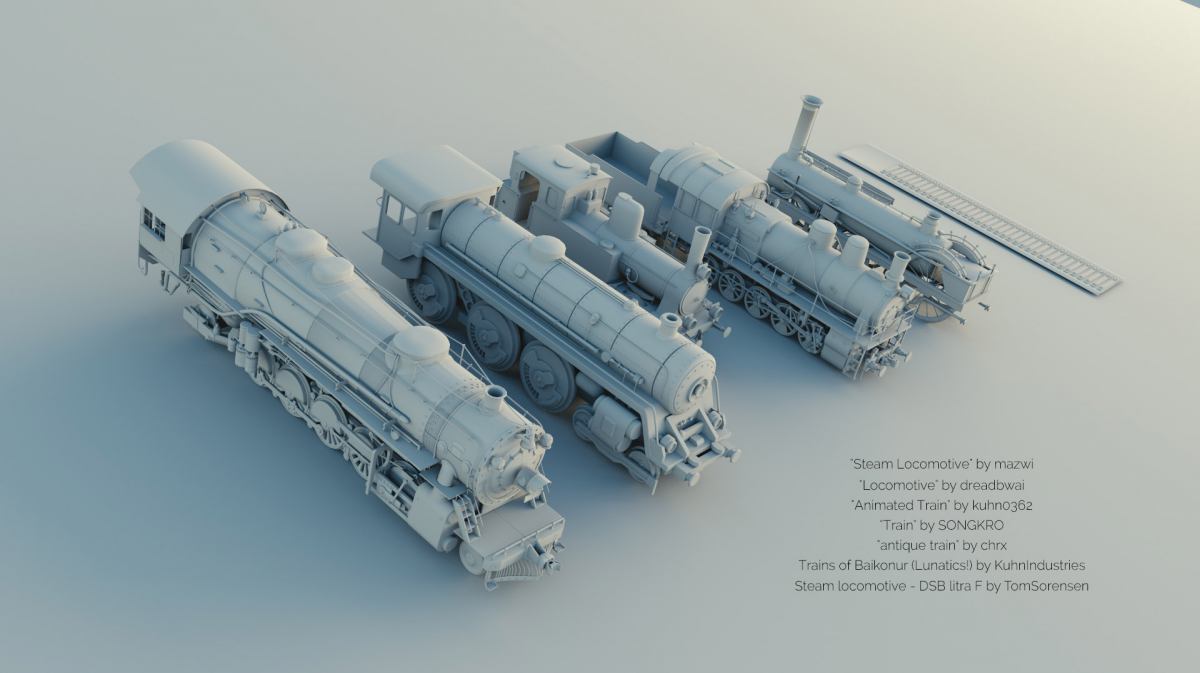
3. Steal Like an Artist
All joking aside, starting from scratch is insanely hard.
We live in the epoch of compilation and remix. So don’t be ashamed to build upon the ideas of other people.
(You may even end up reading Steal Like an Artist book by Austin Kleon).
I bet, they will be glad to see their work given the second life! Made even more bombastic and reborn into epic steampunk creation.

4. Draw a Concept Art
Draw some sketches. If you can’t draw, make a collage.
Take your time and don’t worry if your sketch looks hilarious. Honestly I think that all my sketches are hilarious indeed!
If you feel stuck, use Alchemy to generate the ideas for the concept art.

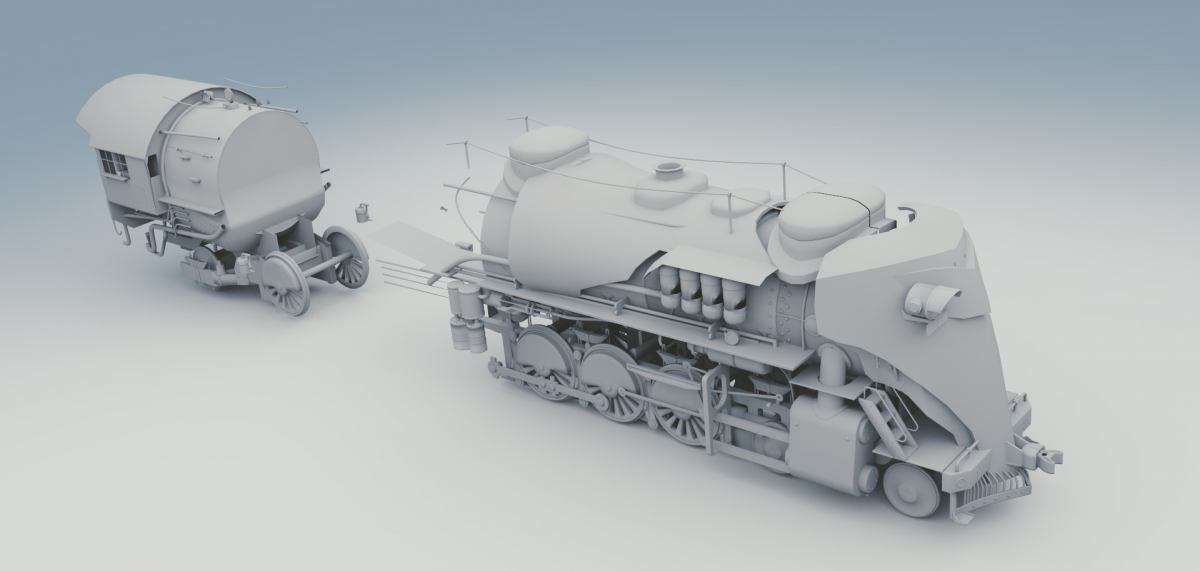
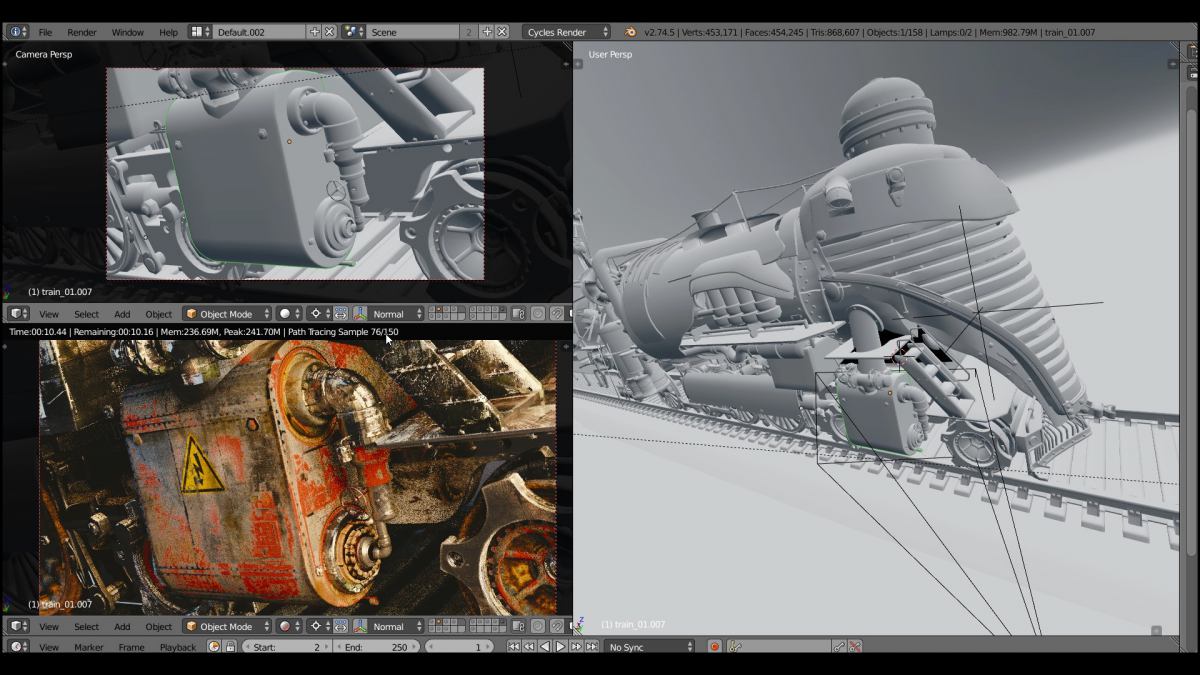
5. Block Out a Basic Model
One thing I really want to emphasize.
ITERATE.
Don’t even try to make everything at once. You will end up making crap.
Iterate through your work like a path tracing algorithm.
Block out a basic model, then slowly improve it.
Bit by bit.
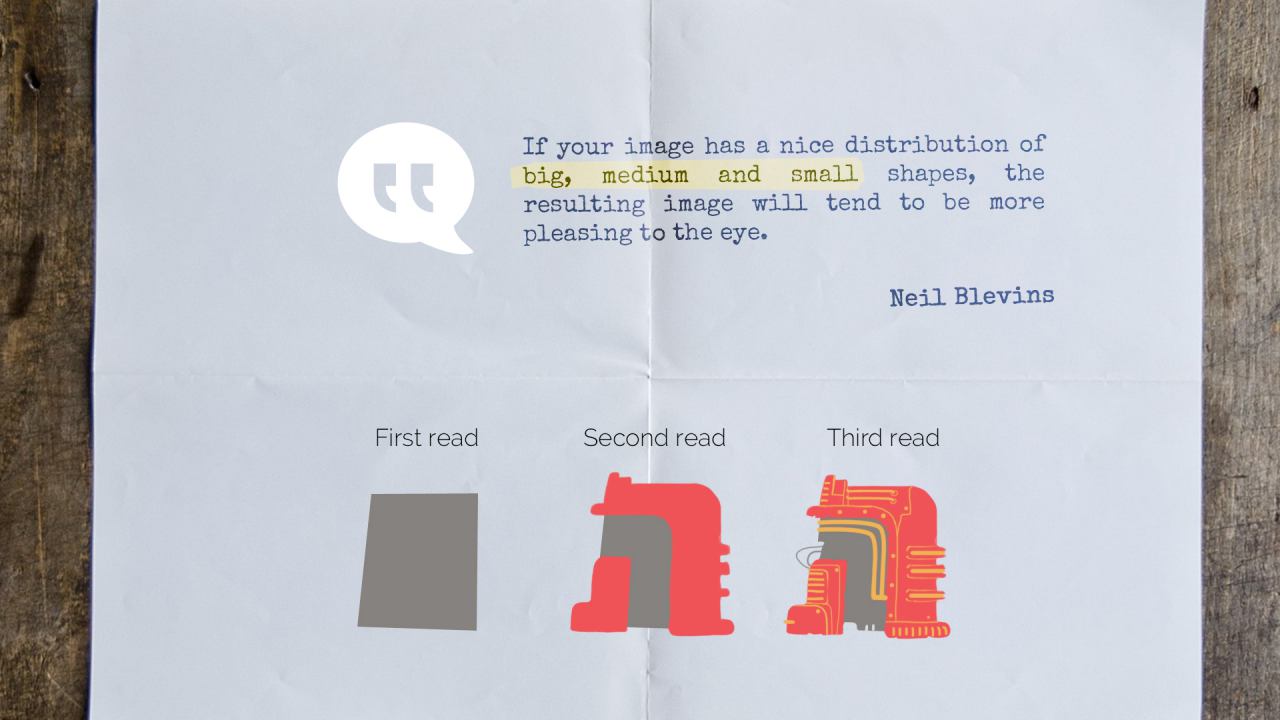
6. Distribute the Shapes (Primary, Secondary, Tertiary)
“If your image has a nice distribution of big (primary), medium (secondary) and small (tertiary) shapes, the resulting image will tend to be more pleasing to the eye.”
Neil Blevins
Start with primary shapes, then iterate through 2nd and 3rd read.
If you want something to look huge, add the super tiny details to it.
But don’t distribute these details uniformly across the surface.
Leave some areas flat and boring.
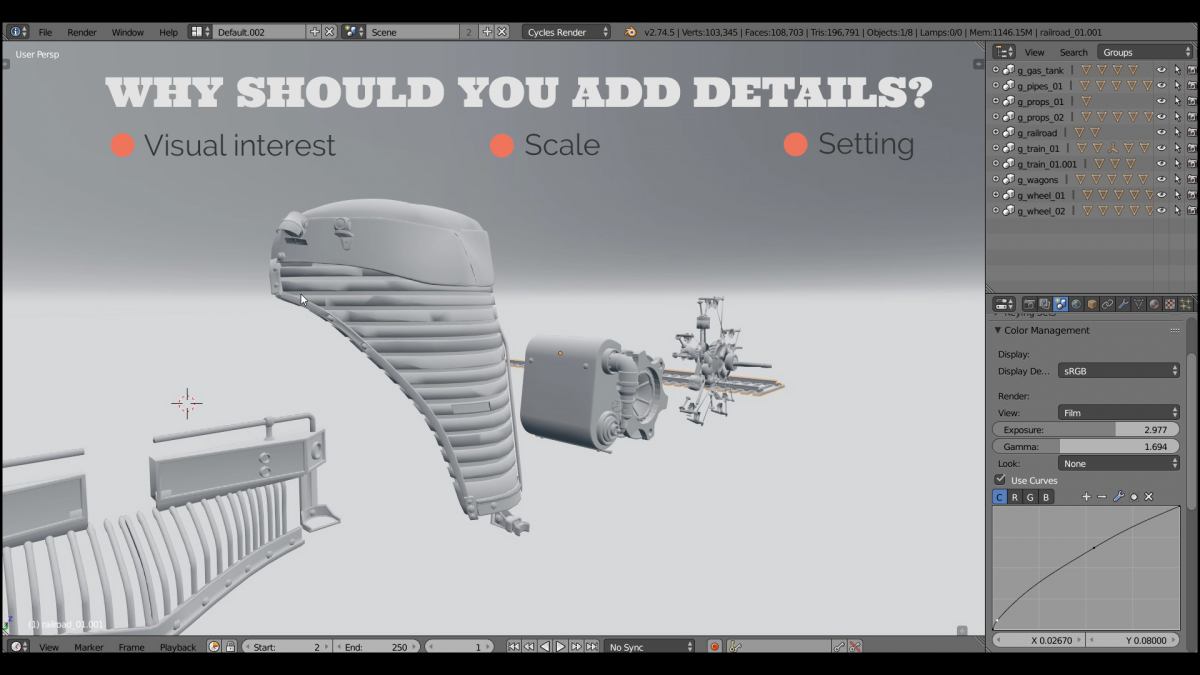
7. Add Details
Now continue adding the details like there is no tomorrow.
Here are 3 reasons why details matter:
• Details add visual interest
• Details enhance the impression of scale
• Details contribute to the setting
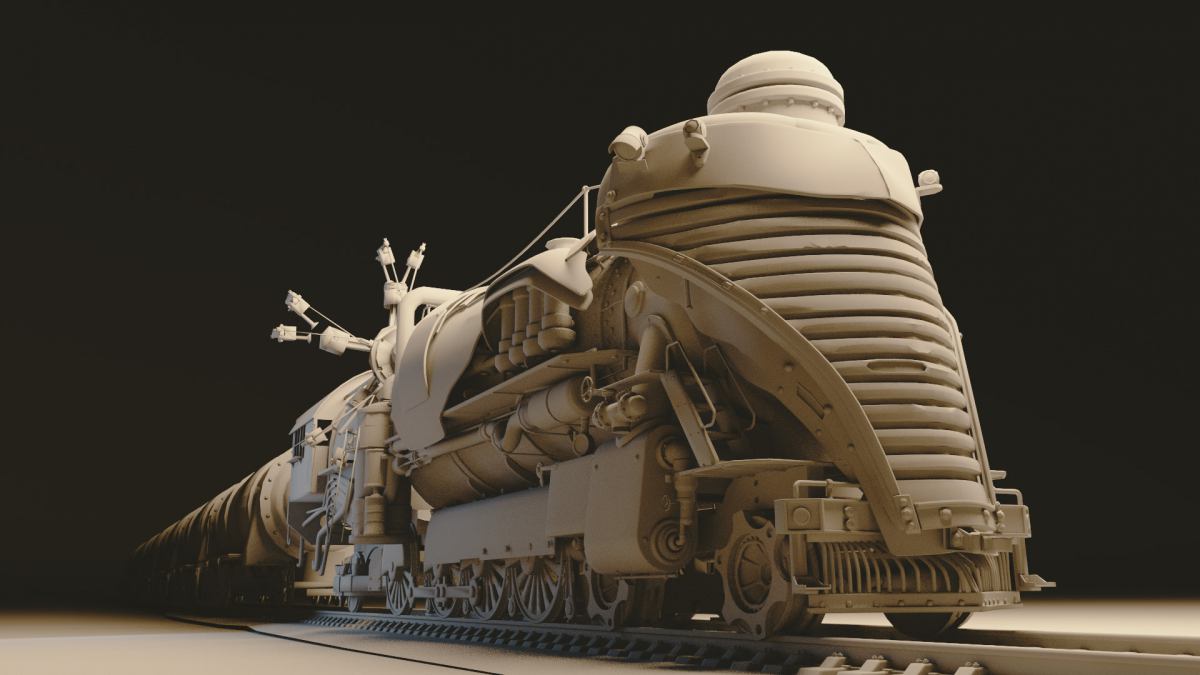
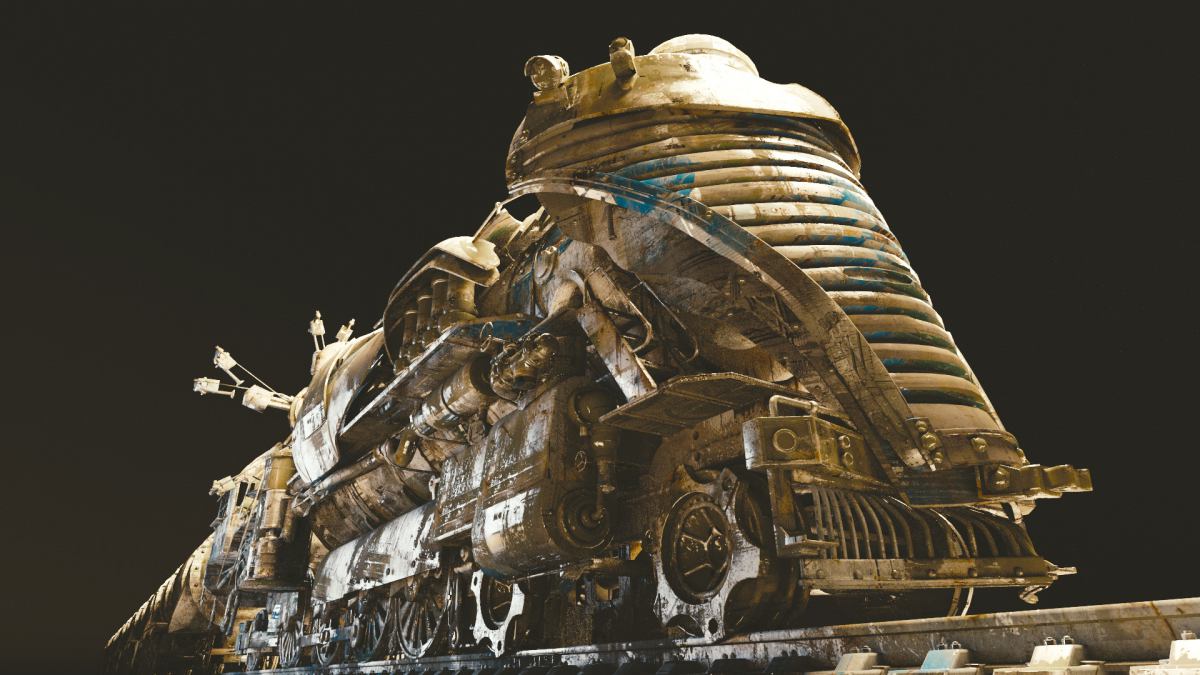
8. Find an Epic Camera Angle
Angle can make your steampunk machine look like a toy train.
Or it can make it look like an epic steampunk monster.
Your call.
Move the camera lower and bam, the locomotive starts to look menacing.
To push the effect to the limit, set the focal length to 24mm. It will exaggerate the perspective and make the foreground and background appear further apart.

9. Set Up a Dramatic Two Point Lighting
Start with adding a strong key light. Position it so it illuminates the machine from behind.
You may say: that’s an edge light!
Well, yes.
But it’s also the most prominent light in the scene. Quite a dramatic one in terms of the contrast and the angle.
So let it be the key light.
After that just add a fill light of a cooler tone.
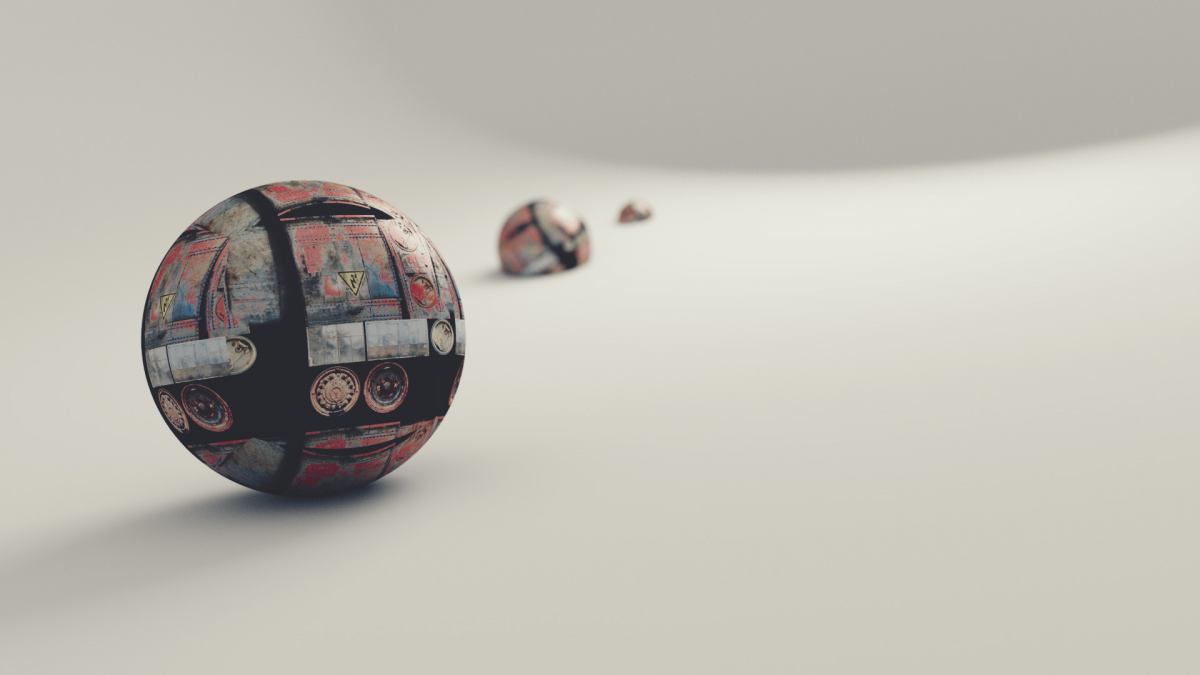
10. Create a Simple Material
Break the process into three stages.
• Paint the texture in Photoshop or Gimp
• Use generated texture coordinates instead of UV coordinates
• Create a basic Mix material (Diffuse+Glossy)

11. Awesomify the materials
Now let’s take material variety to the next level.
Create the second material, a bright red one. It will break up the repetition.
Also let’s add the decals (signs, fake details and so on).
This time, use UV coordinates to place the decals precisely where you want them to be.
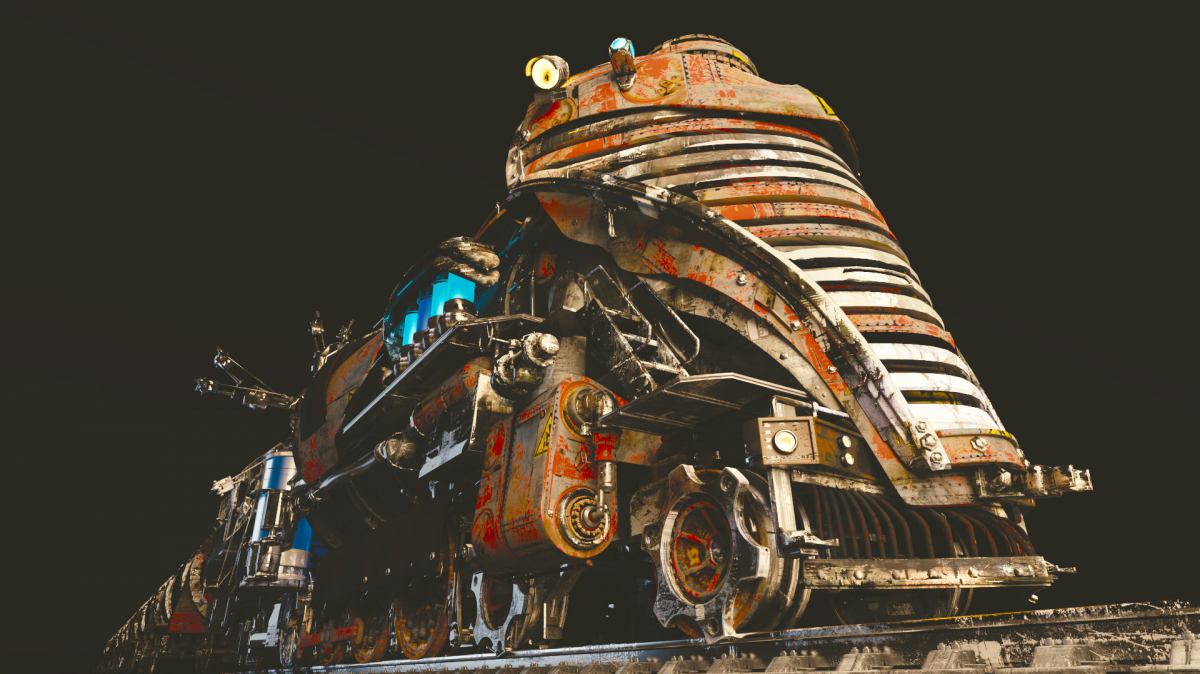
12. Create Additional 153 Light Sources
More lights means more awesomeness.
Aim at the epic.
Spice up your lighting scheme with a bunch of omni lights. In the end, you’re making a steampunk world full of Tesla locomotives.
There must be tons of omni lights.
Oomph!
13. Create an Epic Matte Painting Background
Usually the background demands much less attention compared to the foreground.
Use a combination of matte painting + low poly geometry.
14. Add Steam and Lighting Effects
Have fun with adding electricity and steam effects.
Quick tip: use alpha-mapped planes to fake volumetric effects like steam.
It’s much faster than using a smoke simulation.Fantastic!

15. Post-process the image
You’ve almost finished your epic steampunk work.
Let’s add the icing to the cake.
Before you show it to the world, put a finishing touches like glow and vignette.
Post processing can make or break your work, so don’t overdo it.
• Use the Mist Pass to enhance the aerial perspective
• Add the glare
• Add the lens distortion
• Add the vignette
• Color correct the image
If you don’t know where to start with post-processing, check out the Universal Post-processing Tutorial.
It features 12 easy-to-follow steps, so after watching it you’ll know the basics of post-processing.
Now It’s Your Turn
Hopefully after watching this tutorial you are inspired to create your own steampunk world.
If you like what you watched and know somebody who can benefit from this tutorial, please share it with them. Thanks!
I appreciate you.

Joseph Charles
Hope you don’t mind me adding but I think this video compliments the “teritary,secondary,primary” detail thing nicely https://www.youtube.com/watch?v=eUZz8nC53AA
Gleb Alexandrov
Very good and relevant link indeed! Thanks Joseph, it compliments the article for sure.
Uncle Snail
Epic! This is an awesome tutorial. I love the way you “cheat” with images. It is a really useful thing to get used to doing when you need to speed up for a deadline. 🙂 I also love your texturing workflow.
Niels Hentsch
You should write a book: cheat like an artist 😀
I thought you make the smoke in blender, but your way is so much easier, better and simply great 😀 And your image is still great even when we know your tricks now :O
Go on with your great stuff !
Gleb Alexandrov
Good idea, Niels! “Cheat like an artist”, that sounds appropriate. And I’m glad you aren’t too disappointed with my little secrets when you know them :S
All joking aside, I think that the tutorial about the cheats that save production time can be cool.
Anthony
Blue and orange 🙂
Really, outstanding tut and work!!!
https://www.youtube.com/watch?v=KdxOj-ub4N0
Soady
Amazing! Brilliant! I will definitely study this tutorial a thousand times. 🙂
Taylor Bastian
Hey Gleb, I have been
working on blender for a couple of years now and I’m starting to get decent
with modeling. I have shifted my focus on to texturing and materialing and when
I see the train and the beautiful textures applied to it, I am amazed. I am
wondering what your secret is to texturing? I know that’s a broad question, but
if you can nudge me the correct direction that would be the biggest help. When
I texture I always have the hardest time with it as I always get weird seams as
I can never cover them, or the texture looks unnatural. I have Photoshop as
well but I’m not very good with it. On another note. I loved the tutorial, I certainly
learned a lot. You, Andrwew Price, and other artists from around the community
have inspired me to pursue a career in 3d animation. I am currently 17 years
old and am finishing up high school and hope to be an animator someday. Thank
you so much!!
Gleb Alexandrov
Thanks Taylor! UV mapping is not the only way to apply textures to 3D models. I’d recommend you to take a look at
1. Procedural mapping techniques. Procedural means that you don’t have to UV-unwrap the model. Instead you can project seamless texture from several directions at once.
In Blender try the Generated mapping and the Object mapping, with the Box projection turned on. Practice on a simple model like a cube to see what kind of effect you can achieve using these types of mapping.
2. Check the Projection technique. I made a tutorial for this type of texturing workflow. Here it is: http://www.creativeshrimp.com/game-level-texturing-introduction-part.html
Taylor Bastian
Thanks man, really appreciate it!!
Juandre
I’m studying CGI and animation at the institute of technology WA . It is very hard to find work in animation. All my lecturers have even told me that most people who Finnish their courses, don’t find work. its a very limited and unstable market. I’m not trying to make you feel bad or discouraged mate, but I just don’t want to see someone else make my mistake. I know so many young people who even have diplomas in Animation who cant find work. and even if you do, you don’t know how long it will last. People like Andrew price make money mostly of tutorials and products. they got lucky. you’re better of pursuing a different career and doing the CGI stuff as a hobby.
VFX Artist
Your instructor told you most people who finish their courses won’t find work because frankly, they aren’t good enough to get it. I’ve been an artist in the game industry for about 9 years now. Ye’s its hard, yes, its not always stable, but if you love it, you deal. It isn’t a mistake if you have the passion and ability to see it through, and above all create excellent artwork for your portfolio. School WILL NOT prepare you for a job all on its own. YOU are the deciding factor in if you succeed or not.
cgtalk.com
http://www.polycount.com/forum/
conceptart.org
http://www.gameartisans.org/forums/forum.php
Here are some forums with excellent artists. Read them.
Schools are one of the biggest problems in our industry right now, and the students they accept aren’t helping. They pump tons of kids through some barely thought through curriculum that isn’t applicable, and doesn’t push the students hard enough. A degree means almost nothing to most of the studios out there. Your portfolio and your network is literally all that matters.
If you are a good artist, and a hard worker who is passionate for his(her) craft, you will find work.
Gleb Alexandrov
Agreed. Personal skills and passion is what matters. Everything else including the school is a crutch, but if you won’t help yourself, no one will.
Juandre
Thankyou so much Gleb, I’m not that into steam punk, but the techniques you have shown in this tutorial, have helped my to take my work as an artist to the next level.
Gleb Alexandrov
Juandre, looks great and has a vintage feel to it! I’m excited to see that the techniques/principles from my tutorials are helpful to you. Keep it going!
Dương Nguyễn Minh Thuận
Thanks for sharing your workflow ! But as hard as i try, I cant get my render up to the standard. The lighting is still a bit boring. Can you enlighten me I way to improve my render ? Thanks again !
Dương Nguyễn Minh Thuận
Thanks for sharing your workflow ! But as hard as i try, I cant get my render up to the standard. The lighting is still a bit boring. Or maybe it’s because of the camera angle ? Can you enlighten me I way to improve my render ? Thanks again !
Gleb Alexandrov
Actually when I first saw your transformer render on Blendernation I thought: “woah that’s fabulous!”. And the lighting is very nice too! Maybe I’ll add a strong rim light to push the look into the ‘hollywood’ type of style. And maybe I’ll polish the background a bit. Other than that, it’s absolutely superb.
Glad to see you on my blog. Keep me updated with your renders plz 🙂
Dương Nguyễn Minh Thuận
Tks for replying Gleb ! I’ll repost this render here as soon as a pull something out. But I sure wish that I have ask you this first before posted this everywhere.
oooh and pls use this mech like one of those trains !(it currently on Blendswap) I really want to see what can pull out of this mech ! just remember to post a tutorial on how to do it such as this fine article right here. (thanks in advance!)
Gleb Alexandrov
Don’t worry mate, your image is good as it is! By the way, do you have a portfolio on artstation or some other site?
Dương Nguyễn Minh Thuận
woah, that was fast! http://duongnguyenminhthuan.deviantart.com/ i know little of how to create a web myself so my only place to post my works is on devianart, pretty crap, most of them are test renders. I would be honored to have you visit my portfolio, point out all the mistake I made, don’t go easy on me. Ty
Dương Nguyễn Minh Thuận
Hey, I follow your Post Process Tutorial and edited this image (no changes in Blender), but I don’t know what to do with the background yet. Could you give me a little hint ? That would be great.
Gleb Alexandrov
Dương, I’ll try to get back to you with some ideas.
Dương Nguyễn Minh Thuận
Tks mate. By the way, the name is Thuận, just Vietnamese things :p
Gleb Alexandrov
Thuận, here are my suggestions for your top-notch render. I visually emphasized some things to demonstrate the ideas. Take a look:
1. Separate the transformer from the background to reduce the visual clutter
2. Give some love to the building on the left
3. Make aerial perspective stronger (optional & subjective)
4. Add an edge light here and there
Tell me what you think 🙂
Dương Nguyễn Minh Thuận
The building on the left definately need some more attention ;P. But the smoke are a little too dense to me, i’m thinking of a blue-sky back ground to compliment the red of the mech, also add constrast to make the mech stand out, but i’ve try over and over again and nothing seem to be working ??? I wonder why.
By the way can you make a tutorial on how to create believeable debris ? I can find good tut anywhere. I think I can handle it for my self when I know how to create a decent destroyed city. Tks for your time spent on my behalf !
Mustard Stew
Amazing texturing but when I textured my model the image crashes can u help me Kuya Gleb
Kuya is a filipino word just translate it.
THANKS.
Mustard Stew
Hi Kuya Gleb can u add some details im not a good texturist. THANKS i call you kuya, kuya means older brother beacause i’m only 12 years oldi just started using blender last year when i saw your videos
LINK IF YOU WANT: https://www.dropbox.com/s/6cgthldkabhcxig/TRAIN.blend?dl=0
https://uploads.disquscdn.com/images/d0a272e22e530e2f46780396fad4dd3641a1cb470da799b258376a490b1e3a19.png