Have you ever tried to create realistic ice, glass, or a bottle of whiskey, just to discover how frustratingly hard is to get the refraction right? I want to share some tips that help me to create awesome refraction in my renders.
This tutorial is a step aside from classical form principle, which works only if we pretend that the world is made of plaster. Which isn’t the case, of course.
I’ll try to focus on practical tips – what works and what does not, based on my observations and experiences being a nerd.
This tutorial is a part of a Lighting Project – my way to write a book about digital lighting and give value to you.
You are keeping me afloat, and I’m hugely motivated by your support, interest and comments.
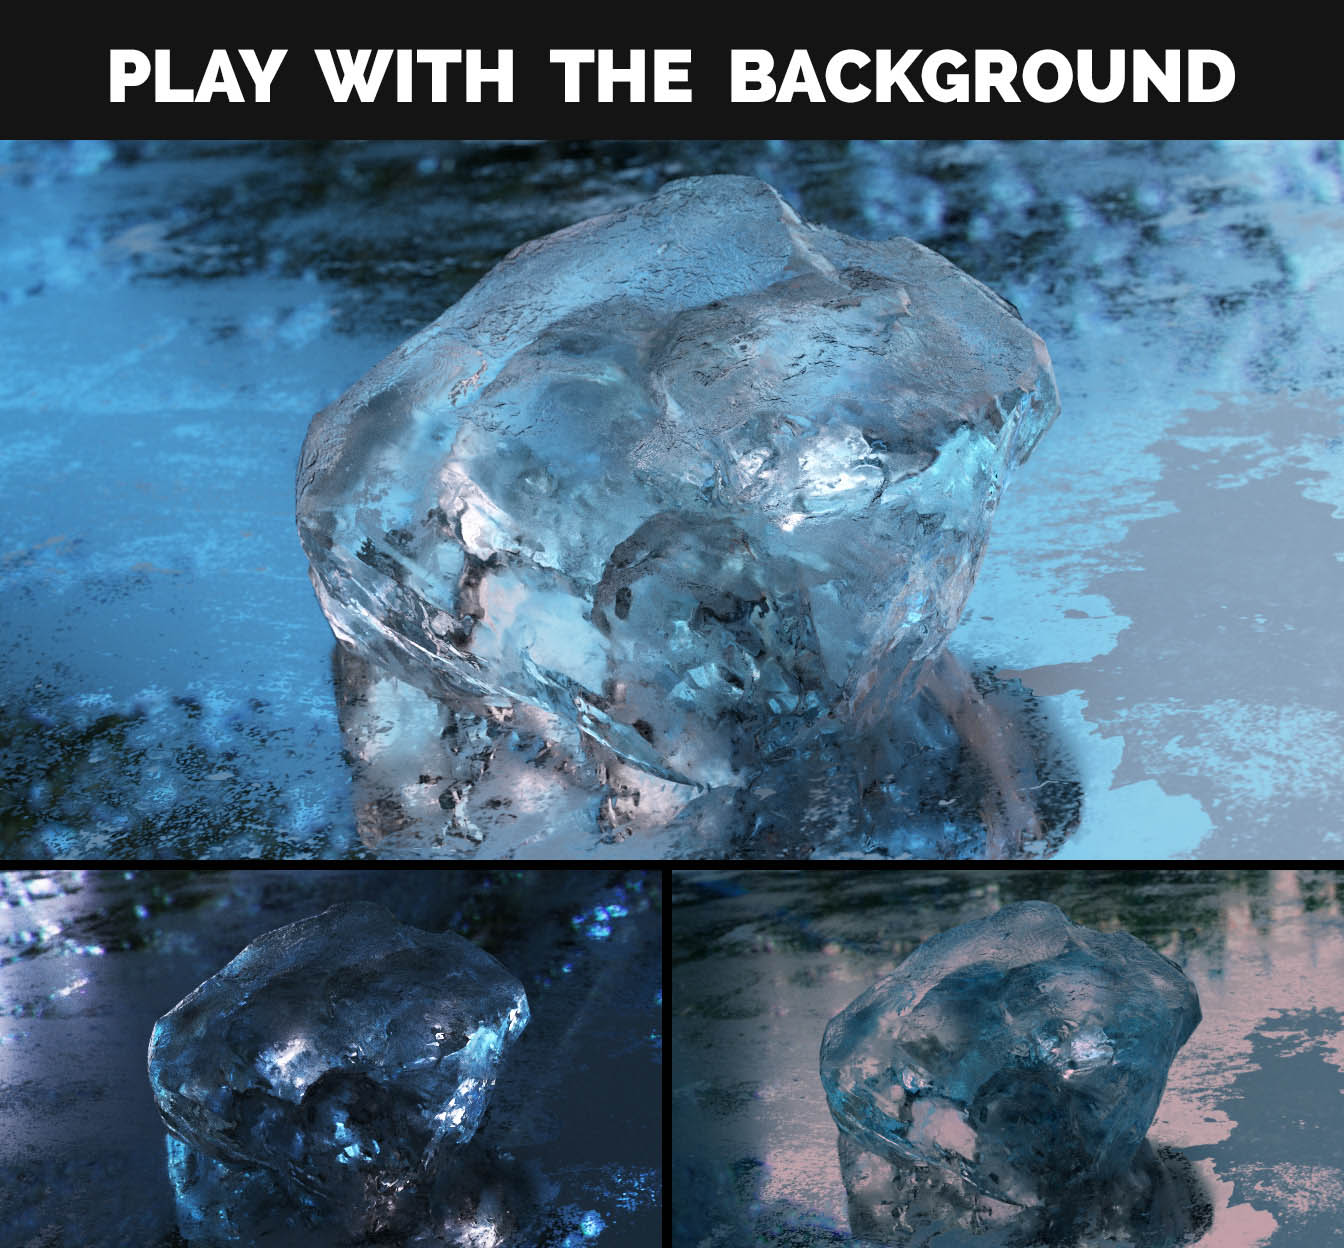
1. Ice is What it Refracts and Reflects
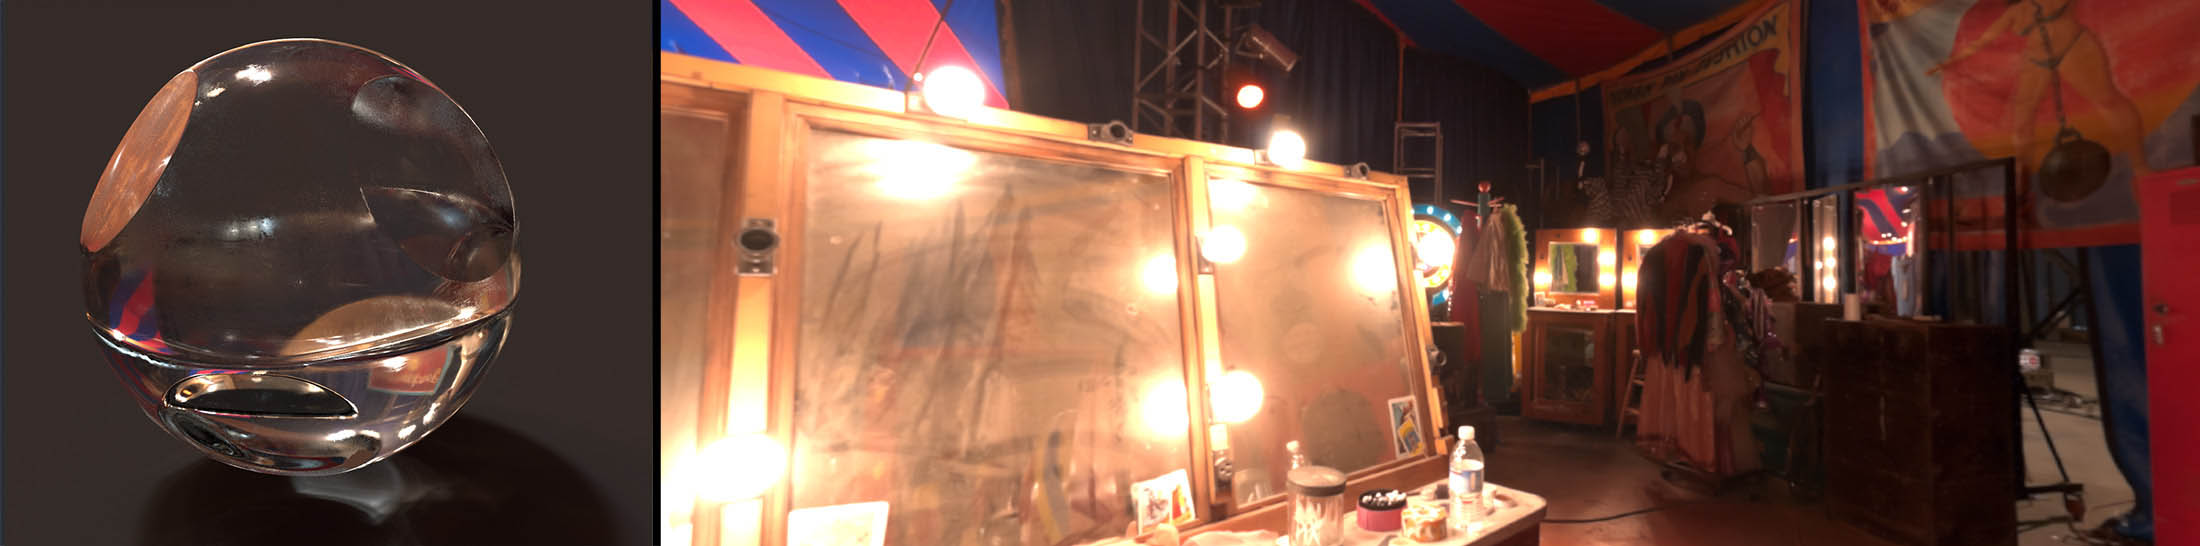
When dealing with refractive objects like ice, I find it very productive to think about the world in the first place. Often, ice and glass is nothing more than a glimpse of the world, that peaks through refraction and reflection.
Think of it as the analog of movie editing, but in still picture.
Even when we don’t see environment clearly, the color and value are still there.
Still, ice is what it refracts.
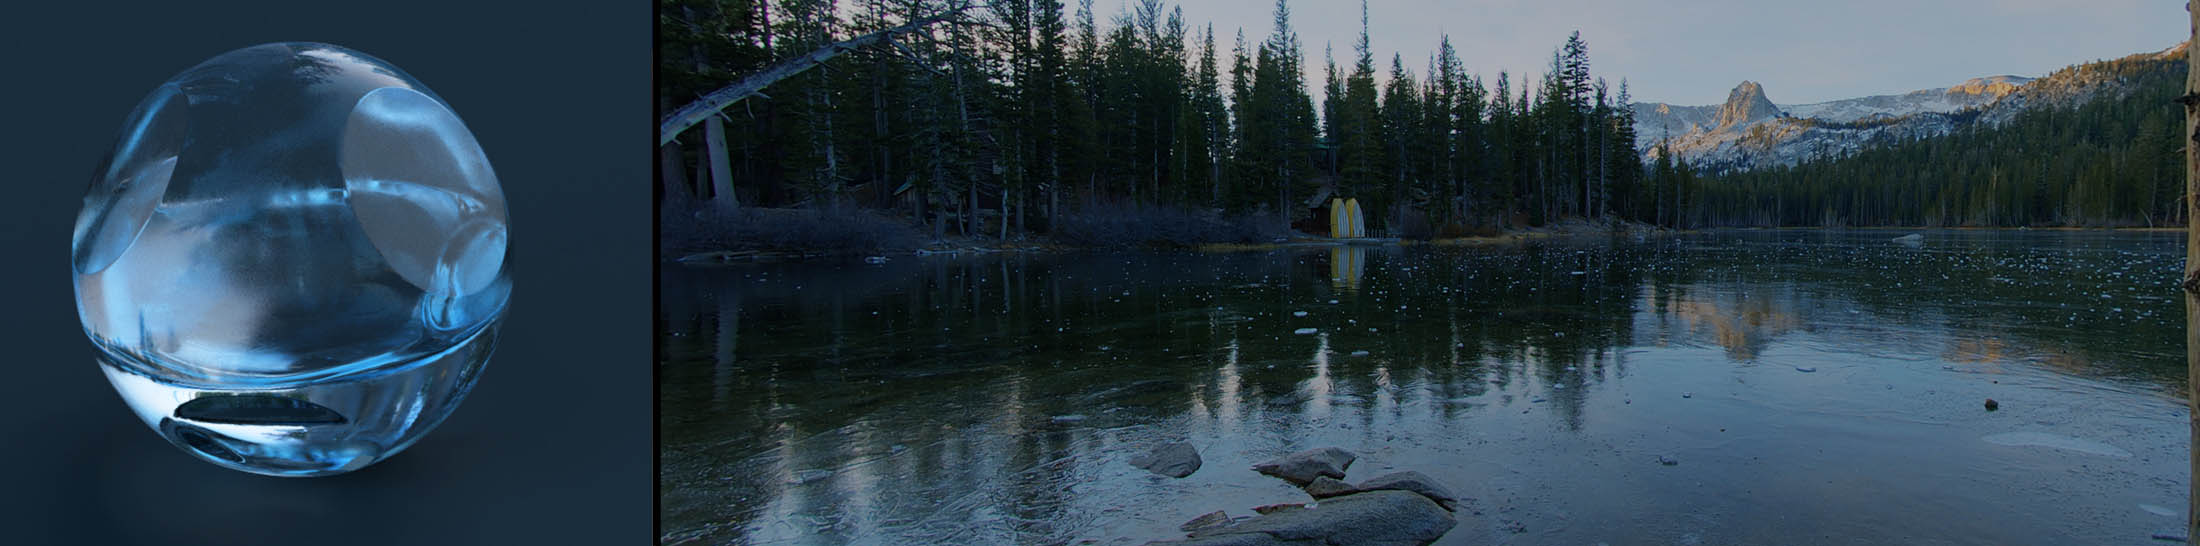

Free HDRi come from iSBL archive, I recommend checking out this resource. In the scene, I used the Ice Lake image.
A common mistake is to tweak transparent material just by changing shader values.
Start with environment, develop the feel. Show what is off screen.
Just like shadows give us a clue about the environment outside of the camera view.
Moreover, reflection on glass and ice is view dependent, so take your time to find a cool camera angle. Or just rotate the object to capture the pretty parts of the world in refraction.
Hyper-realism
Probably, that’s why hyper-realists love depicting reflective surfaces like glass and car paint: it allows them to open up the world by overlaying multiple dimensions. Ah, they also love wrapping things into transparent plastic and covering it with refractive droplets of water, seen through frosted glass. See the pattern?
2. What Happens to Light Inside of Ice?
Six types of light and material interaction
Let’s see the difference between various types of light interactions. Why? To deal with one thing at a time. To organize the chaos.
The world is not made of plaster. At least, in physically based rendering. A whole lot of exciting processes are going on in the block of ice.
Refraction, anybody? Reflection? Or maybe absorption?
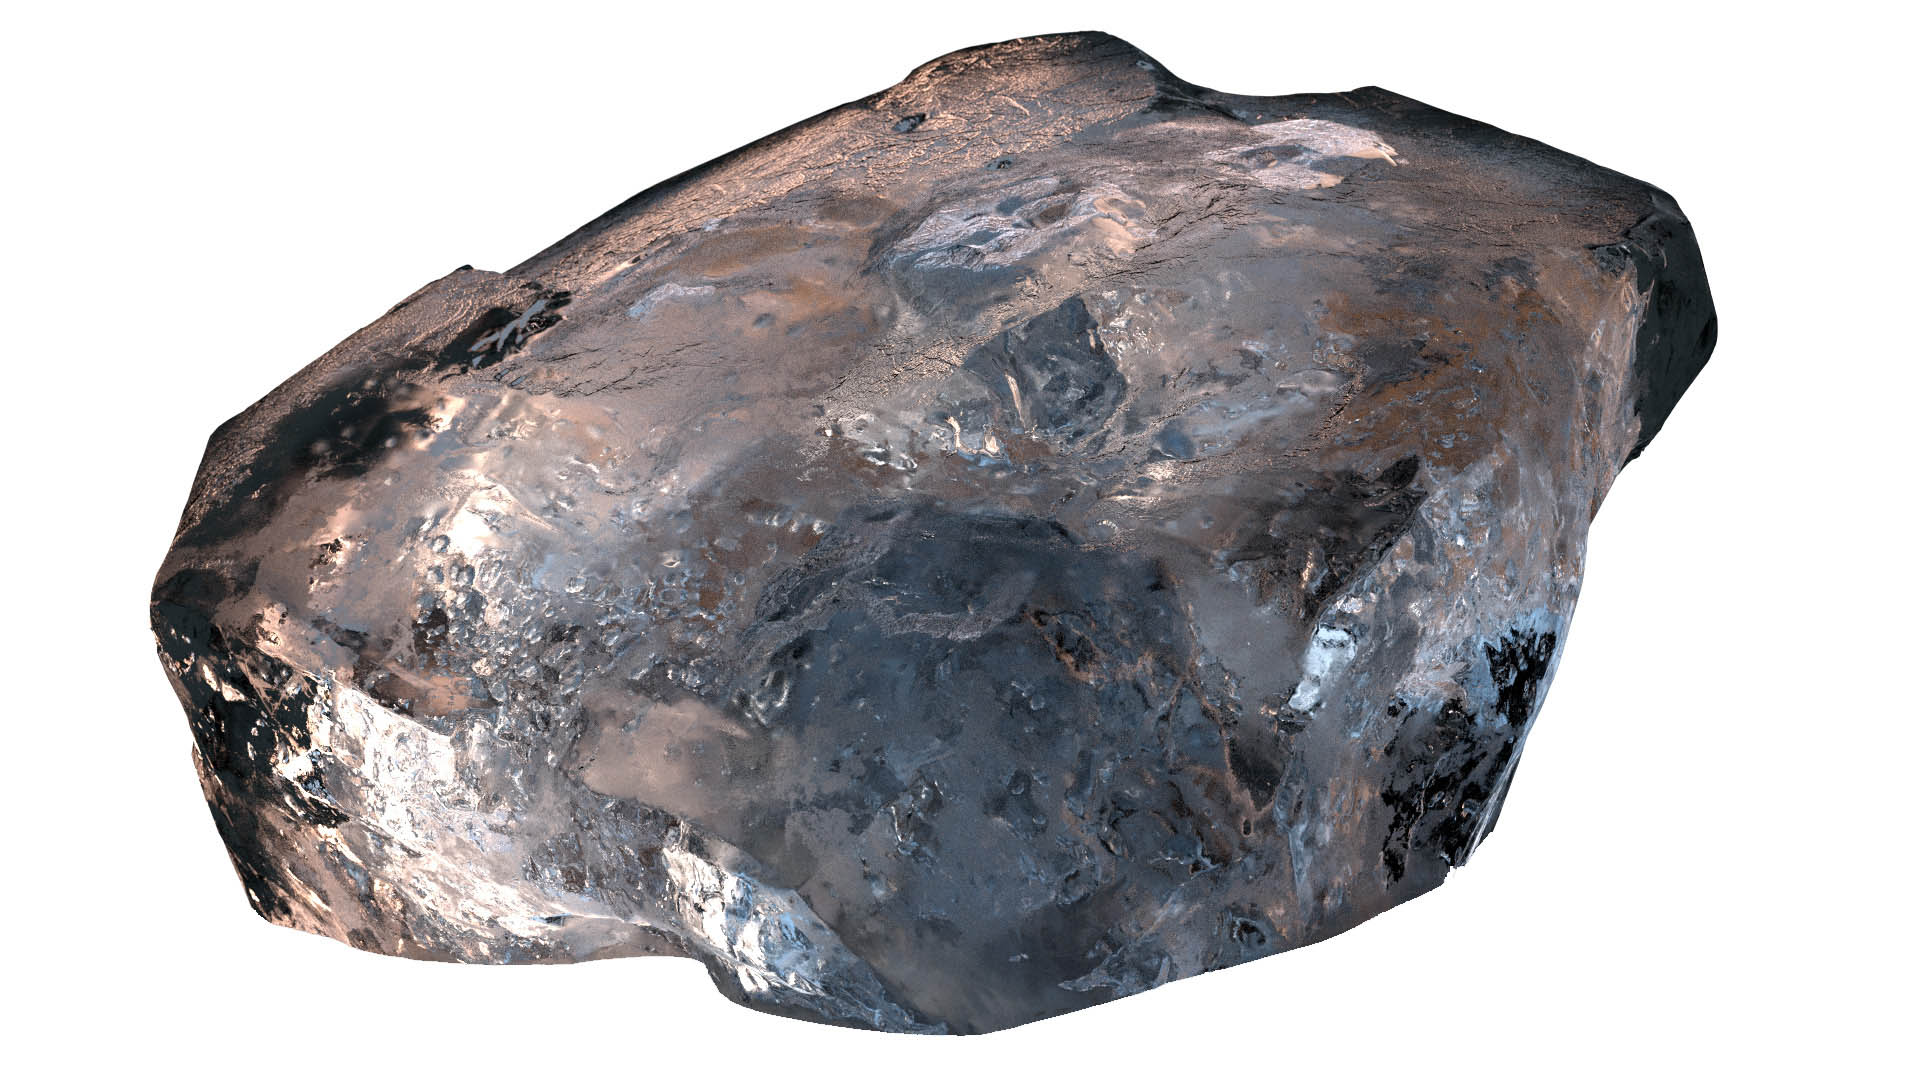
Enough talk. Let’s take this piece of ice and decompose what’s going on in terms of lighting.
Refraction
A transparent object which doesn’t alter the light that passes through it in any way, will be completely invisible. The reason we see glass is that it reflects the light, and refracts it.
It bends the light.
Imagine whiskey bottle: essentially, liquid acts like a lens. It alters the direction of rays, that passes through it.
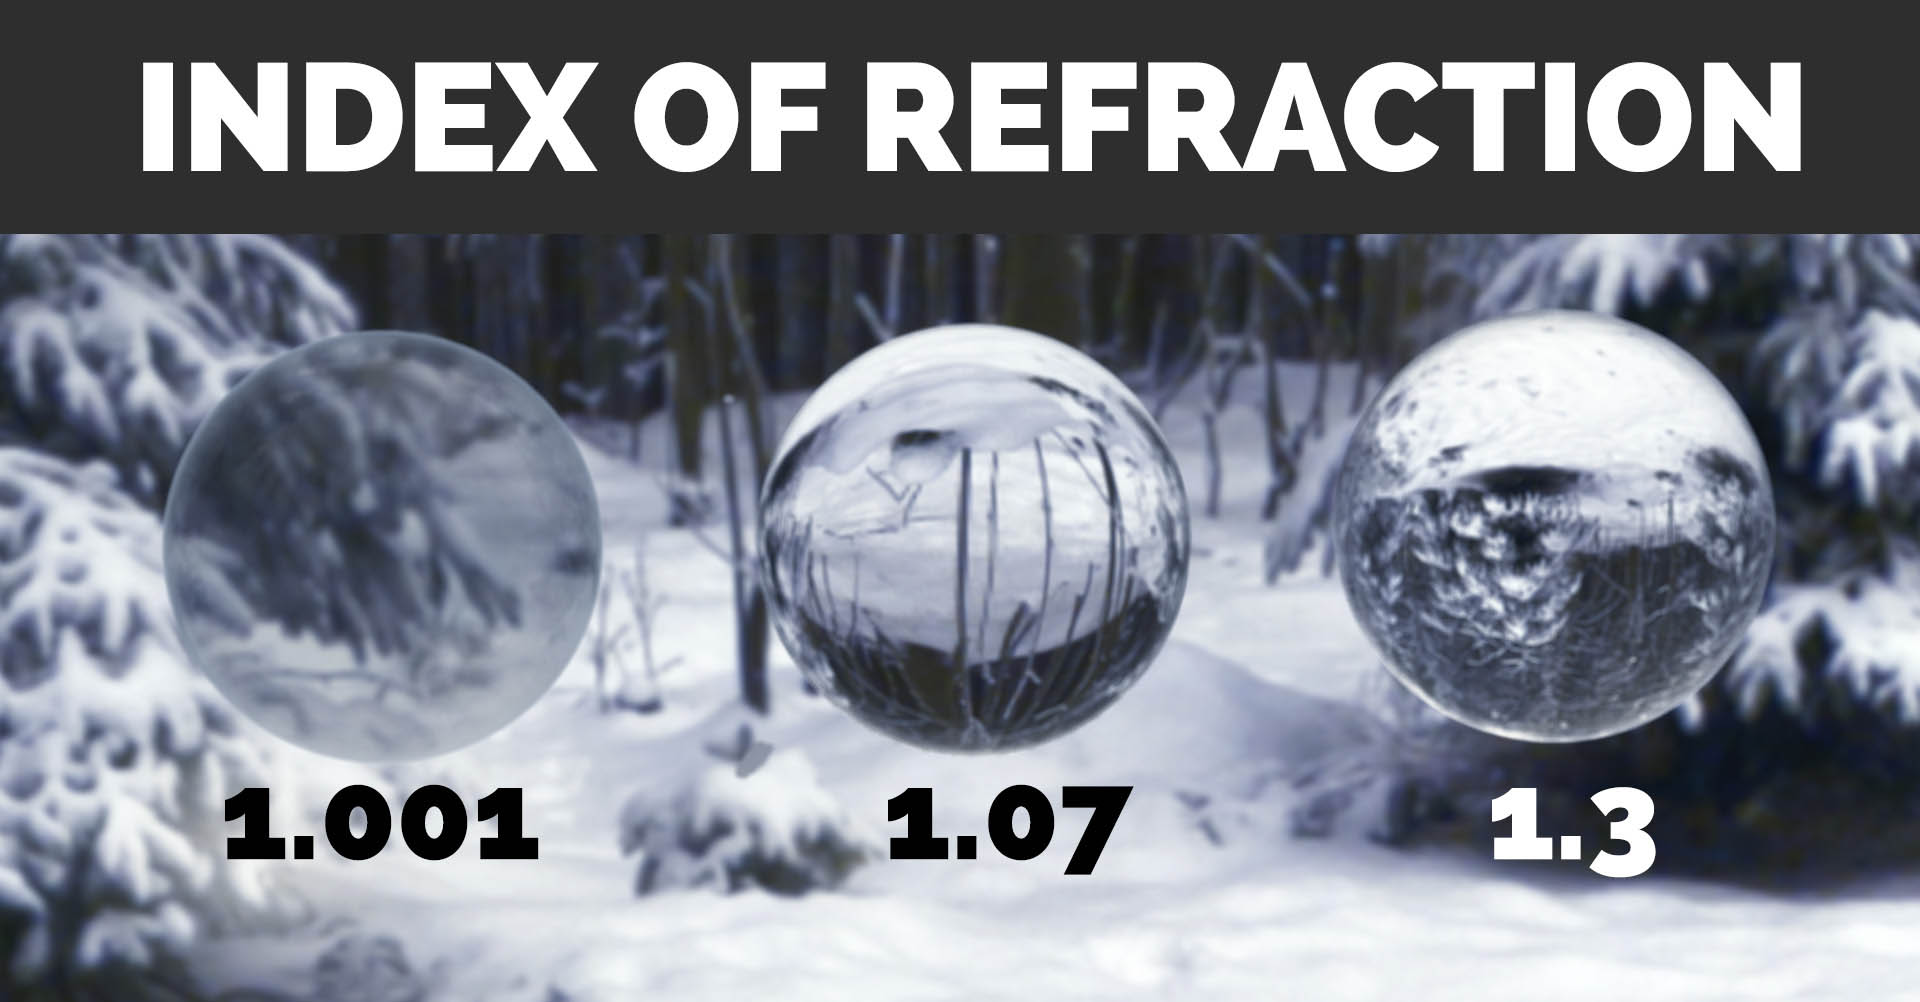
Index of Refraction
The refraction of different materials have been given a number value called the index of refraction. The higher the number, the more distorted everything will appear, when seen through the refractive object.
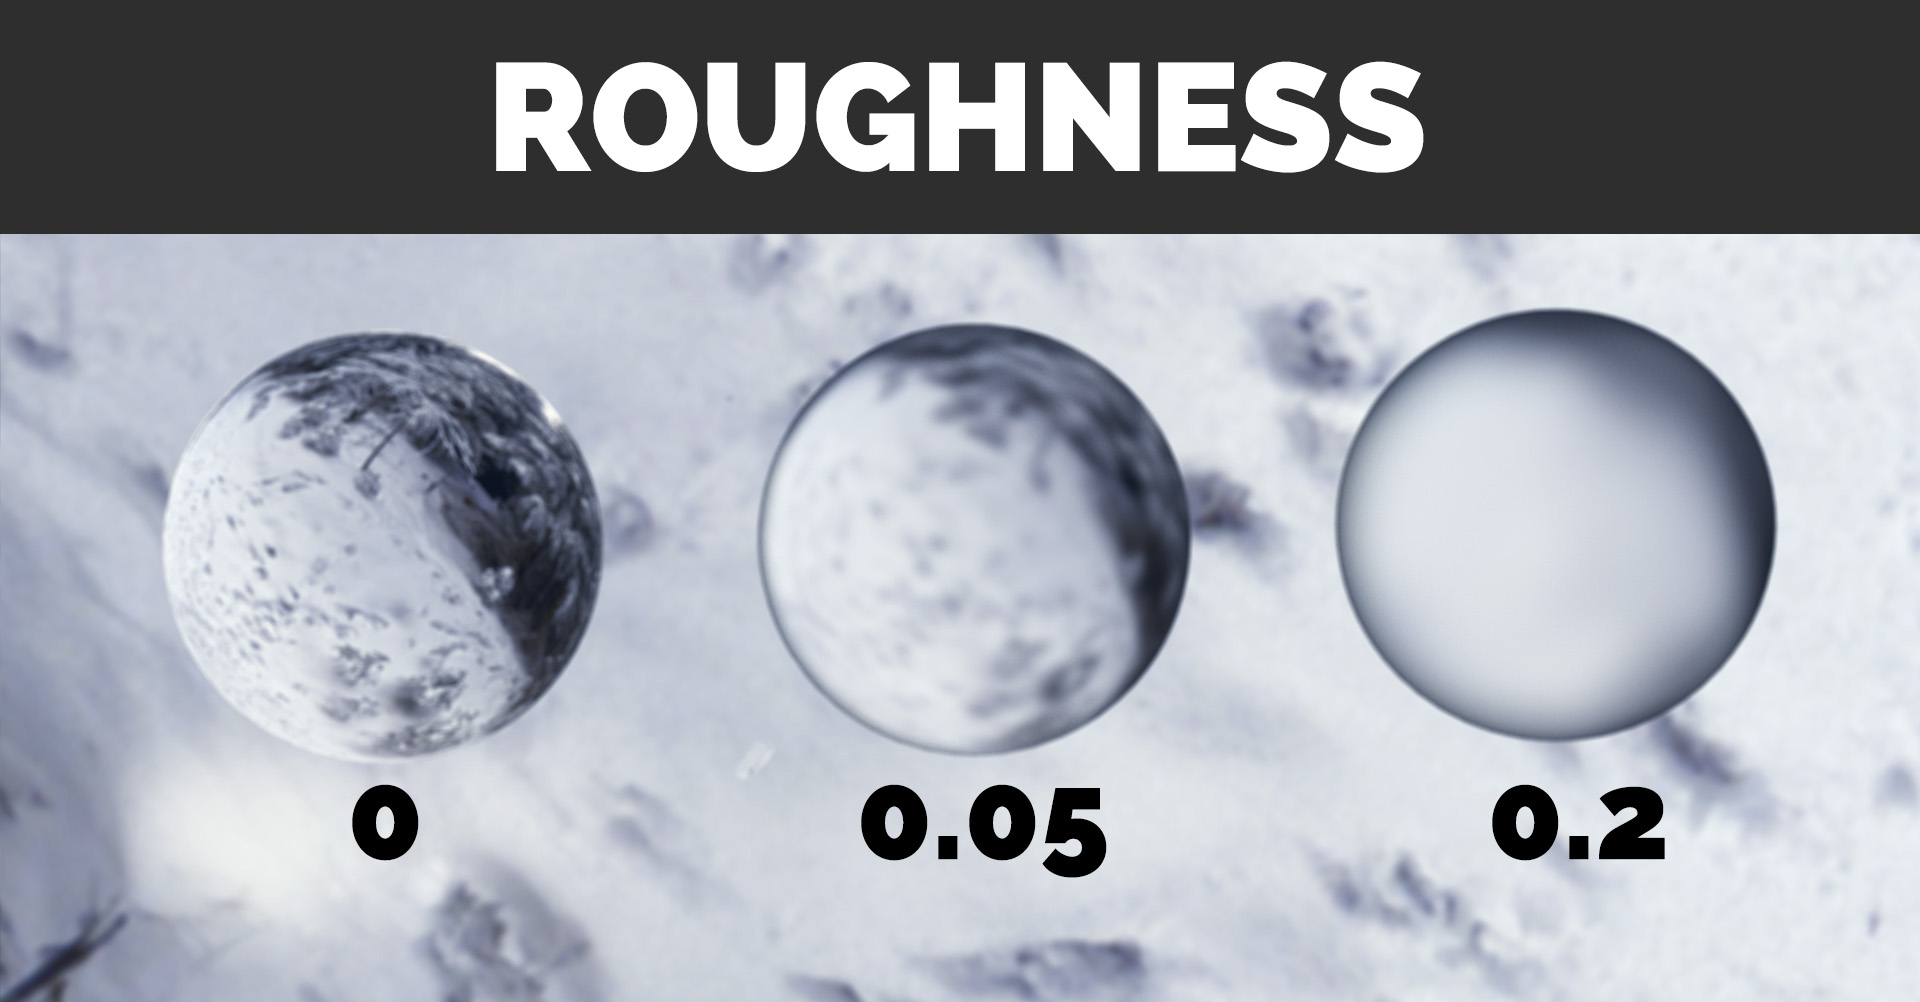
Roughness
Still water in an aquarium is perfectly clear and we have no problem deciphering fish.
On the contrary, frosted glass has very dispersed refraction. The door in my bathroom is made of frosted glass and I don’t care if somebody will try to decipher me when I take shower. Too dispersed.
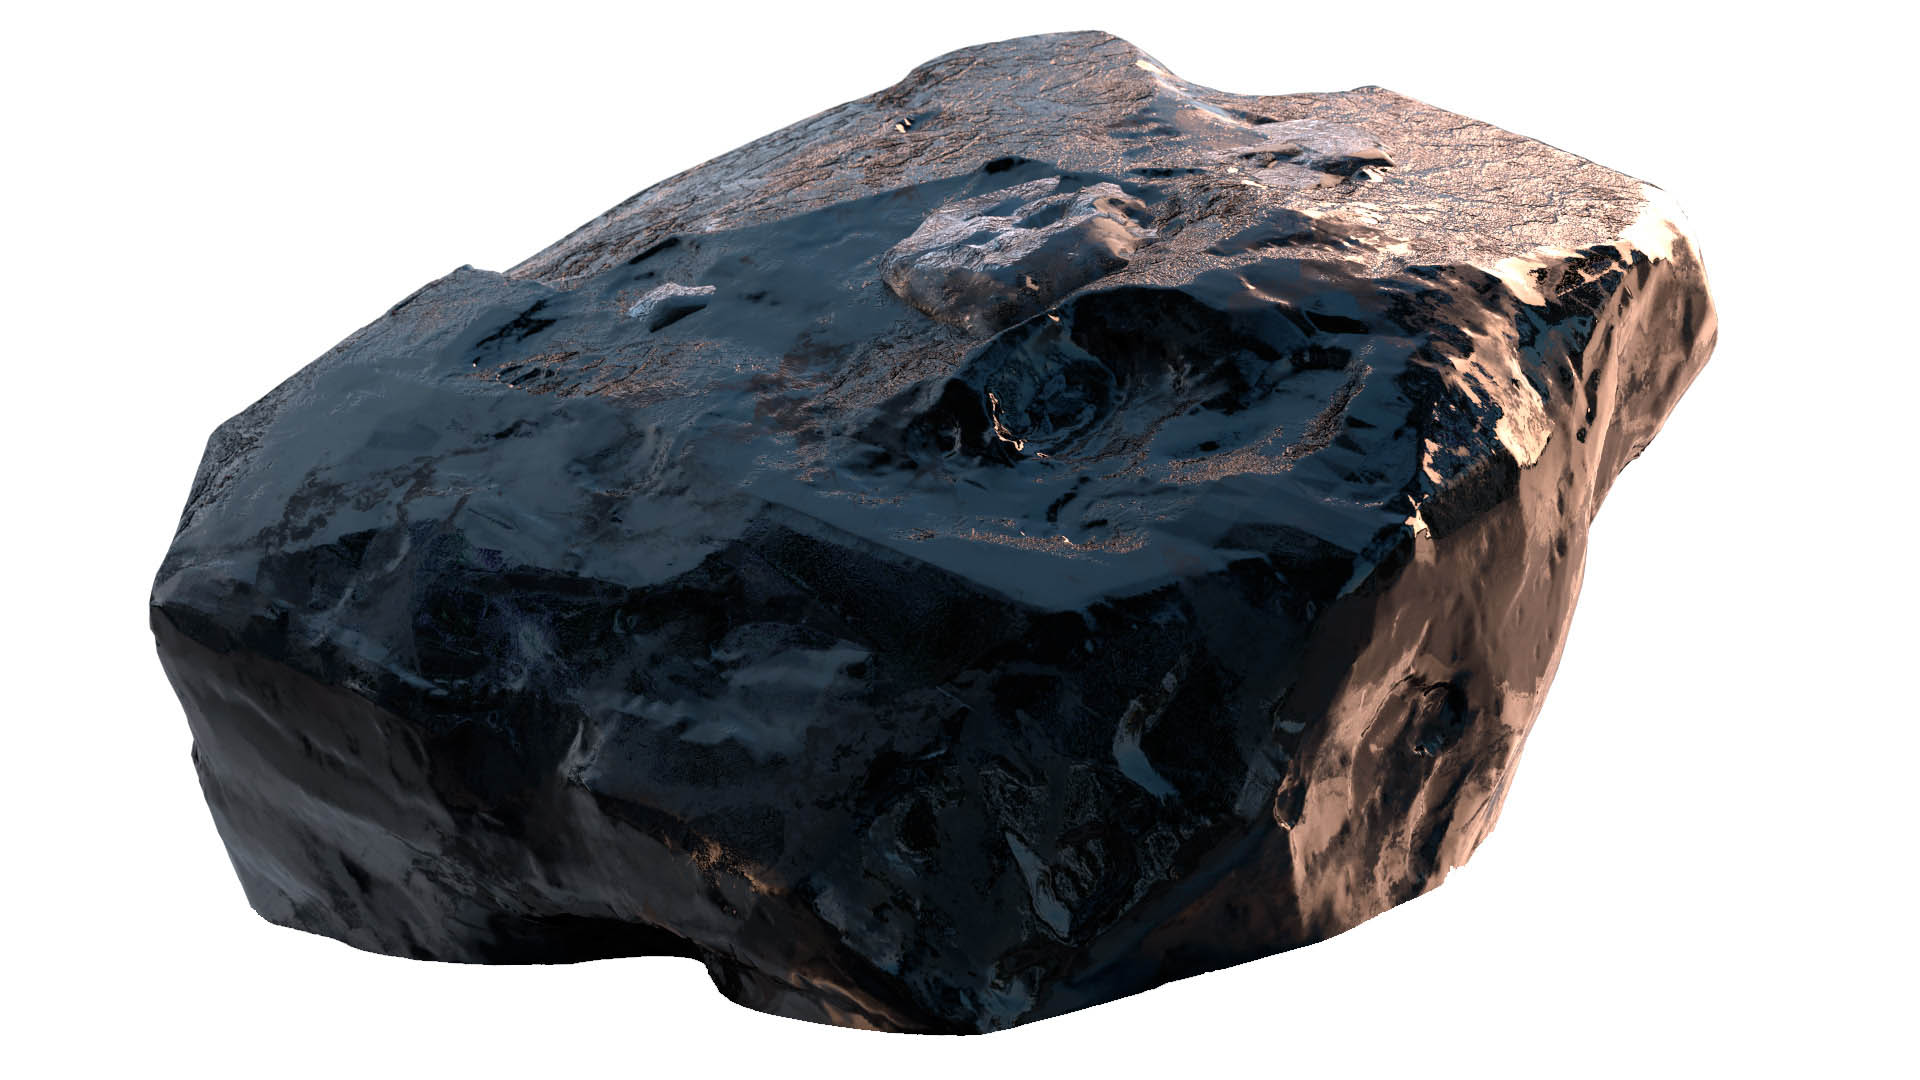
Direct Reflection
When the surface is perfectly reflective (imagine a mirror) light rays bounce of it in a very predictable manner. The angle of incidence equals the angle of reflectance, and that’s it. Light hits, and light is reflected straight.
But objects are rarely so ideal. Small imperfections cause light to be diffused.
Moreover, in case of our ice part of the light gets through it and the other part is reflected. Why does it behave like this? Why is something transmitted, and something is reflected?
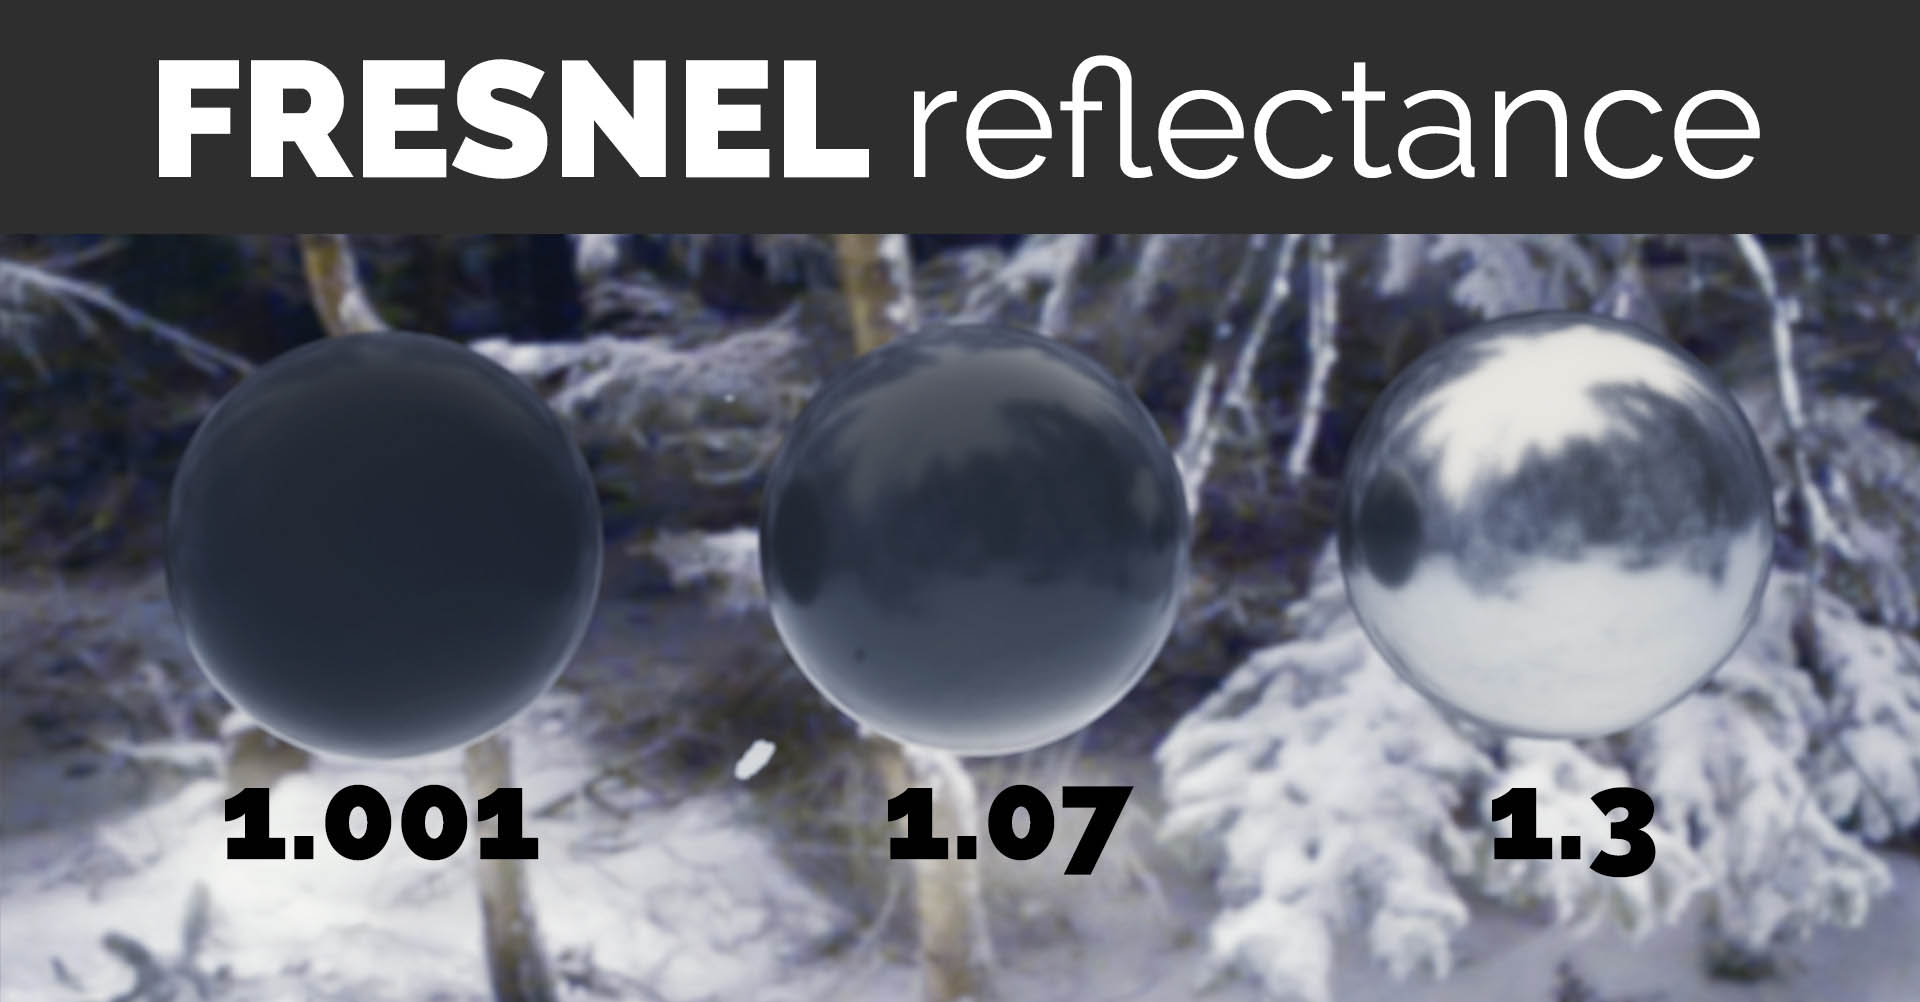
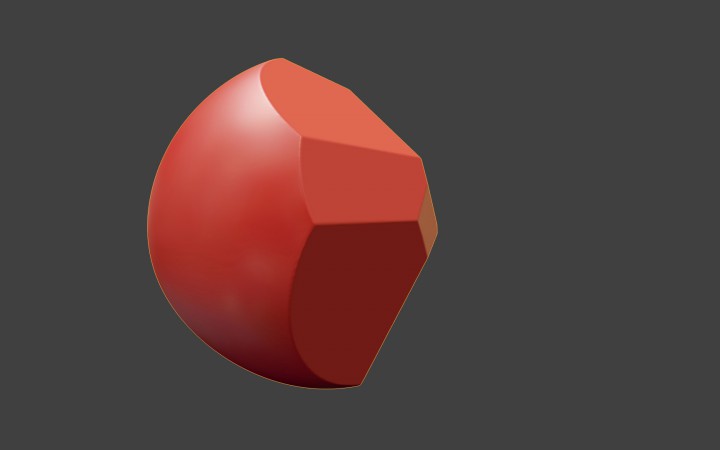
Fresnel Reflectance
To simplify that stuff, I’ll just say that many objects are more reflective the more their surfaces are angled away from the view. On the contrary, metals are not, so they are equally reflective at all angles. In another words, it depends on Fresnel coefficient.
Here you can see how Fresnel reflection at value 1.07 is seen only near the edges of the sphere. And at value 1.3 it starts to fill the whole object.
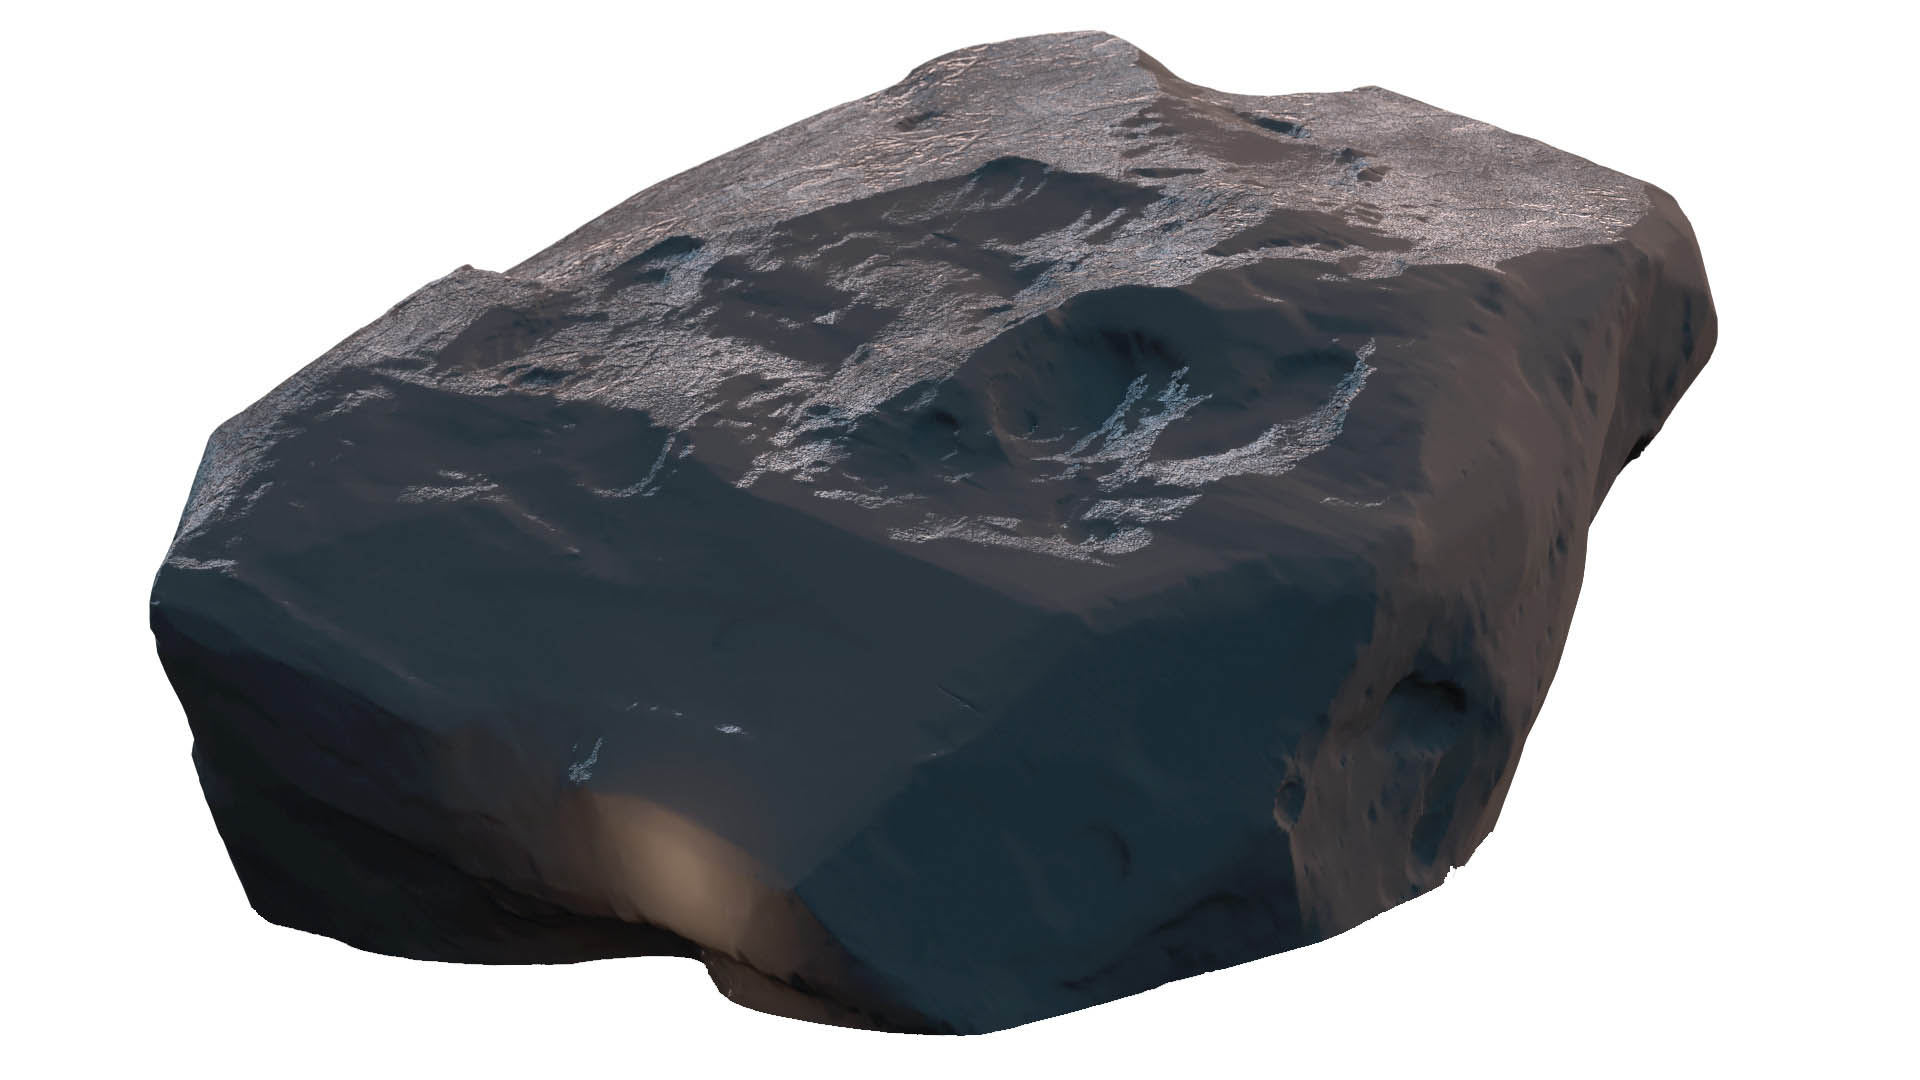
Diffuse Reflection
When light rays hit a matte surface, they get diffused in all directions. In computer graphics, we often don’t perceive it as a reflection at all. Just as a color of the surface. But nevertheless, it IS the reflection, from the standpoint of physics.
In the case of our piece of ice, diffuse reflection is almost non-existent. The world isn’t made of plaster, remember?
Lots of ray tracing, lots of light bending, and almost zero color.
That’s the ice.
Absorption and Scattering
Part of the light is being absorbed, while traveling through the matter. Imagine the piece of ice with suspended sand, sea weeds and plankton. Sure, it will absorb a lot of light and will appear muddy.
Also, some light rays get scattered inside the object to illuminate it from the inside.
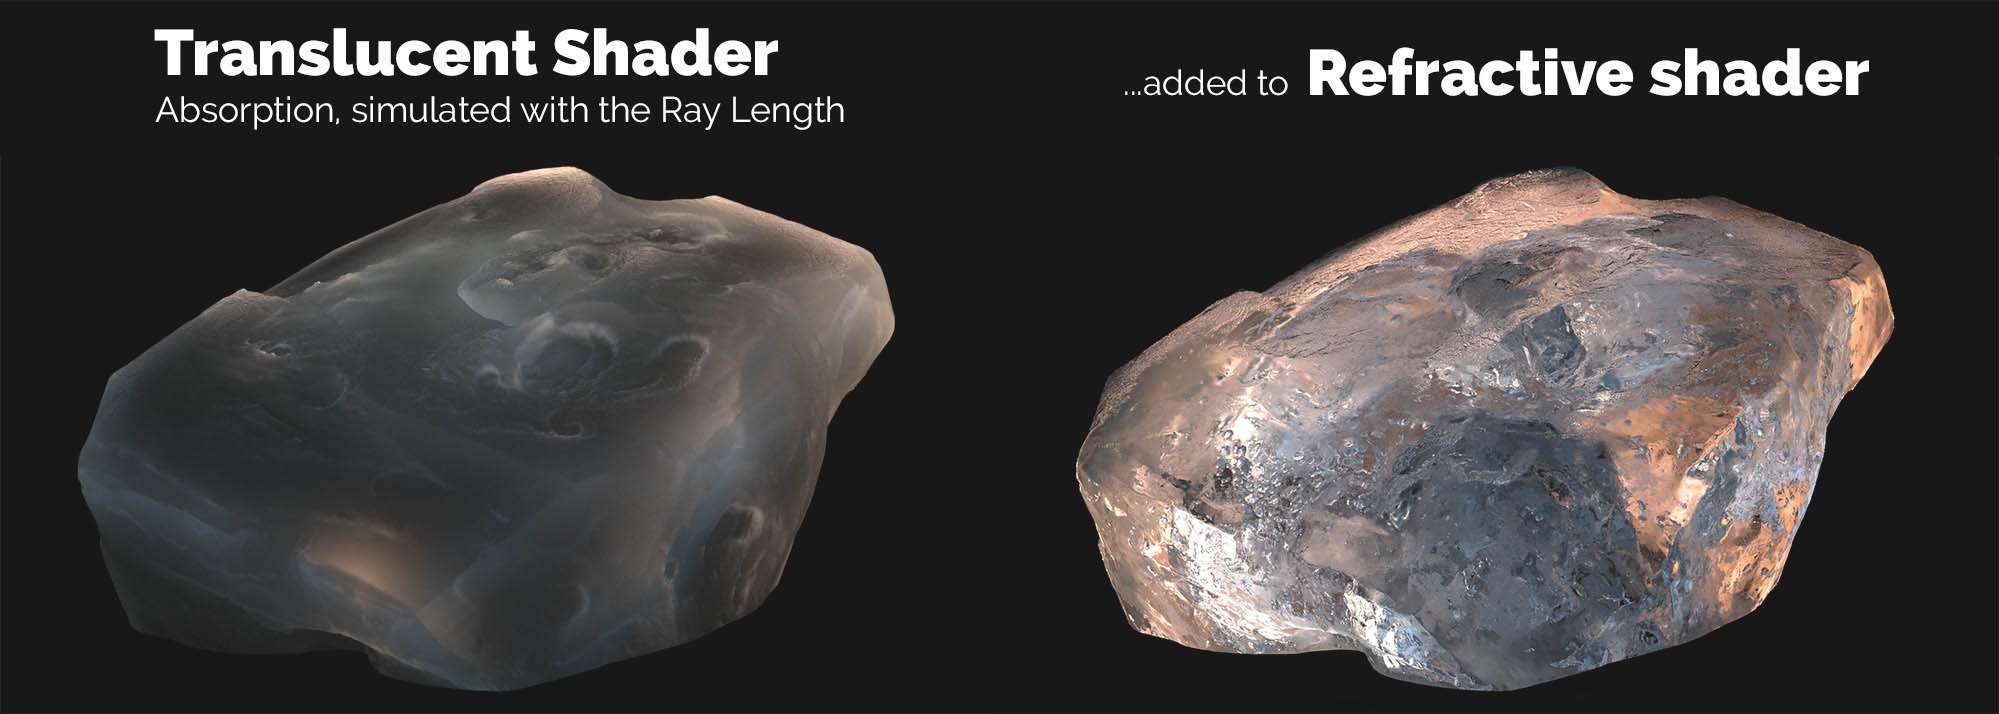
We may either fake absorption & scattering effects using Ray Length node in Blender, or try to be cool and use “real” volumetric material on top of the standard one. Your call.
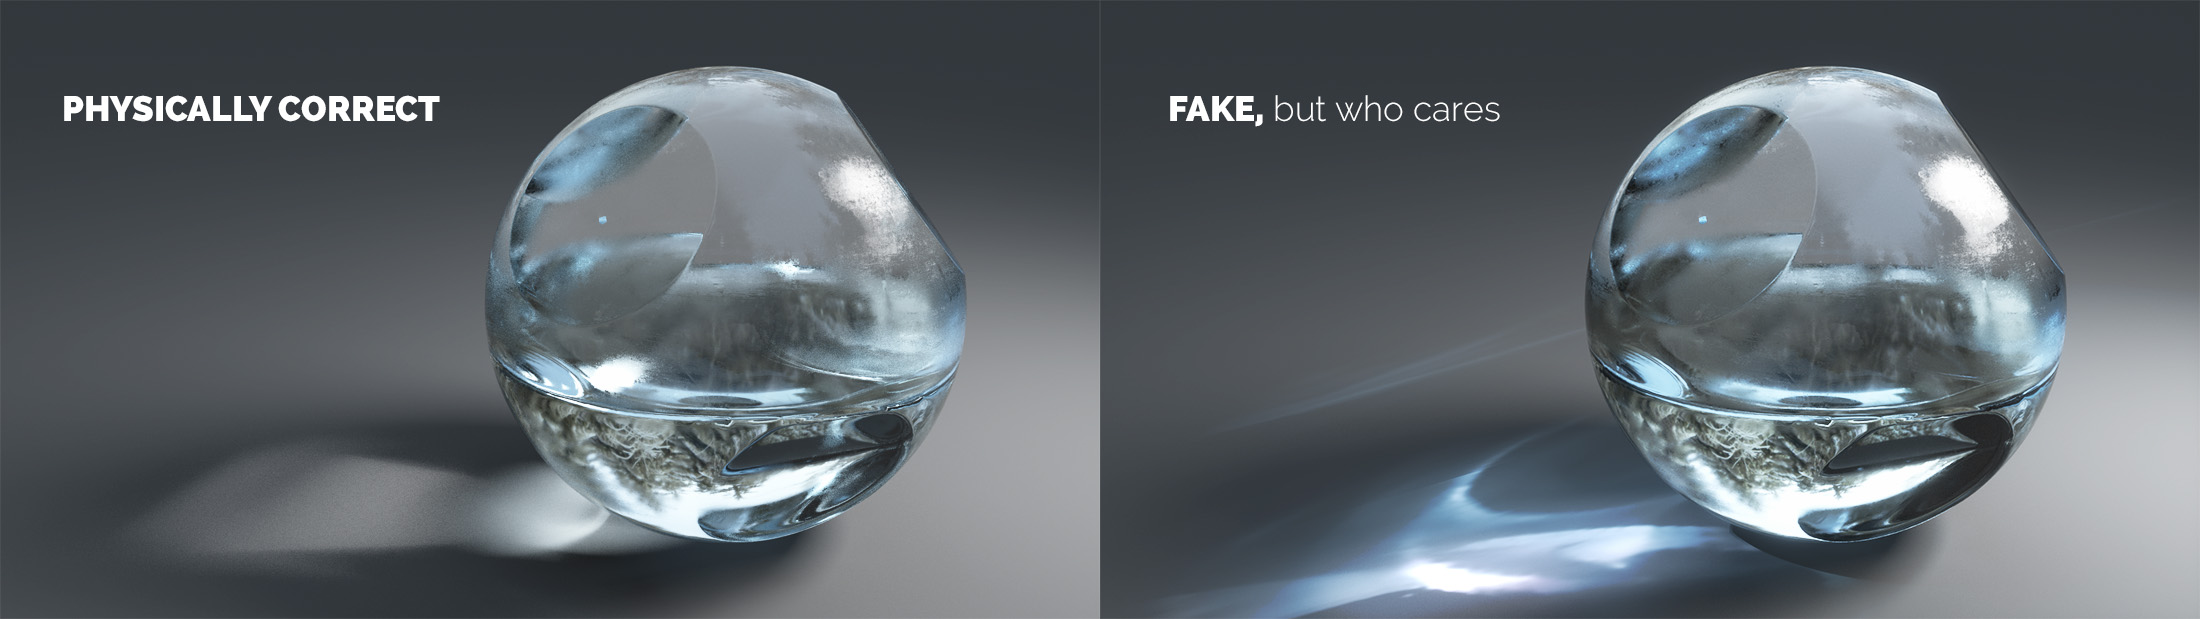
But personally, I find it interesting that trying to stay true to physics rarely pays off.
If it looks like a duck, swims like a duck, and quacks like a duck, then maybe it’s a duck?
Doesn’t matter, how you create the illusion of rays scattering in the ice depths. What matters is whether it looks believable.
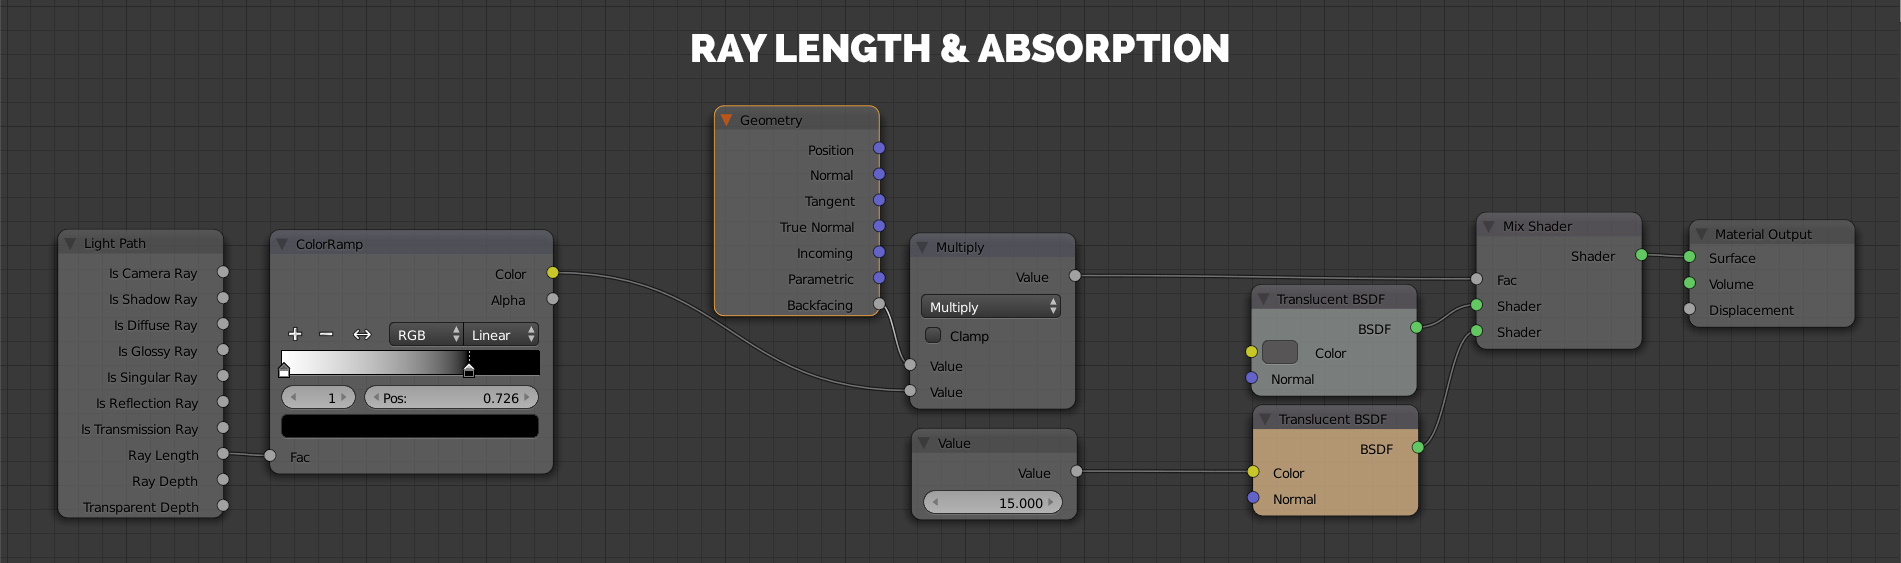
Technically, scattering is a part of refraction. But in CG this effect of the glowing ears is best described in terms of Subsurface Scattering. Or just use Translucent shader with Ray Length node plugged in.
Actually, the glowing ice looks a ton more convincing. After all, ice is supposed to have some depth, isn’t it?
3. Variable Roughness Reveals Character
The ideal is boring. As I’ve said earlier, when light passes through an object without any effort, it doesn’t leave a trace. Only when light is partly absorbed, refracted or reflected, we start to notice the disturbance.
Reflection is the case, too.
We need variation.
Variation in roughness can greatly enhance the character of a refractive object. Compare 2 pictures: the perfectly smooth ice and the ice with variable roughness.

Learn more about roughness and how it can change the way we think about materials.
4. Caustics: How to Cheat While Simulating Physical Phenomena
When light passes through glass, we can see awesome caustics, that illuminate objects behind it. While it’s no problem to generate caustics using a sphere and 1 light source, it’s much more complicated in real world scene. Huh, now I can’t even get it right on 1 sphere.
You rarely get cool caustics. Fake it.
Light may not travel the direction you want it to travel.
So prepare yourself to do some cheating. Personally, I think it’s okay to fake effects, even trespassing boundaries of physically correct stuff.
In computer graphics, what an object is and what an object looks like are the same thing. So, just throw in some additional lamps with light textures to get the impression of caustics going on and we are good to go.
Bonus Tips for Creating Realistic Ice:
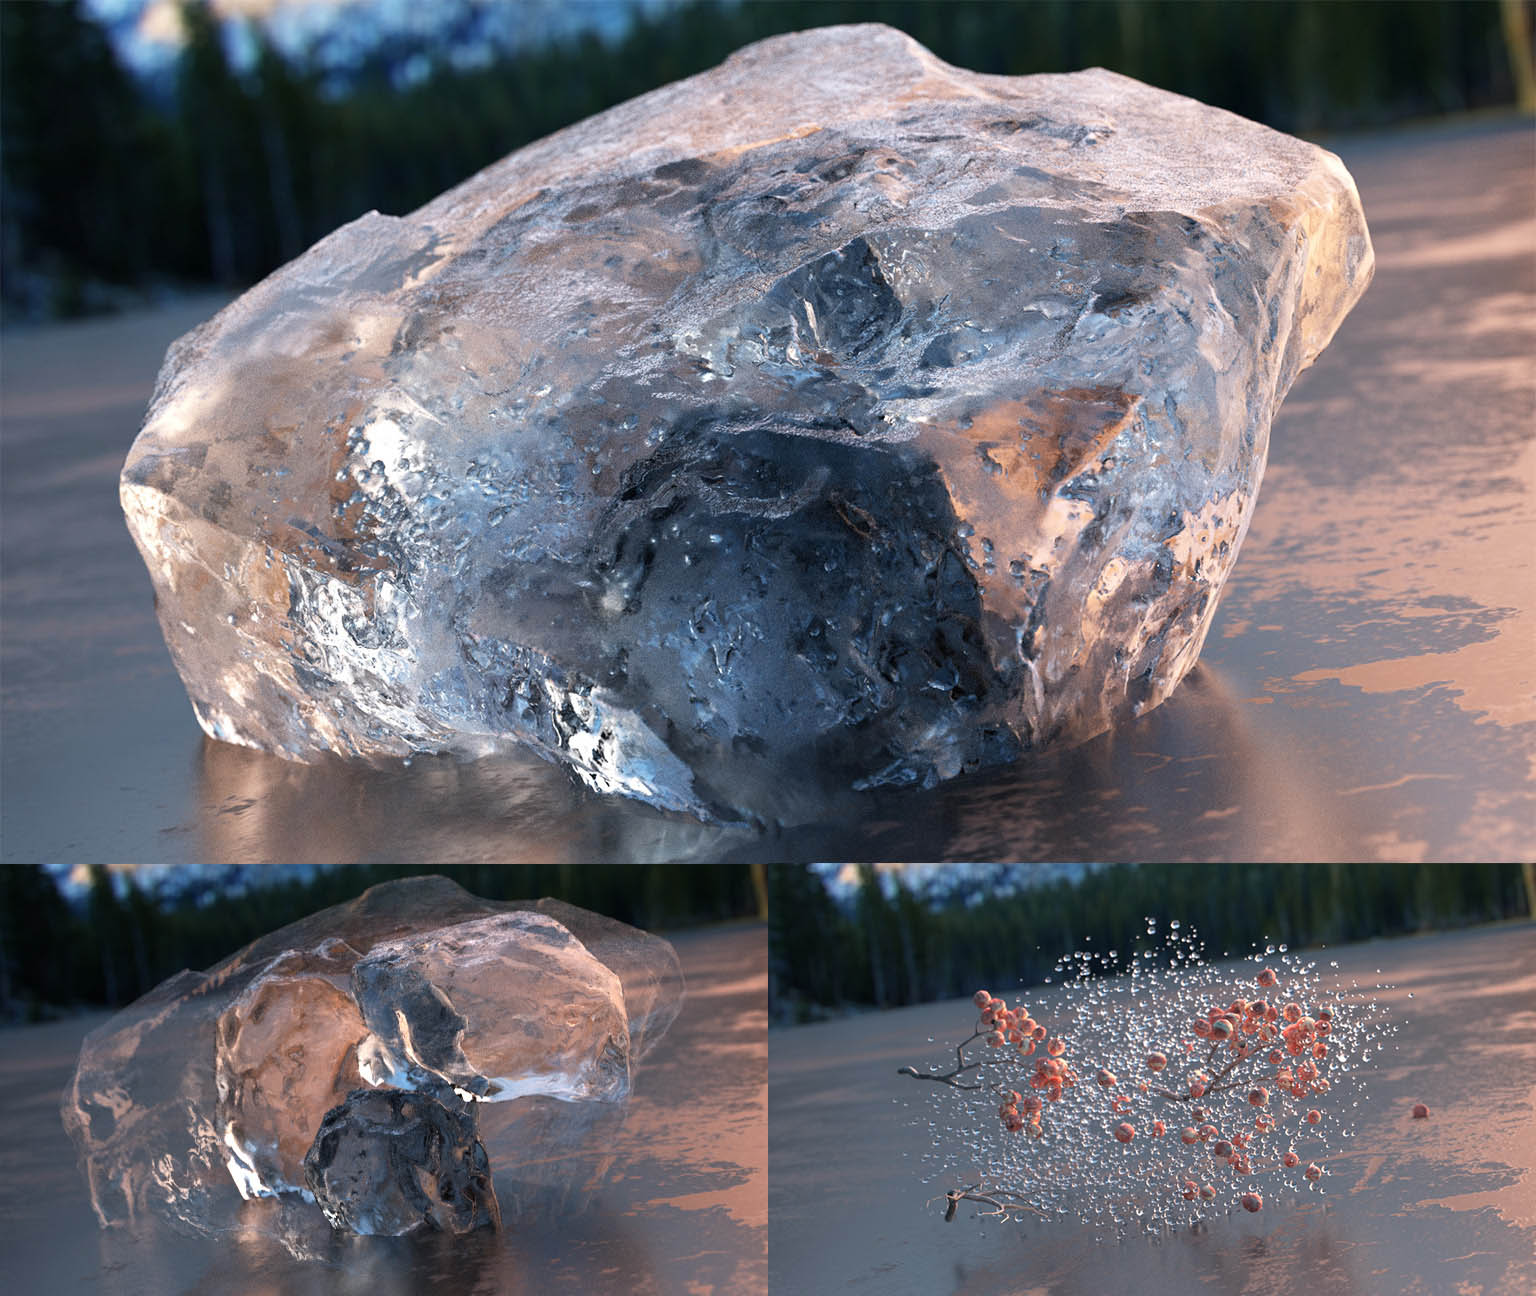
Simulate volume by placing something inside the ice
To create a convincing illusion of depth inside the ice, place something right inside your cube of frozen water. For example, insert another piece of ice.
And add bubbles to spice it up.
Why bother with it? You know, recursive refractions are so awesome.
Shape the ice using Bisect, or sculpt it using the Scrape brush?
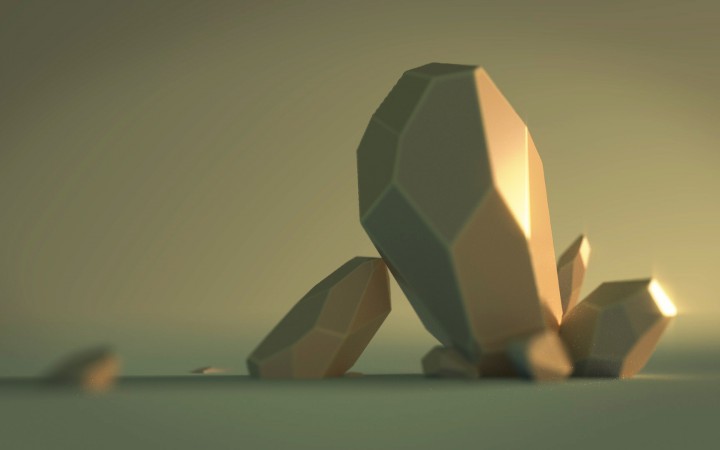
If you feel like sculpting, or have been using Zbrush for some time, then you might feel comfortable while trying the Scrape/Peaks brush in Blender. In my opinion, it is the most intuitive way of getting the stone-like shape.
As an alternative, you may use the Bisect tool to cut parts of the geometry. Once again, this tool works just like Clip brushes from Zbrush.
Let’s keep it open and make this book together

I want to keep this Lighting Project open in terms of communication. I need to hear your voice, so please leave a comment and tell me, what do you like/dislike about the article, and what do you want to see in THE NEXT one.

Ayoub M
Great work Gelb!
I like the way you combine art and physics, very informative.
I only think that it would be even better to provide the blend files, for others to study and compare,
Also if possible it would be great if you could share at least one of the original HDR images as its one of the key elements to achieve similar results.
keep it up!
-Ayoub
Gleb Alexandrov
Ayoub, that’s a good idea – and something that I want to include too. I’ll update the article with a link to .blend file later on.
Also, added a link to a free HDRi resource – sIBL Archive. http://www.hdrlabs.com/sibl/archive.html
I used the Ice Lake image.
Mason Menzies
dang, no video. looks like i got a lot of reading ahead of me. looks amazing though can’t wait.
Gleb Alexandrov
Luckily, we have video… almost ready to go! 🙂 I’ll post it over the next few days.
Mason Menzies
AWESOME! can’t wait 😀
Deanna Johnston
I would like to know why your images are so clean? Mine have lots of noise and fireflies.
Jeffrey Wilson
have you watched the video on blender guru.com about removing noise? there a few setting tips that really help. A lot when using glass or high gloss items. I had the same issues but over they years there are a few tricks that are not easy to find out on your own. Any trouble feel free to email me jeffreywvg@gmail.com and I can walk you threw them 🙂
Deanna Johnston
Yes I actually do remember watching that but at the time I wasn’t using cycles. The whole node thing was way over me. I guess most of it didn’t sink in. Now that I’m starting to use cycles and nodes I can see I really need to learn those methods. After I posted the question I did remember something about increasing the samples and tried setting that to 2000. That made a huge difference! Do you know why? What is happening differently with higher samples? I will go back and watch the guru video again. Thanks for the suggestion. I will let you know if my eyes gloss over again. 🙂
Jeffrey Wilson
Yes I do know why and 2000 seems a bit high. Listen I really want to help, honestly. if you get stuck or just need some one to walk you threw even the simple things I am will do that!
Ibrahim Diallo
you should post your image here, I’m interested to see the different results at different sample rate.
500 didn’t cut it for me. I had to clamp direct and indirect light for better result (3.00 value)
Jeffrey Wilson
Before this came out I was working on glass effects and the different options to tackle dirt and reflection. As well as 4 “common” node setups with the effect on render time and noise. I should be out mid FEB. Bogged down right now crazy how blender is exploding so far this year.
Nathan L.
Your ice looks amazing! I am definitely going to try to create it. I noticed that the background contributes a lot to what you see in ice. Thanks for the tutorial 🙂
Jeffrey Wilson
I am with mason, Speaking the behafe of all lazy Americans I want the video please lol. Still Great work, .blend files for reverse eng your hard work is a great idea tooo. If you are willing to park with that much of what goes on in your head. Keep at it man! Really don’t stop. If you need a investor to support cups of coffee for increased production then I think we should start that up lol! Going to go play with that node setup now thanks man!
Gleb Alexandrov
Heh 🙂 Thanks, Jeffrey! If I run out of coffee, I’ll email you.
Even if I don’t, I’ll still email you, so be prepared.
Jeffrey Wilson
jeffreywvgd@gmail.com ……… i guess i am prepared lol
Jeffrey Wilson
I feel like watching this video the magic trick was explained and now its not as cool. I mean that as a complement not as a degrading insult as it might sound. Sometimes I have to play it twice as you get talking so fast whilst clicking whilst I am trying to watch what you are doing. Please keep in mind that I cant think as fast as you can talk and add your accent that sounds harsh on an american ear and I say “wait what was that” alot. But good on you keep it up!
Gleb Alexandrov
Hehe, I imagine 🙂 But well, show must go on, even if it loses magic along the way.
Jeffrey Wilson
Whats your preferred feedback method? email, twitter, this comments box?
Niklas Blume
Best text tutorisl ever 😉 Like that there are plenty of images, which shows what kind of diference a value makes!
Java
You should do a Q and A. Where are you from? What do you do aside from blender? What languages do you speak? Favorite food? Favorite animal? I think it would be cool. Just a thought. Renders look really good. I’m meh at material creation.
januz
Great tutorial Gleb! Any chance we can see the light texture(s) you used in the fake caustics example?
wordsand
Thanks Gleb. An Excellent tutorial! The combination of the video and write up really helps. You pack so much into that video I had to watch it several times – but that’s because there is so much in it. It looks like you explain some of the awesome techniques to create high quality artwork – I need a lot of practice to get there but your tutorial is a great guide.
wordsand
ps: I really like how you cross reference related articles. As a Learner when I watch/read a tutorial there are parts that are unknown concepts to me – the related articles approach solves that 🙂
Ibrahim Diallo
From the video, I see that you are setting your sample rate at 9000. I don’t think I have that luxury with CPU rendering.
Here is my attempt. I rendered it first at 500 samples, then I added just the crystal on top at 2000 samples. I think that’s as sharp as I can get. Do you think there is something obviously out of placed that I am not seeing?
Thank you for the amazing tutorial.
Gleb Alexandrov
I think you are moving in the right direction, really. And your image is looking nice. Try clamping indirect samples even more: maybe something like 1 or even 0.3?
Also, enable Multiple Importance Sampling in the background settings. And set its value to 1024 or 2048. Hopefully, that should reduce noise (even without clamping).
As far as I remember, my final render was 1500 samples.
Ibrahim Diallo
I wish I red your comment before rendering. I had set multi imp sample to 2048, left the clamping to 3 and … set the sampling to 9000 😀
It took 3.5 hours to render (not so bad). I also modified to text and moved the hdr a little. Here is the new result.
Thank you for the tips 🙂
Gleb Alexandrov
Yeah, I wish Cycles was a bit faster (or a less noisier). Let’s keep fingers crossed for the speed boost during Gooseberry project development.
Joshua Flores
Wow my friend, I really like the ice that you have there. I like seeing the amount of grime and dirt that you put into it. Quite realistic.
Ibrahim Diallo
Thanks Joshua. Sculpting plus a good displacement texture does make a big difference. If only I had a better graphic card though 🙂
Joshua Flores
Well my friend, I may direct you to a link that could help you with your displacement slowdown 😀 Credit goes to Kent Trammel
http://cgcookie.com/blender/2014/07/10/shader-forge-material-speed-boost/
Ibrahim Diallo
Wow, thanks for the link.
Joshua Flores
Anytime Ibrahim, hope it helps. Feel free to message me if you have any more questions, and I’ll do my best!
Guest
Thanks for the great and helpfull
tutorial Here is my reasult
Raphael Beguin
Great tut, very instructive, thanks Gleb !
Here is my result:
blender 2.73
200 samples PT CPU clamp to 3 filter glossy to 0.5
on Intel(R) Core(TM) i7-2600 CPU @ 3.40GHz
For compositing i used the PassCombineDeNoiser
happy with the result 🙂
keep it up!
Gleb Alexandrov
Raphael, thanks for sharing you render. Looks nice and cold 🙂 Denoising with b0wide node pack is a good move, too. Kills details partly, but removes noise very well.
JABOUT
How do I see just the particle system? Without the object itself?
Gleb Alexandrov
Try disabling ”Emitter” checkbox in the particle system.
Pingback: Blender Blog - Lighting by Gleb - KOPILOT - Blender 3D video tutorials and news
Pingback: How To Create Realistic Ice in Blender_ Lighting Project #2
Jeremy
a bit of post and it was my first time sculpting. I had a lot of fun playing with light and variable roughness. I Really enjoyed this Gleb,
-your newest fan,
Jeremy
Jony Mira
geez! you are the best dude! thank u so much! and please, let me know when u finish that book. wanna make it part of my collection.
Voleuro
Thanks for another great tutorial, Gleb!
As always very useful and well explained. Keep going!
While watching your tutorial I had an Idea for an image using your ice shader. I had to tweak it a bit to work in my scene, but I’m very happy with how it looks!
I’d love to hear, what you think about it. 🙂
Again, huge thanks for your tutorial!
Kai
Gleb Alexandrov
I like how it looks, simply speaking 🙂
Pepe
The light shows everything, light alights, light passes through, the light travels, it adapts to the elements. understand that and explain it in Blender is the master. Thanks Gleb.
prabha4blend
Here its mine…
3000 sample
Gleb Alexandrov
You got it! Fresh, light and clear – I like it. Almost can touch it.
Pingback: How To Create Realistic Ice in Blender
Blaine Fisch
here is my attemt on an piece of ice
Eka Kurniawan
how to get such amazing caustics below the glass ball?
Troy Newell
Thanks Gleb, nice tutorial!, this is my work in progress…..
Input
Thx a lot. Extremely helpfull tutorial. Got a little bit frozen last weeks %)
Here’s the result:
https://uploads.disquscdn.com/images/0bb2f32eddac0f86583ef38e58769981398e7d9dc4ea7c6af08f1b5c37eb14e0.jpg
You can find full resolution render here: http://bd-input.deviantart.com/art/Frozen-550062218
Alexander Pukhalsky
Hey Gleb! The tutorial is impressive, as always. I personally have a problem: at around 1:50, when you’re making a simple ice shader, mine ice block doesn’t even remotely looks like yours, tho I’ve followed every step of yours. Also, what’s omnilight?
Michal Kotek
Hello Gleb. Nice tutorial. I am not blender user, but there is my ice test in motion 🙂 I used same hdri map and simple boxes models.
https://www.youtube.com/watch?v=jnVgct7L-c0&index=1&list=PLwtrXudEqkbg6VQmeI-QMBQ_qXnlsm6_6
sSouls
Hello there ppl ! I’m trying to reach a good result with that ice block and still can’t feel it realy “icy” you know what i mean… My first try was this ice shard on that pole, but it looks more like a rock or a mountain from the background instead of an iceblock. The second try i had inspiration from the video and copied most of the Node alex used to re-create the feeling of the ice, ( to be honest i just wanted something different and started to play around with the values of everything to see what happens XD) And thats what iv done so far 🙂 can’t get rid of the little white points around the round made by the noise of the light bouncing… any clue on how to lower this noise ?? already checked the reflective and refractive caustic.
TY for the tutorial Alex =)
Gleb Alexandrov
Nice results! To get rid of the noise, try using the Clamp (set direct and indirect to 1 and see how it affects the image then tweak the values). But honestly, noise is almost unnoticeable in these images. I’d spend some time on adding finer textures to everything.
Thanks for sharing!
sSouls
thank you so much man, im such a noob on blender and those tutorials help me understand how nodes works and how more i can improve my work with maybe a new light effect. =) see ya !
sSouls
here i am, back again for showing how this is growing and i think to stop adding things right now i feel satisfied 😀
The snow material is made by following the tutorial from Andrew Price if someone will know.
Seghier Mohamed Abdelaziz
thank you very much
i like alot your tutorials and render results
Ivan
Man, I thank you so much!
I don’t use cycles, but I learned so much about how you constructed the shader, that I was able to make my own in V-ray for blender, I’m a photographer and wanted to make a conceptual shot involving crystals, I did a bit of a making of on my site (lifeoftheartist.com) referencing your tutorials, Thanks again!
Gleb Alexandrov
Ivan, your ice is so impolitely realistic! Awesome concept and well composed. Absolutely keep it going.
Max Ray
can you upload final project ? please ?
Pedro Ismar
Thanks Gleb! Awasome tutorial (as always). Here is my attempt, 50% done:
Gleb Alexandrov
Pedro, that’s a cool idea, I love it! I’m sure it’ll develop into the amazing work.
EHL
How does Blender interpret a numeric value fed into a Color input? In the Ray Length node tree here, the color for a Translucent node is 15. What does that mean, in plain English?
Shay Roitman
Great tutorial. A bit too fast for me, but all the information was put out great and right to the point. I can’t wait to start my next progect. I got a lot of inspiration from this one i hope i did fine on this one, but man yours looks great. I would like seeing full 2 h tutorials from you Gleb Alexandrov. Again thank you 🙂 .
Josh
Hi Gleb.
Thanks so much for this tutorial, Your site is a wealth of knowledge and experience,
unlike other tutorials yours are far easier to reuse in different scenarios, They focus much more on the process and how to recreate effects rather then following ‘exact’ steps.
anyway, here is a small scene i rendered, i couldnt quite get the coloured glow from the spot light, but it turned out ok i think. would love to hear your feedback
all the best
Иван Кириленко
Hi, Gleb! That is amazing tutorial! Thak u for it)) That what I’ve made. I like the picture but still have problems with particles and rouhgness texture on ice((( https://uploads.disquscdn.com/images/094d550cf04e5f0ef7525ec4cc09ff8add1c04849a6c905346f3be29a35fea19.png
Yuri
Gleb, it’s a long-belated question, but could you please explain the ‘alchemy’ or, rather, the math behind the node-tree you have provided for faking ray scattering?
How exactly ‘color-ramped’ ray length works together with geometry-backfacing (and why the math is ‘multiply’, not something else?
And why it is ‘value = 15.000’ plugged into ‘color’ socket of the lower ‘translucent’ node?
Sorry if all of this is kinda fundamental (and probably lame at my side) to ask.
Pingback: The Forefront – More real than reality | Scribble
Pingback: UE4 RnD – Colored Lights & Caustics | Scribble
Pingback: Glass in Blender | A Dinosaur Contemplating Asteroids
Pingback: Research and Technical- IOR- The basics
Pingback: Small Bathroom Glass Shower Door - Rumah Terkini